Agusan del Sur State University Biological Assets Property Card SystemADSSU BAP Sign in

Farm and office personnel who register animals and keep their records up to date.

1

Getting started

Create your account, wait for approval, then sign in.

9 steps
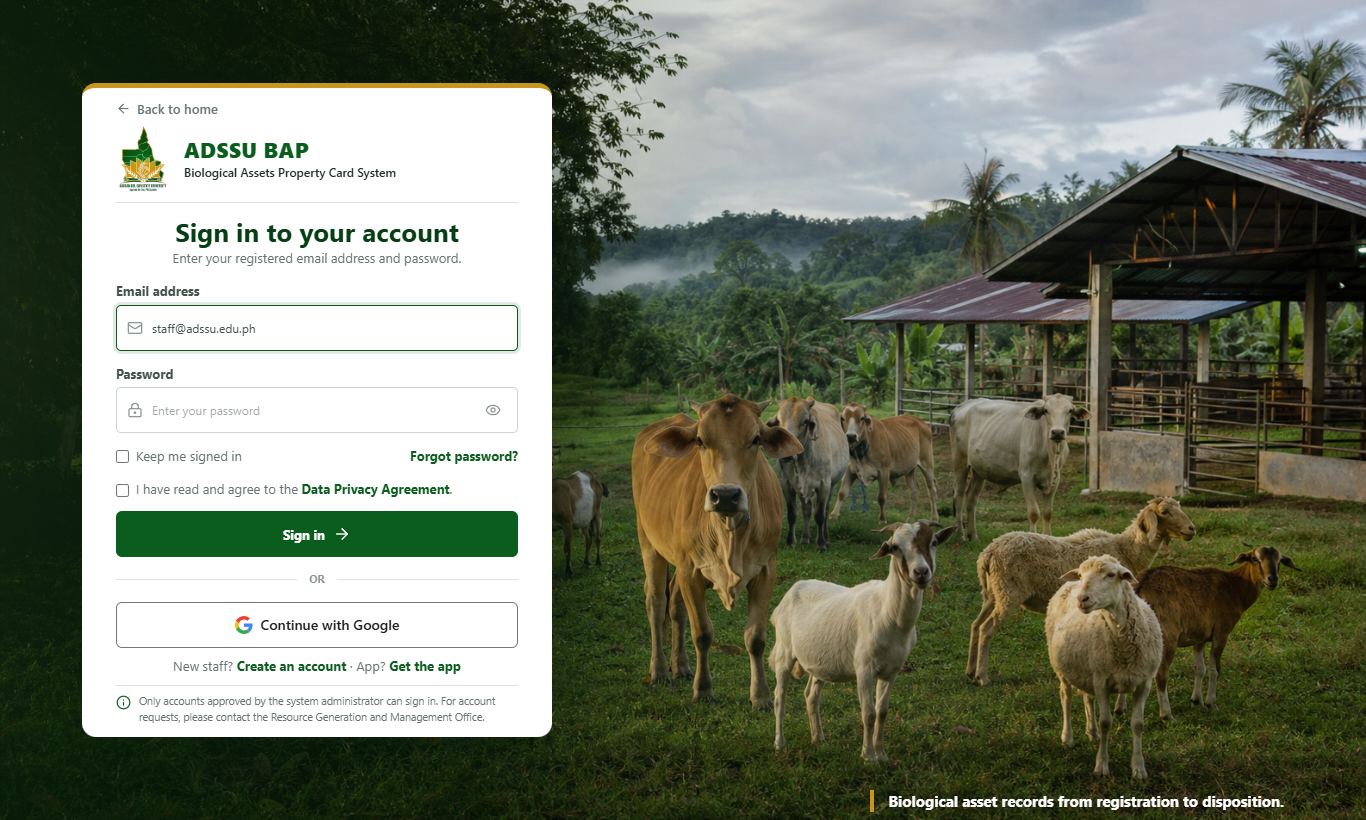
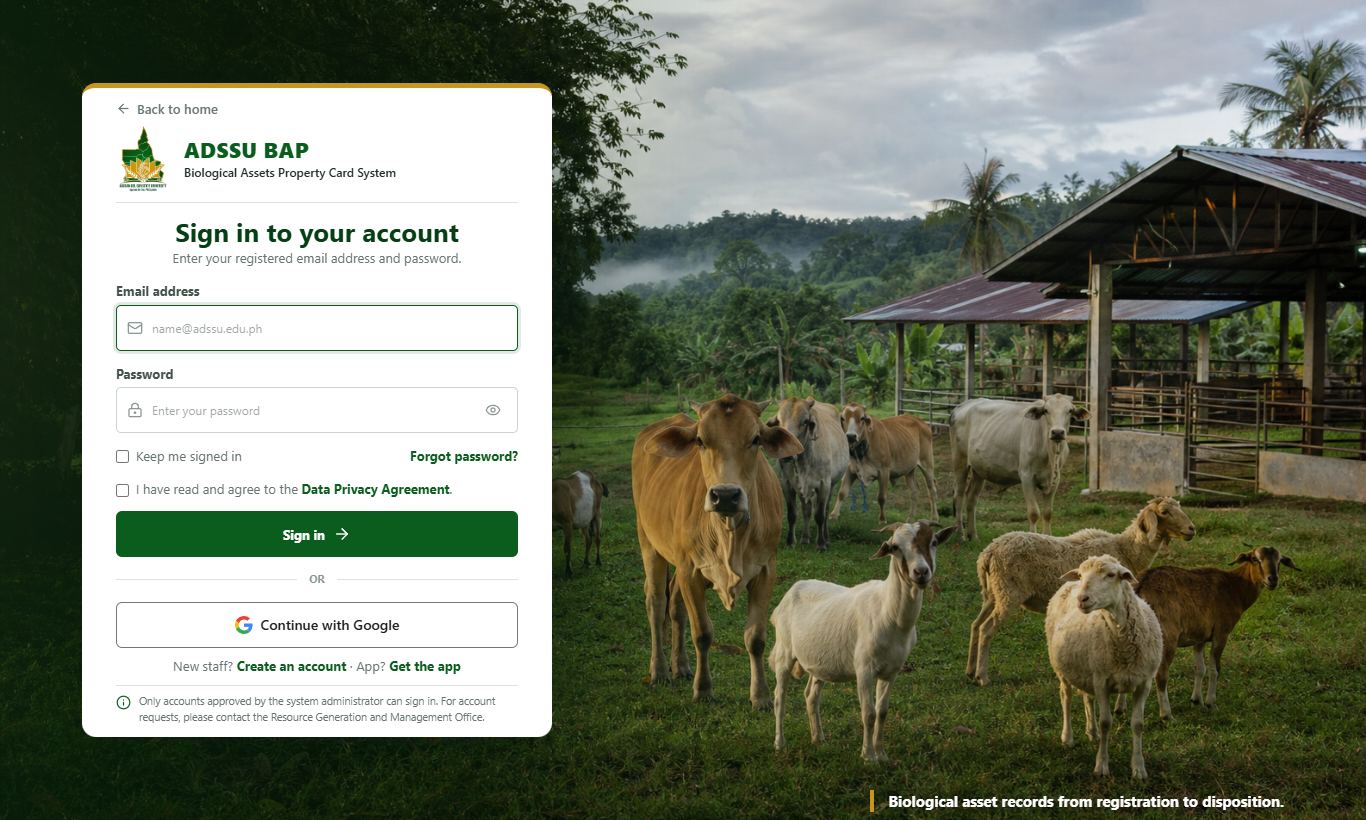
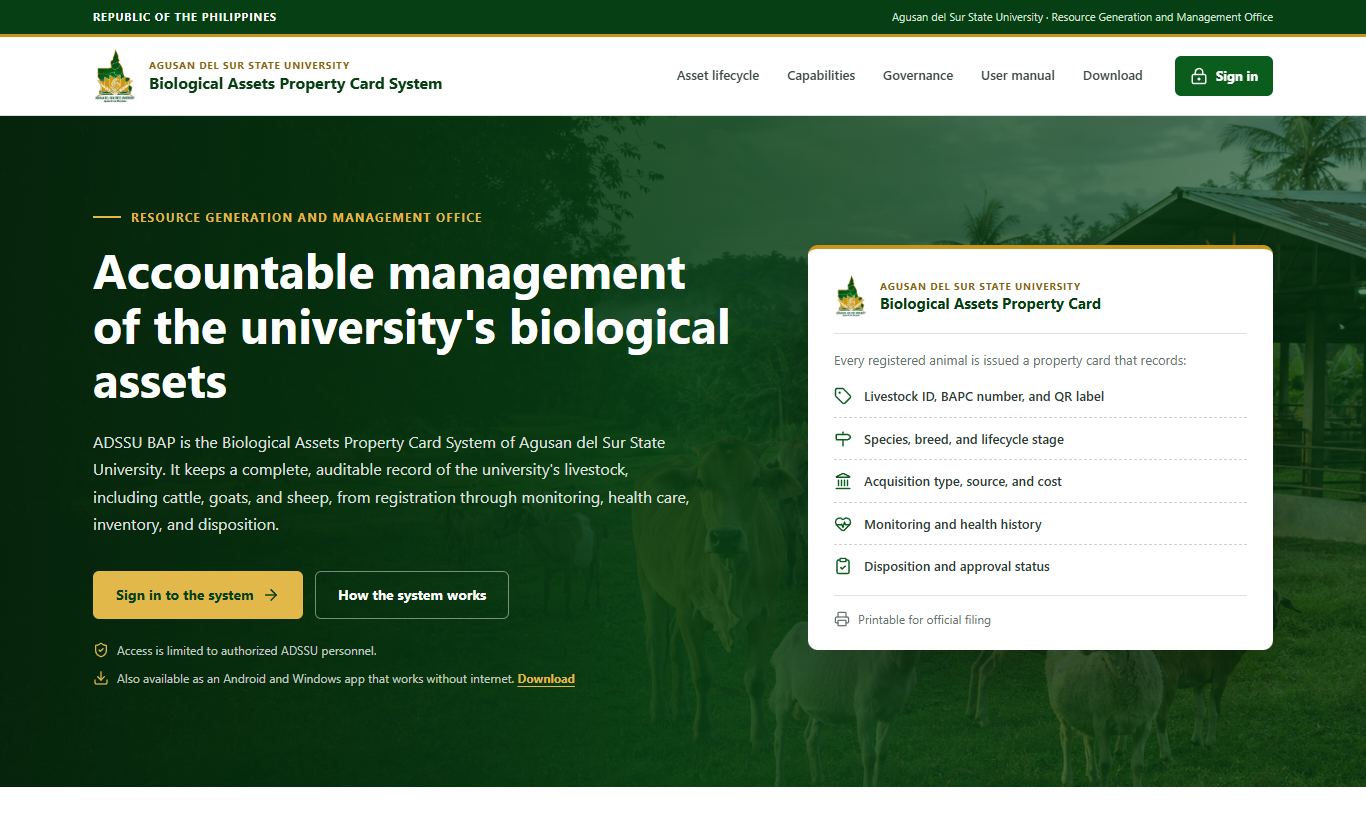
  1. Go to the ADSSU BAP site and press Sign in at the top right. New personnel press Register on the sign-in page instead.

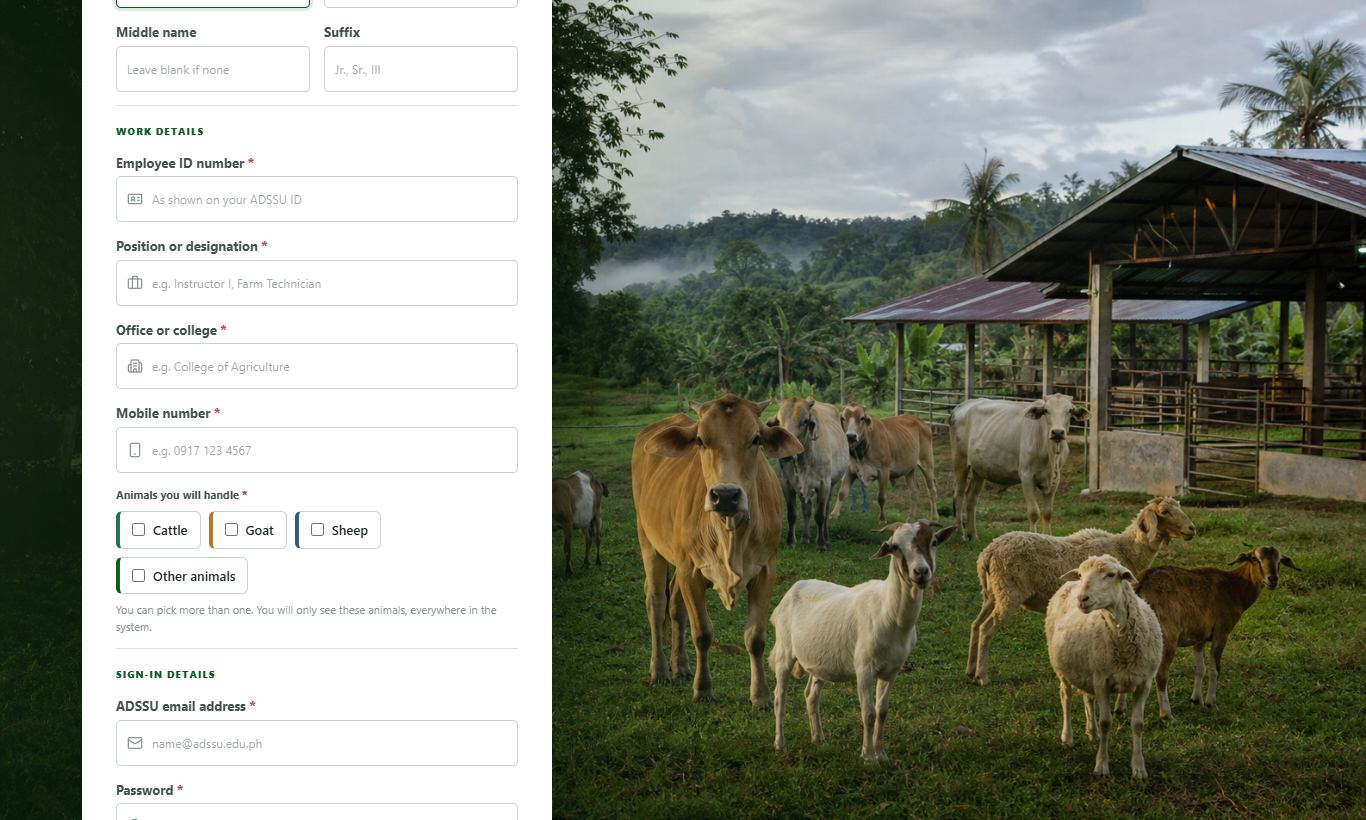
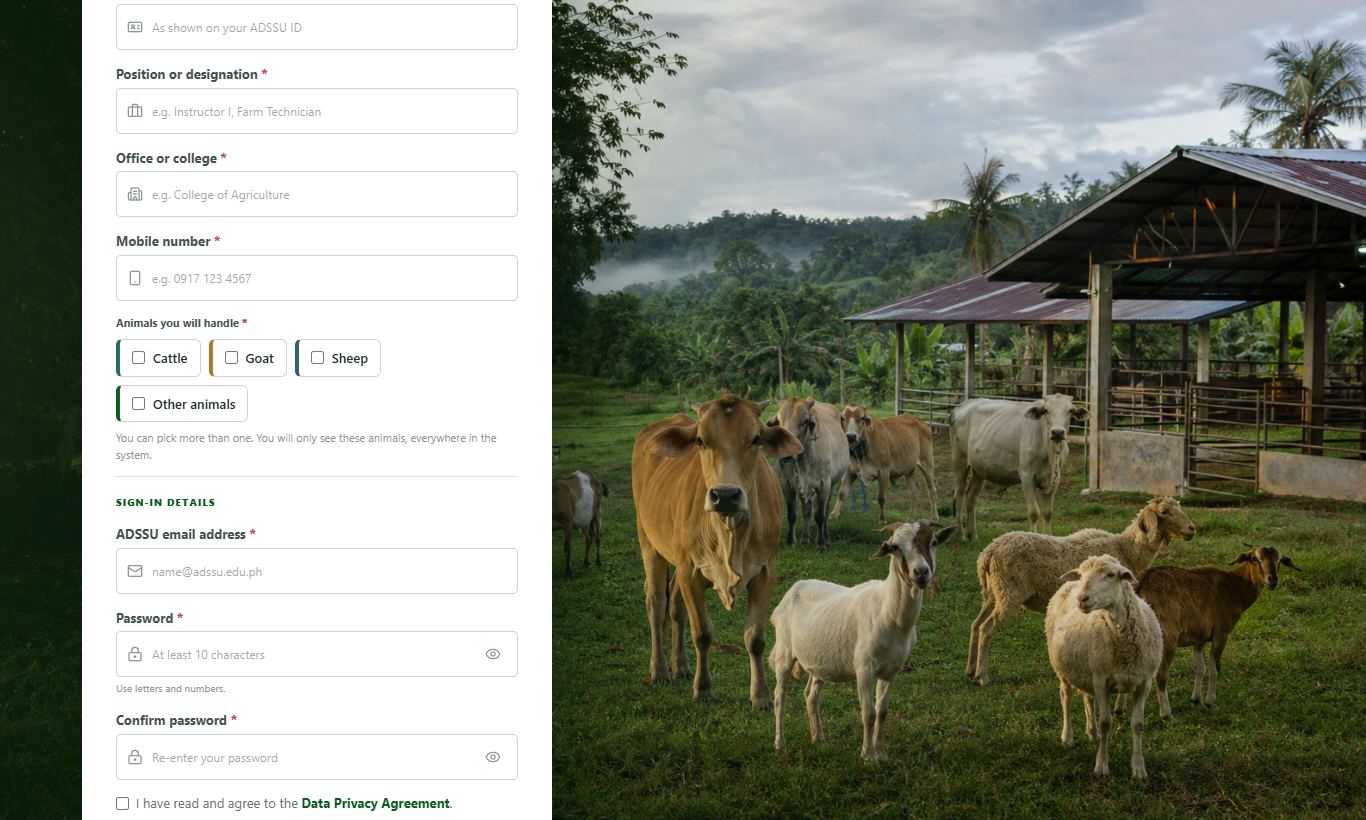
  2. Type your name, employee ID, position, office and your ADSSU email address, then choose a password.

  3. Tick the species you take care of. You will only see those animals once you are approved.

  4. An administrator reviews your registration. You can sign in once they approve it; ask your administrator if it takes long.

  5. Before you sign in, tick the box to agree to the Data Privacy Agreement. Press its name to read how your data is used. You are asked again only when the agreement changes.

  6. The quickest way: press Continue with Google and choose your ADSSU email (the one ending in @adssu.edu.ph). No code is needed.

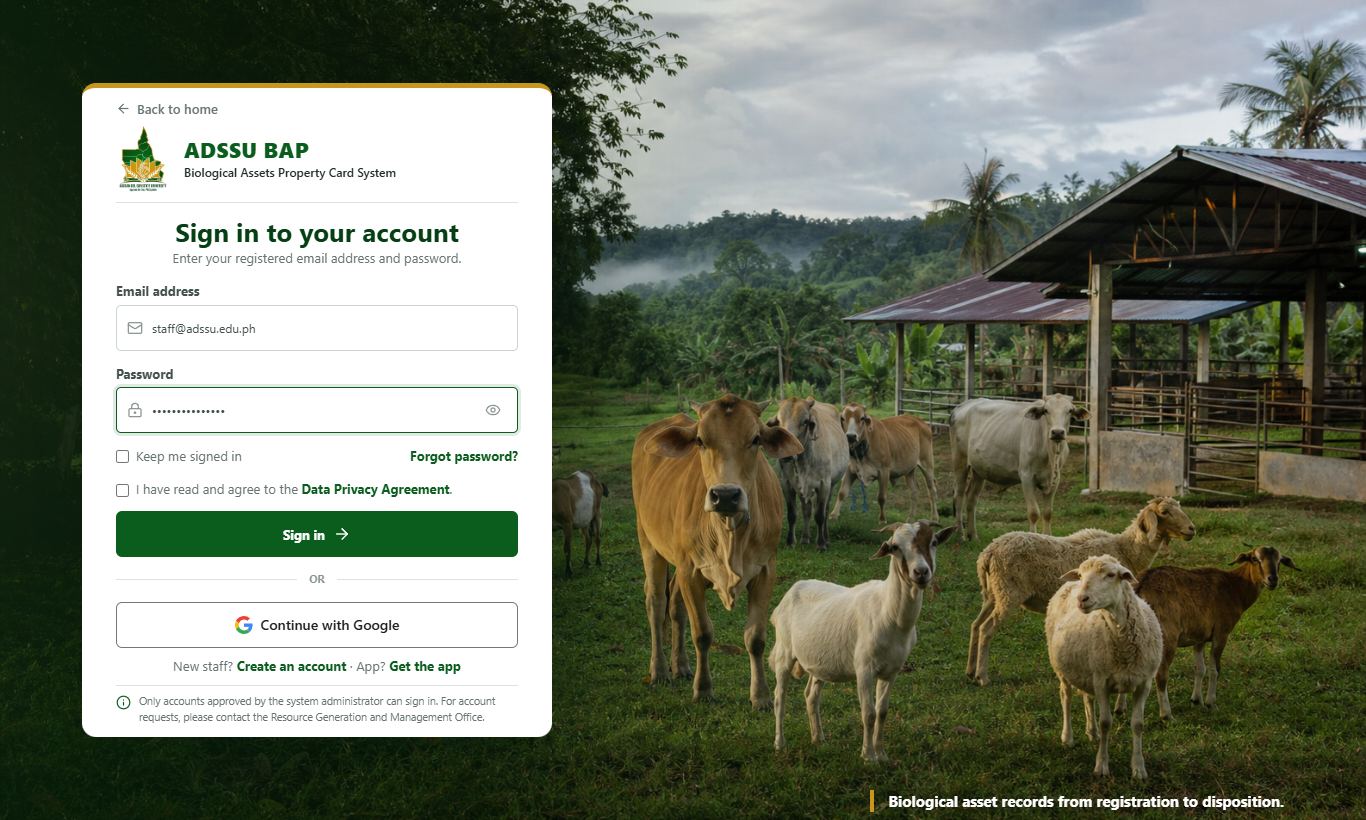
  7. Type your email and password and press Sign in. We then email you a 6-digit code: type it to finish. If the email does not arrive, press Send a new code, or use one of your recovery codes. The first time, the system shows your recovery codes: save them.

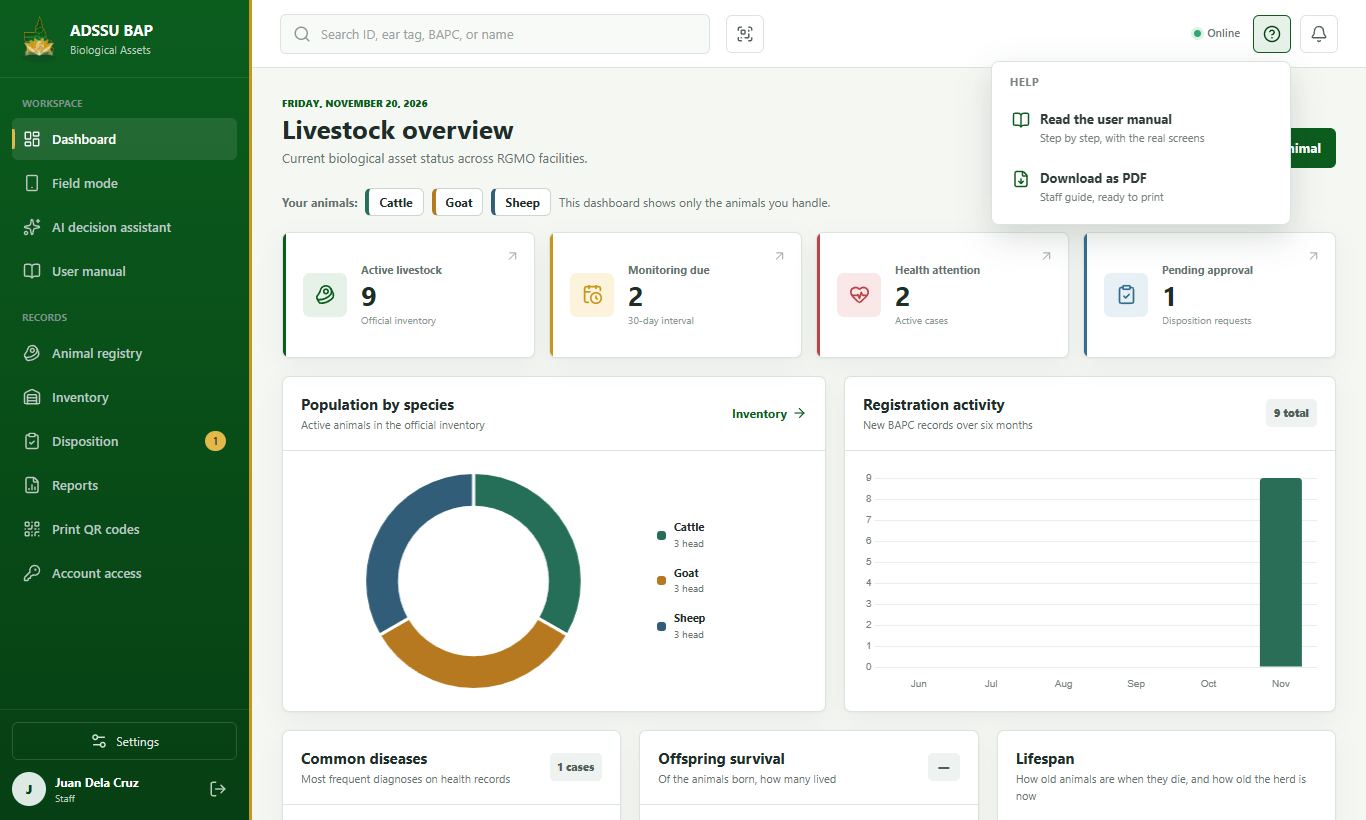
  8. The question-mark button at the top right is the Help menu. Choose Read the user manual to open this guide, or Download as PDF for a printable copy with every screen.

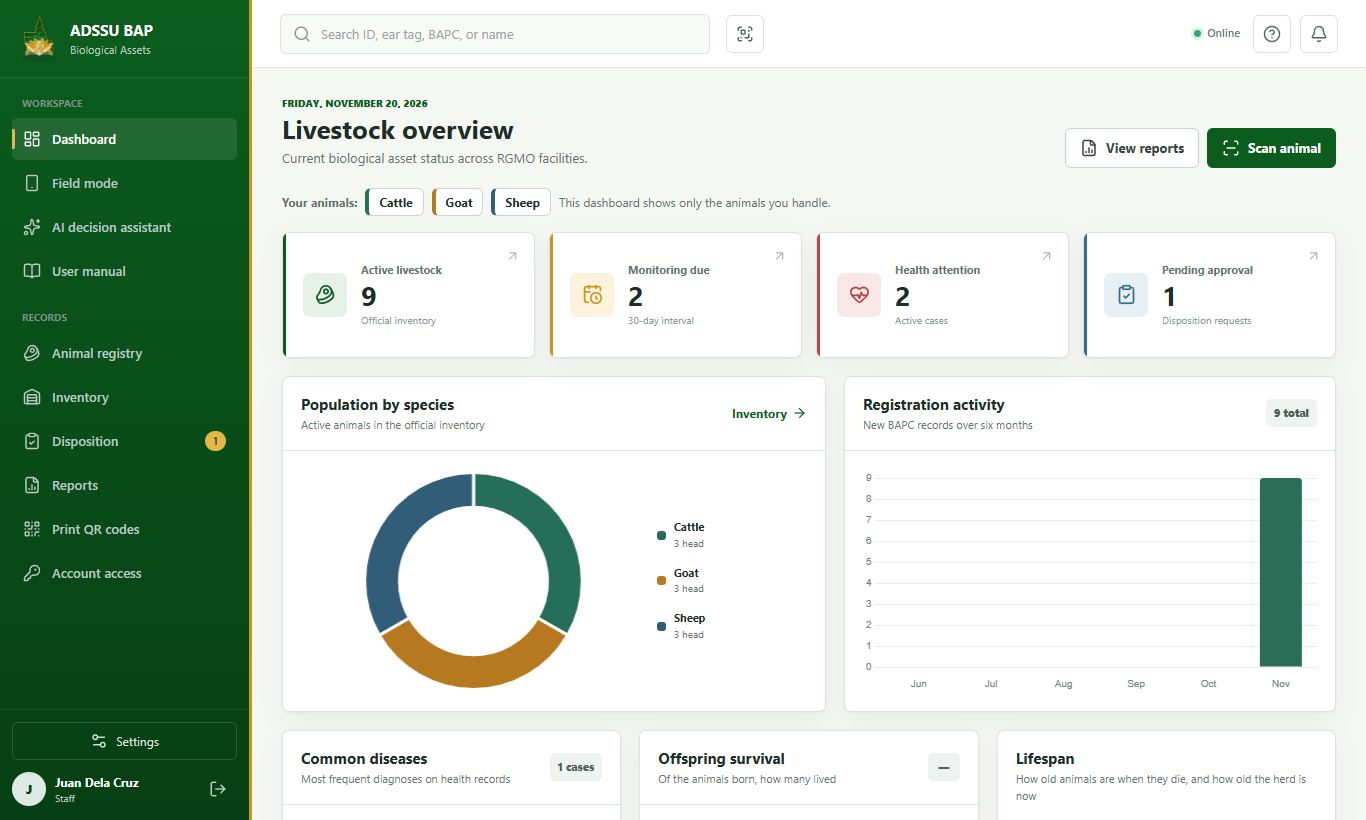
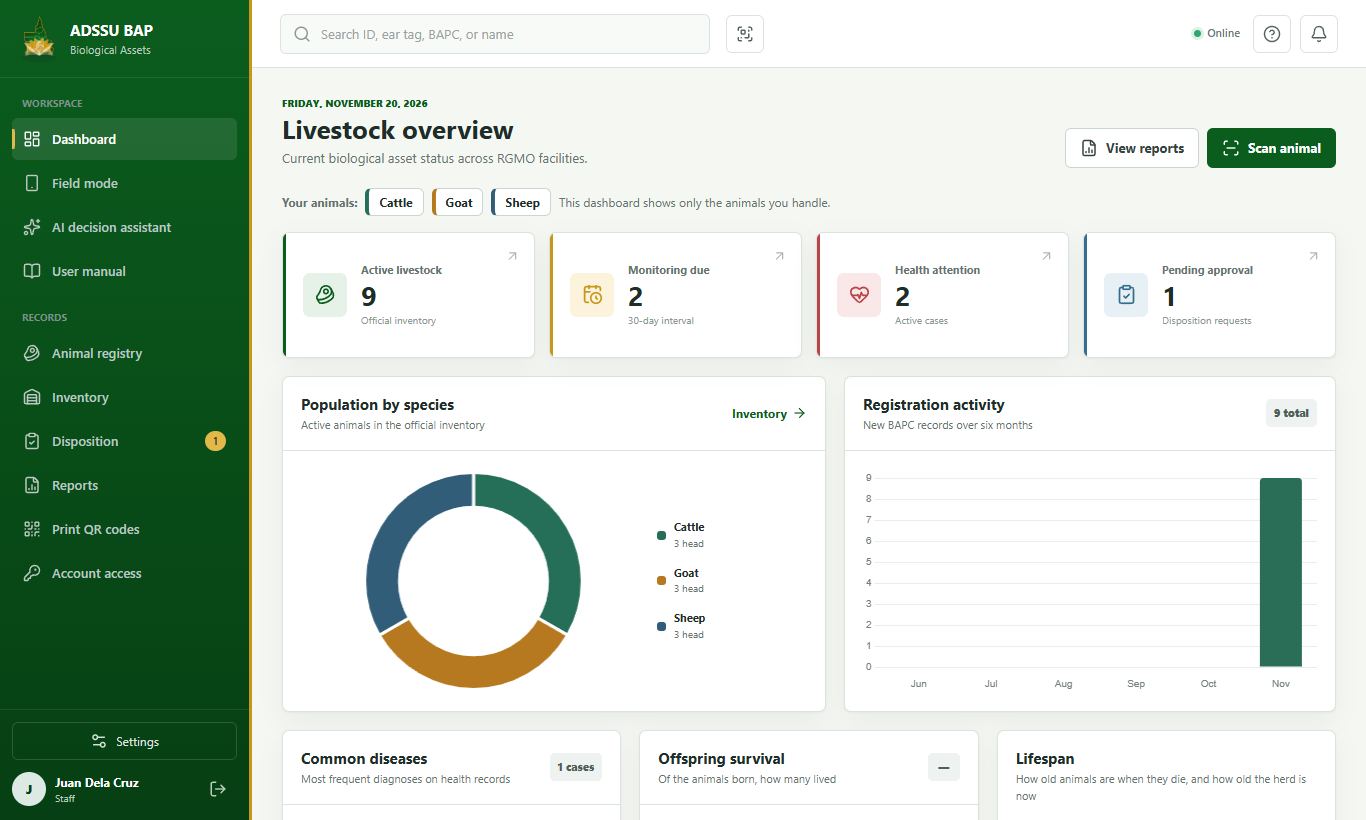
  9. The dashboard shows head counts, monitoring due and health follow-ups, and charts with the numbers written on them. Use the sidebar on the left to open each part of the system.
Step 1: Open the system Step 2: Register with your ADSSU email Step 3: Choose the animals you handle Step 4: Wait for approval Step 5: Read the Data Privacy Agreement Step 6: Sign in with Google Step 7: Or sign in with your password Step 8: Find the Help menu Step 9: Find your way around
Open the systemGo to the ADSSU BAP site and press Sign in at the top right. New personnel press Register on the sign-in page instead.
2

Animal registry

Find any animal you handle and open its profile and property card.

5 steps
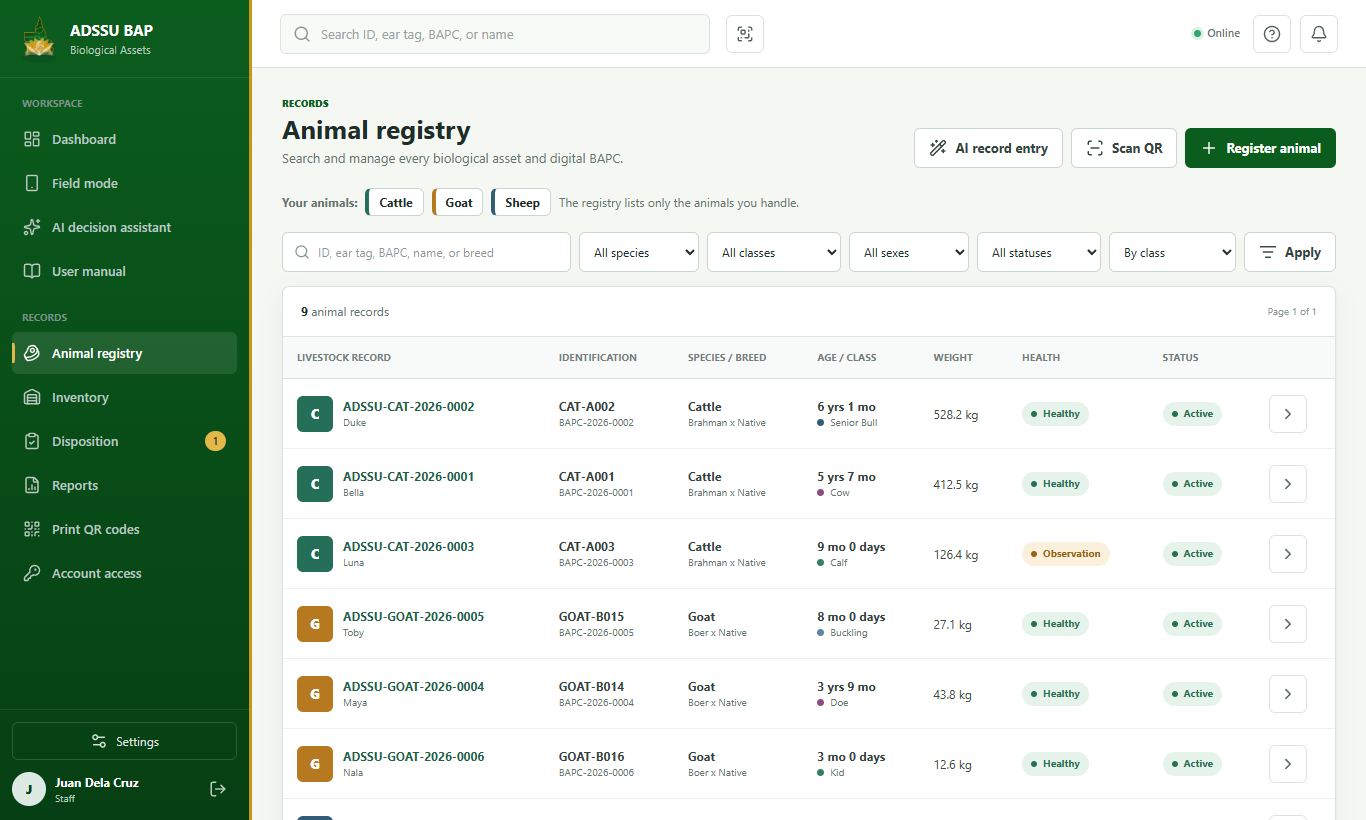
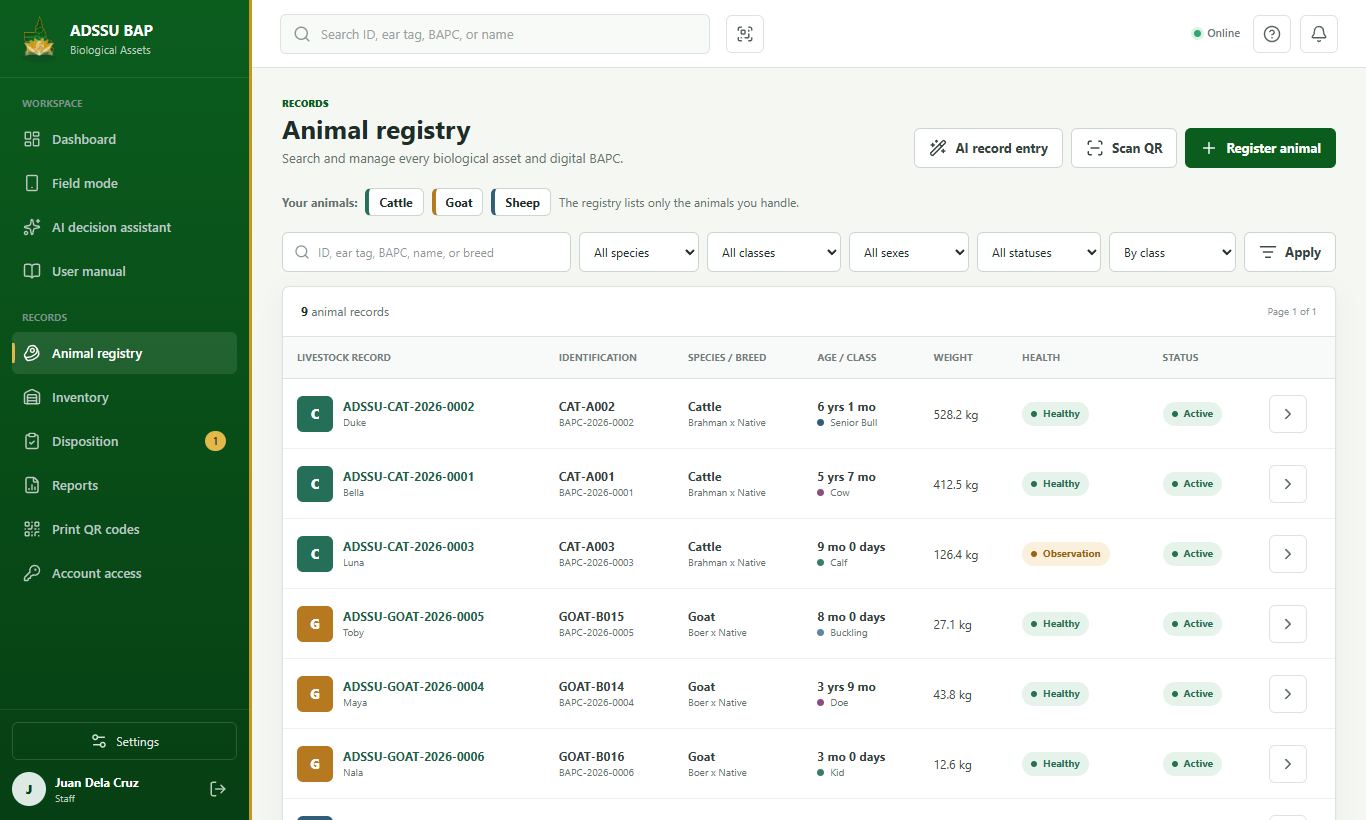
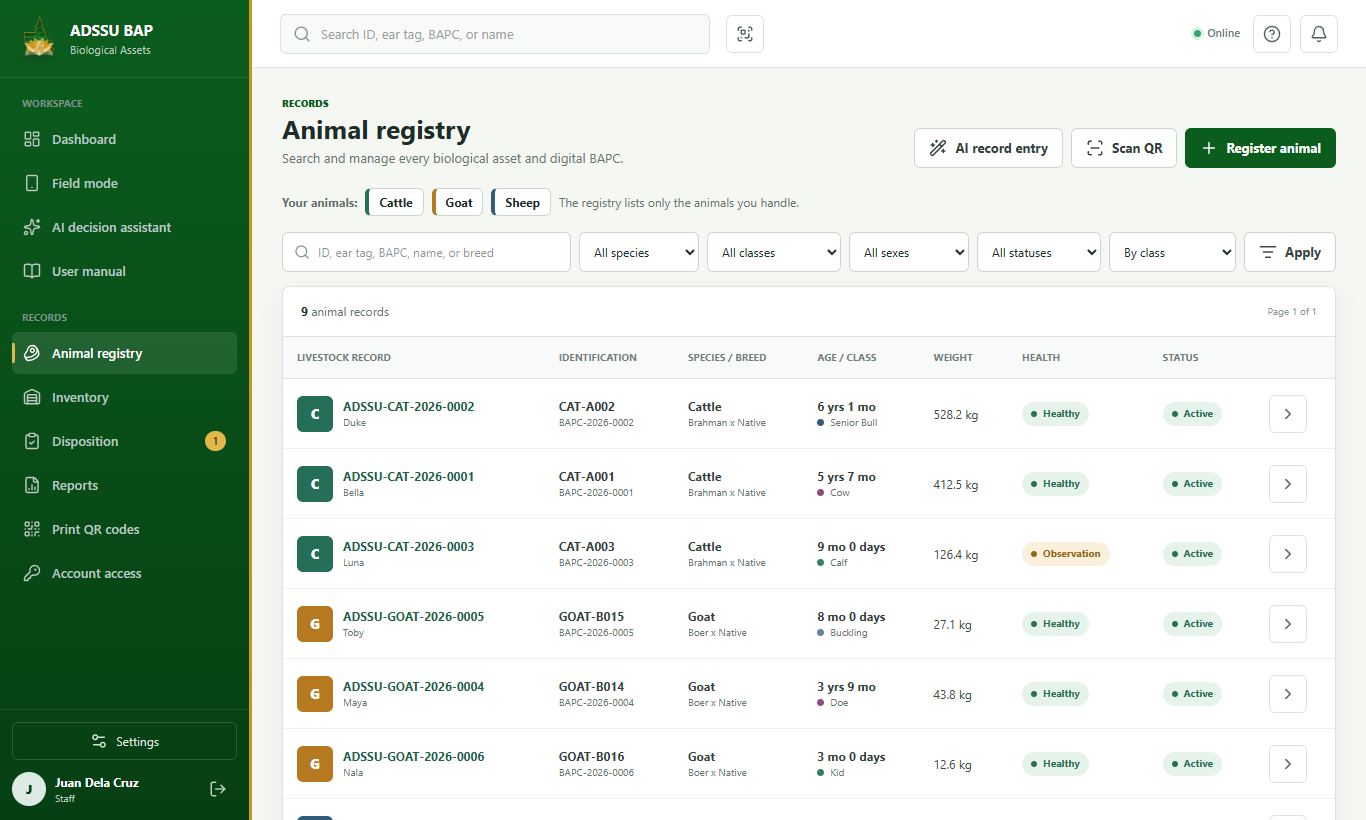
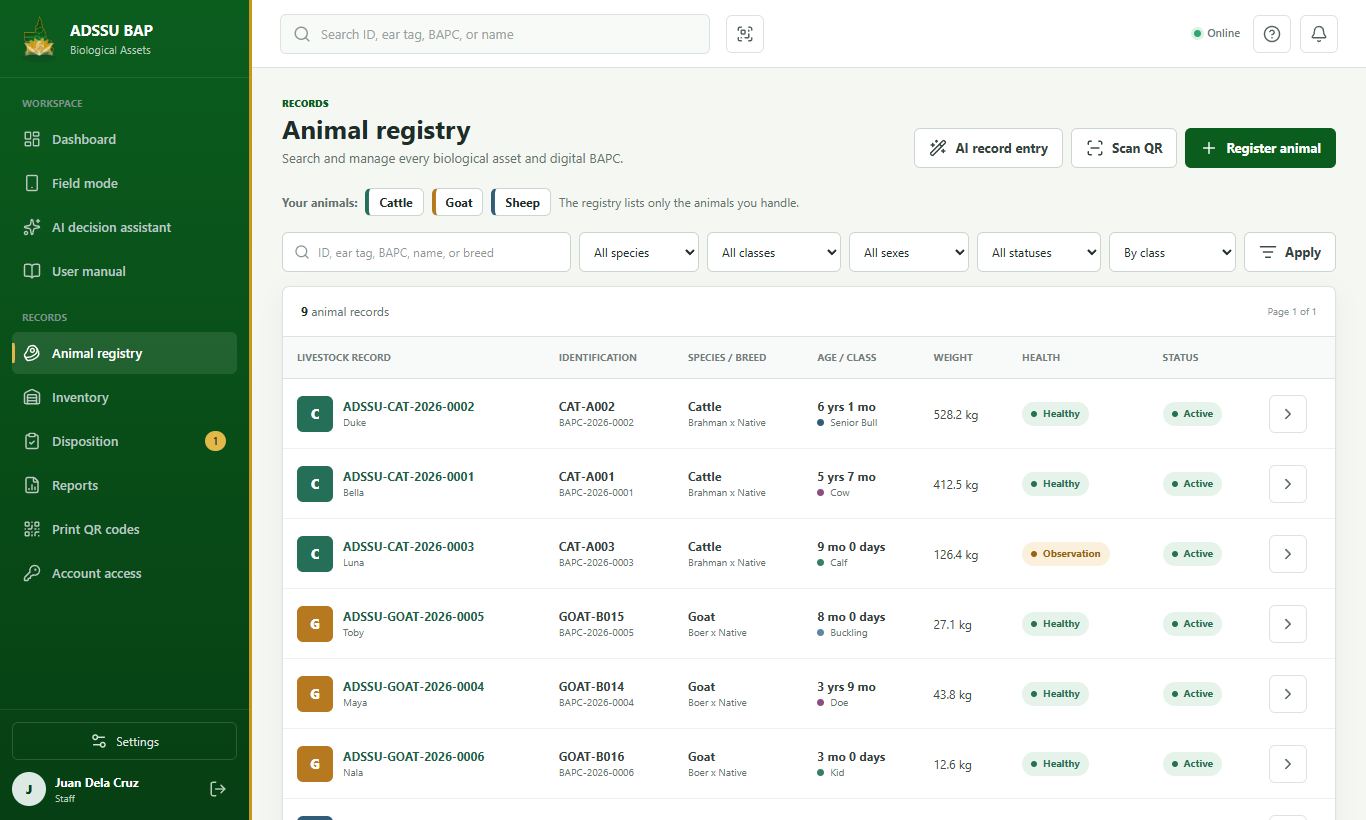
  1. Choose Animal registry in the sidebar. Type an ID, ear tag, BAPC number, name or breed in the search box.

  2. Filter by species, class, sex or status, then press Apply. Clear filters brings back the whole list.

  3. Click the animal to open its profile.

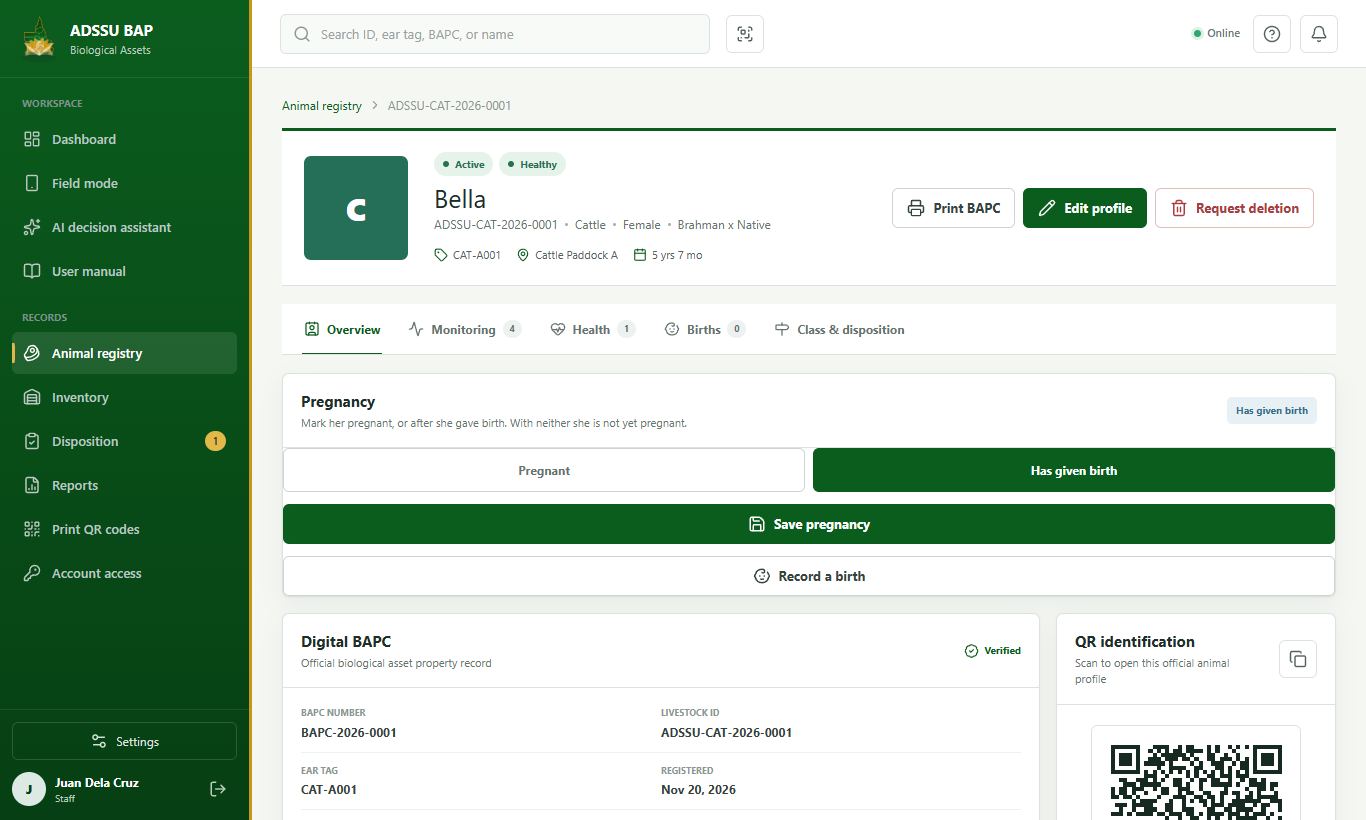
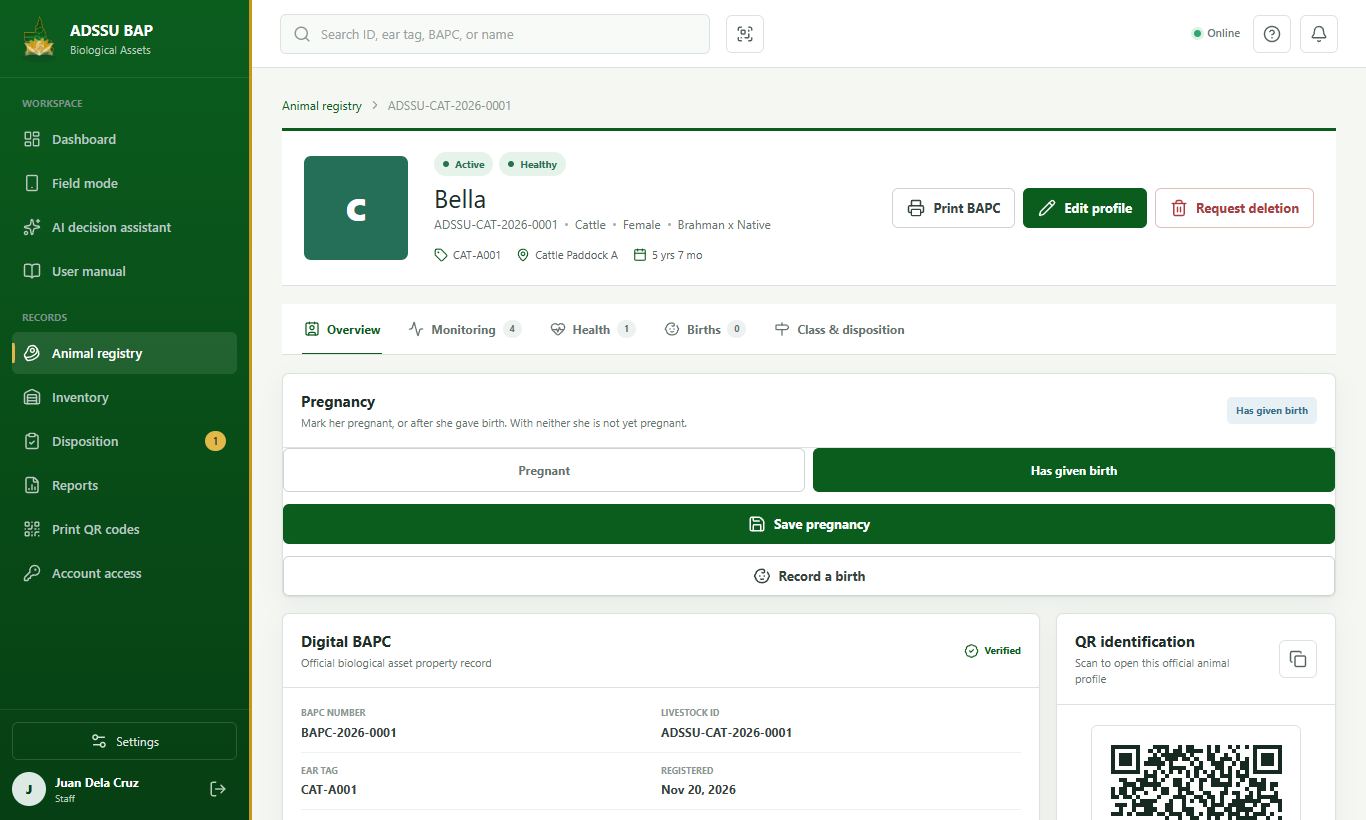
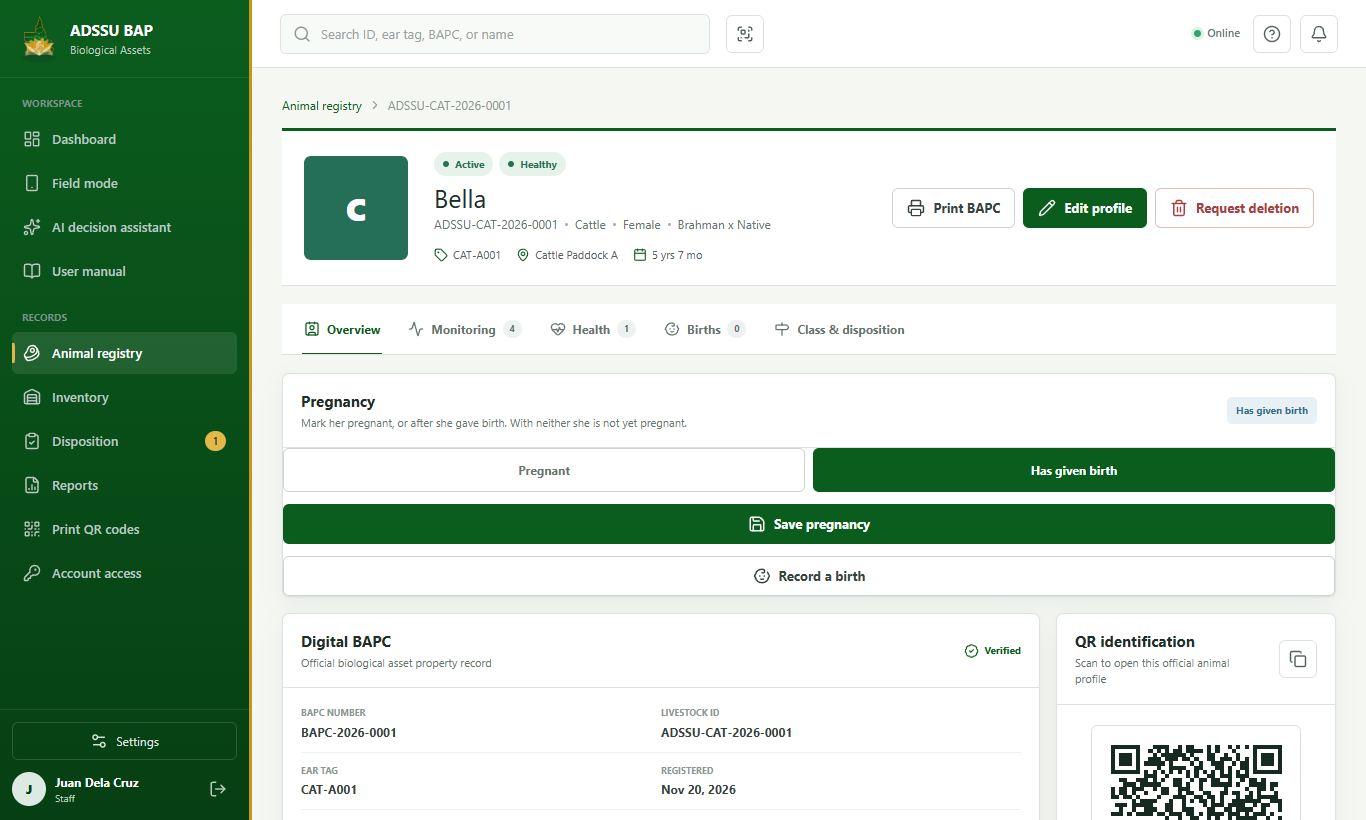
  4. The tabs show the overview, monitoring, health records (Add health record is here), births, and the class and disposition of the animal.

  5. Print BAPC opens the Biological Assets Property Card of this animal, ready for printing or saving as PDF.

Step 1: Open the Animal registry Step 2: Narrow the list Step 3: Open an animal Step 4: Read the profile Step 5: Print the BAPC
Open the Animal registryChoose Animal registry in the sidebar. Type an ID, ear tag, BAPC number, name or breed in the search box.
3

Registering an animal

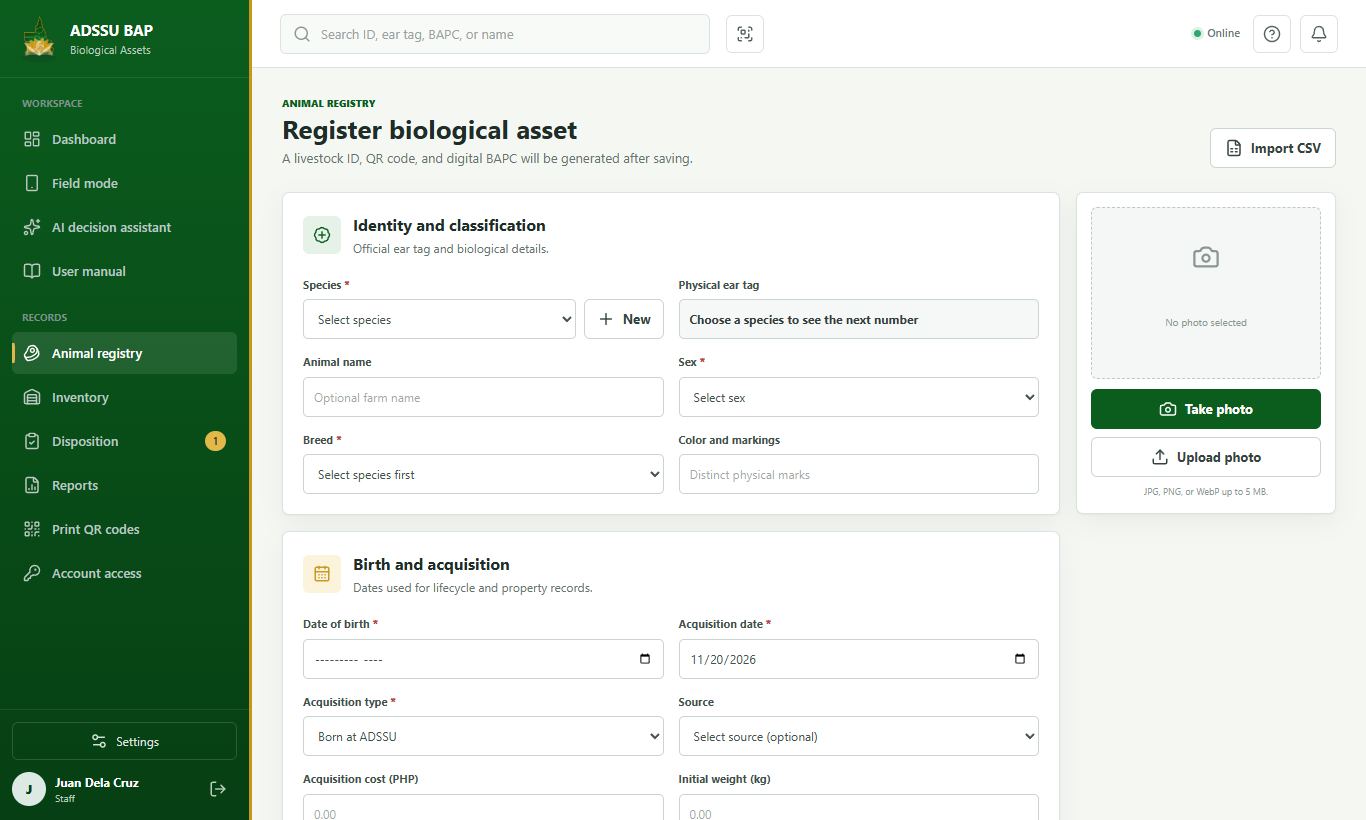
Add a new animal. The system gives it a livestock ID, a BAPC number and a QR code.

8 steps
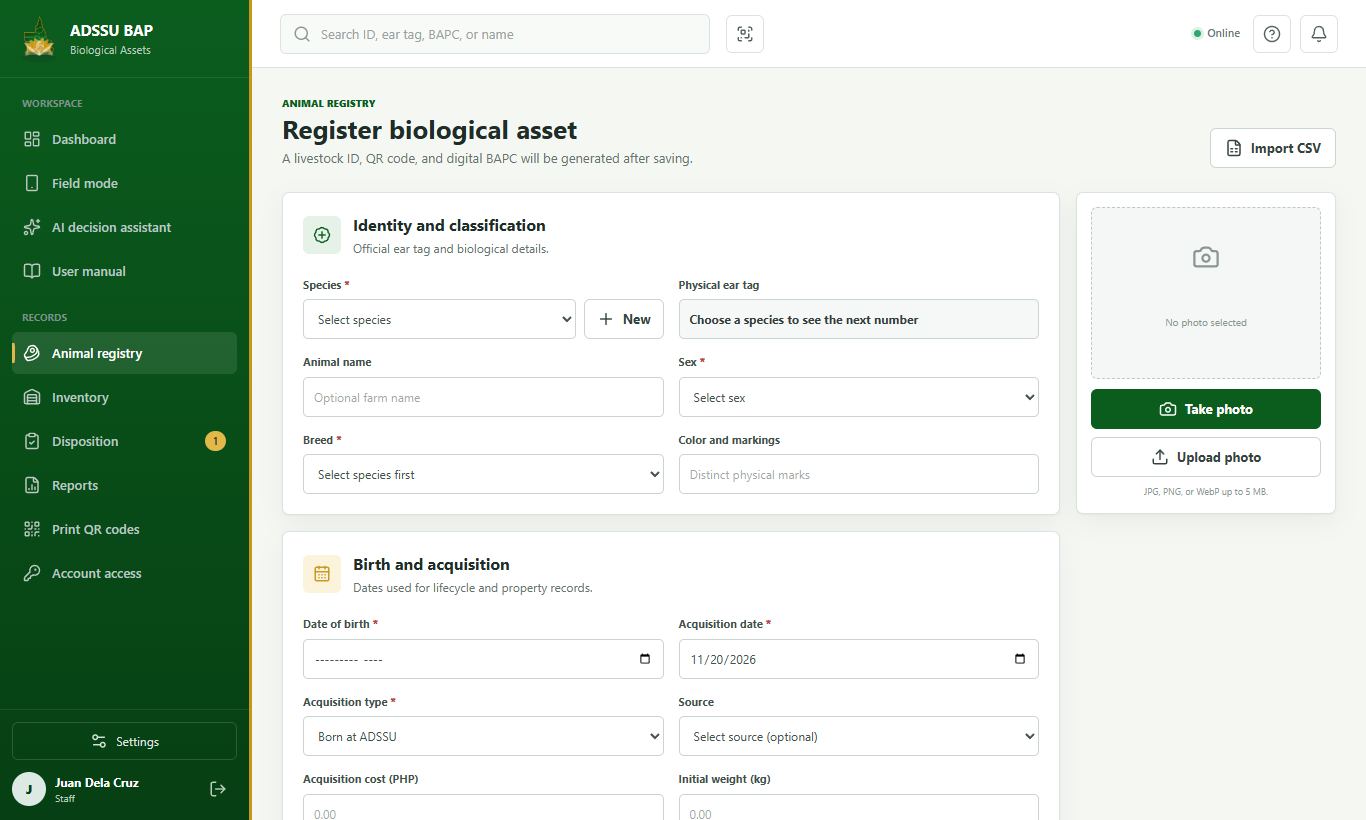
  1. In the Animal registry, press Register animal.

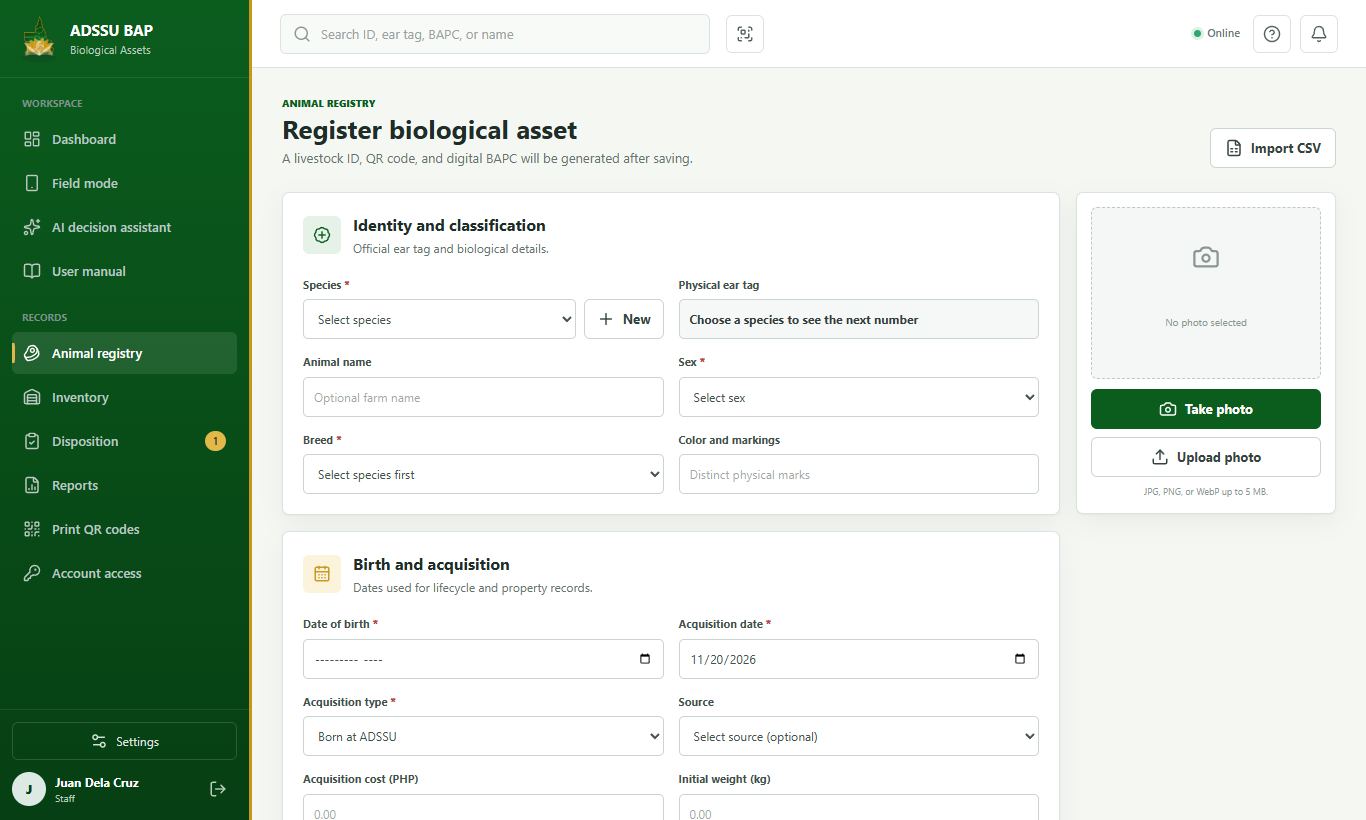
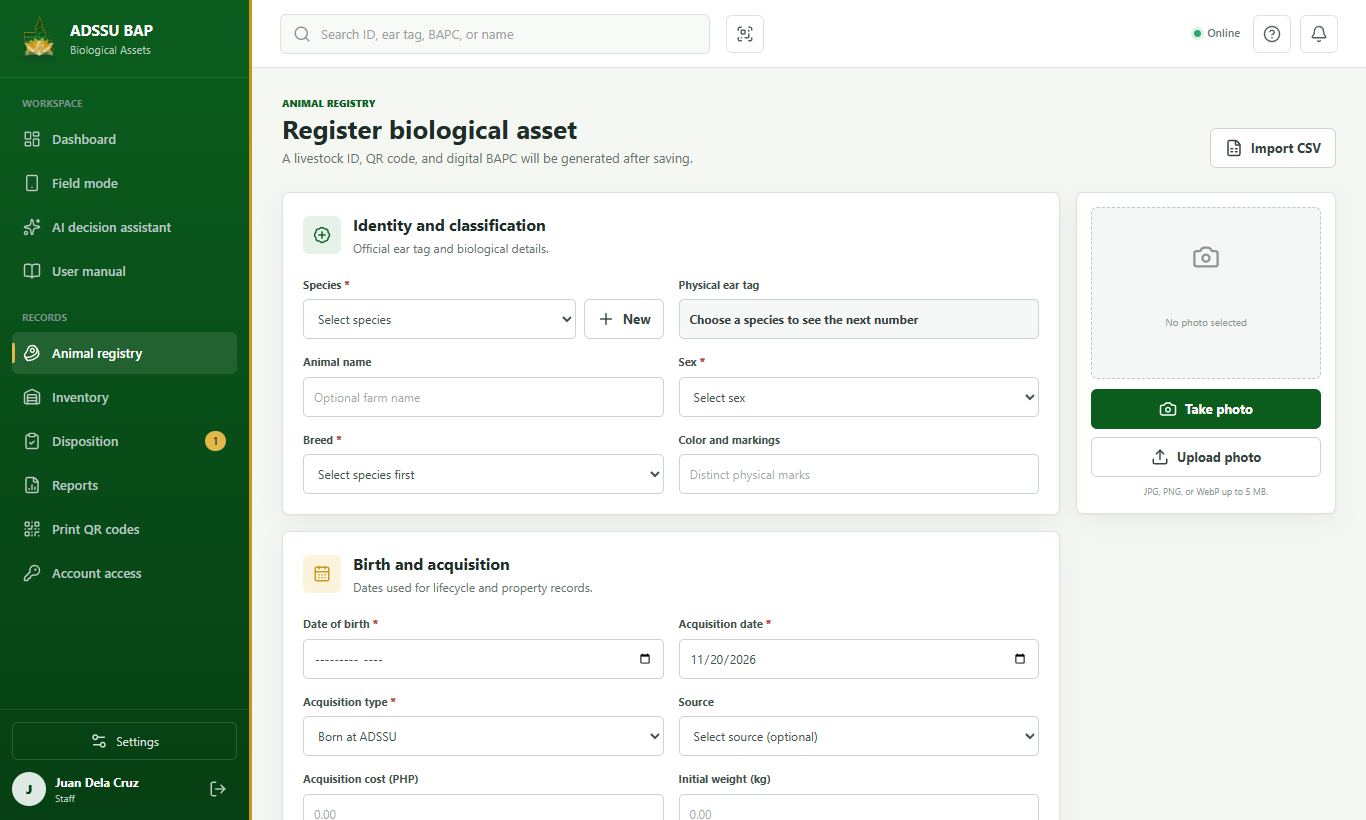
  2. Choose the species, then the sex, breed and breed type (optional). For a female, choose Pregnant or Has given birth; leave it empty if she is not yet pregnant. The class (for example Weaner or Heifer) is worked out for you.

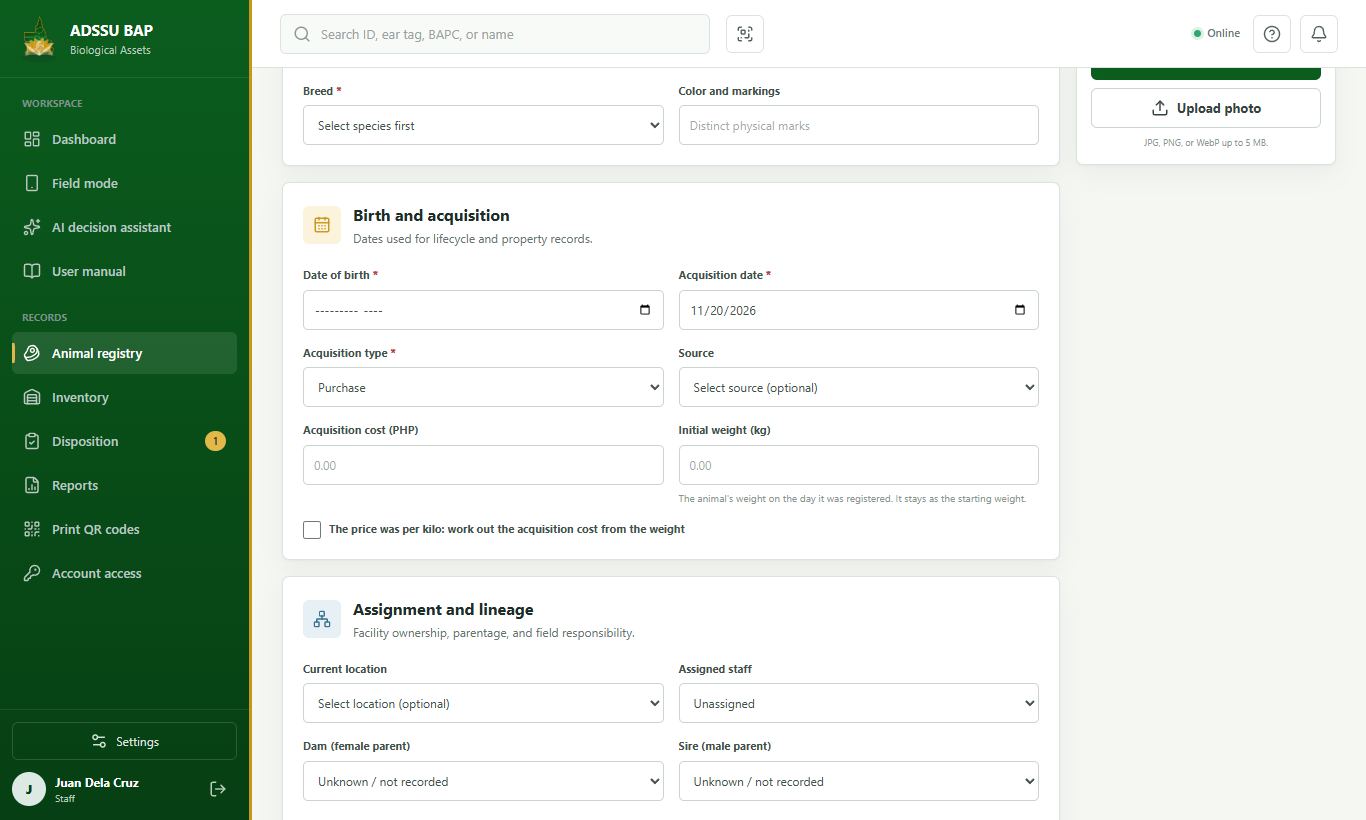
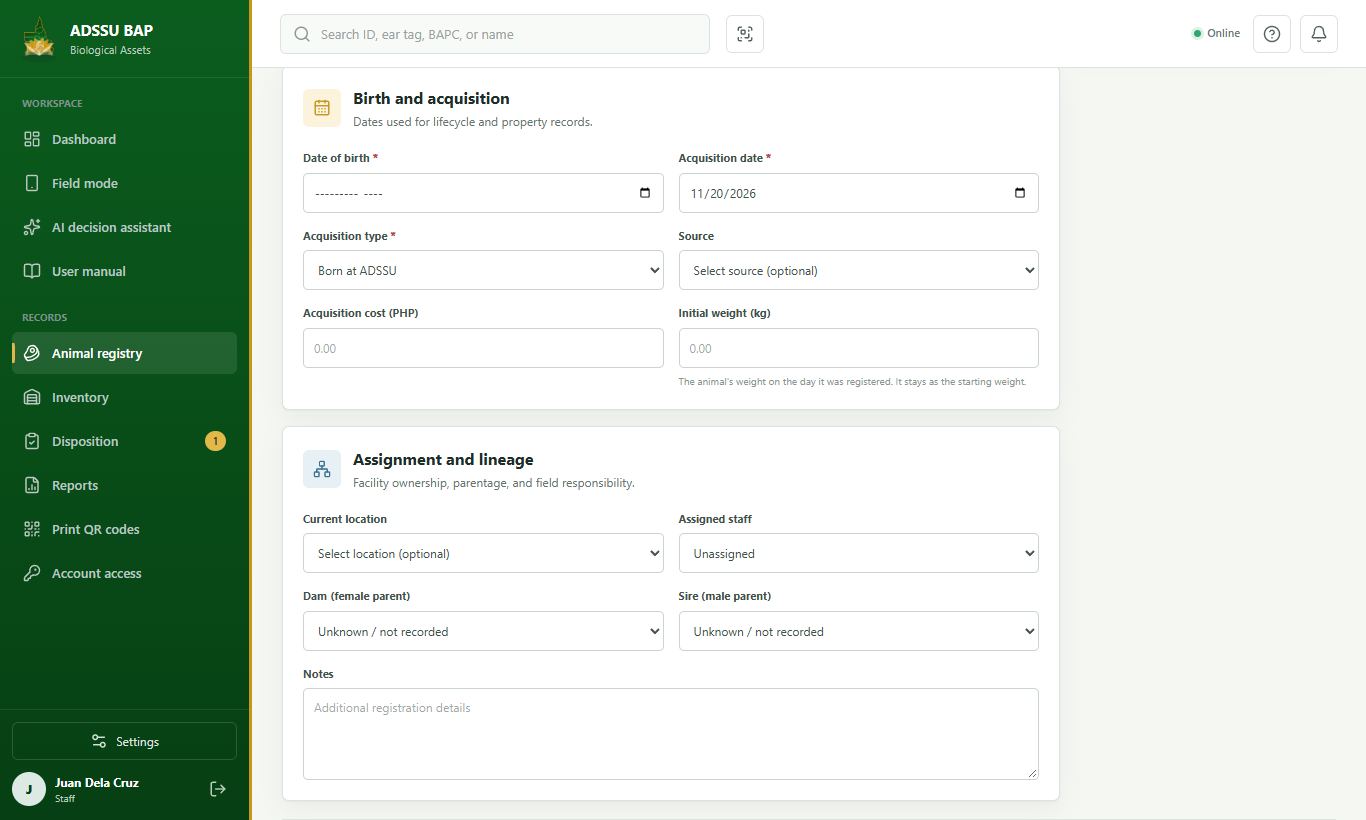
  3. Pick the month and year of birth (the day is not needed), the acquisition date and type, and the source and cost if it was bought or donated.

  4. Pick the source from the list. If it is not there, choose Add a new source, type it once, and it is in the list from then on.

  5. When the acquisition type is Purchase, tick the per-kilo box, type the price per kilo, and the cost is worked out from the initial weight.

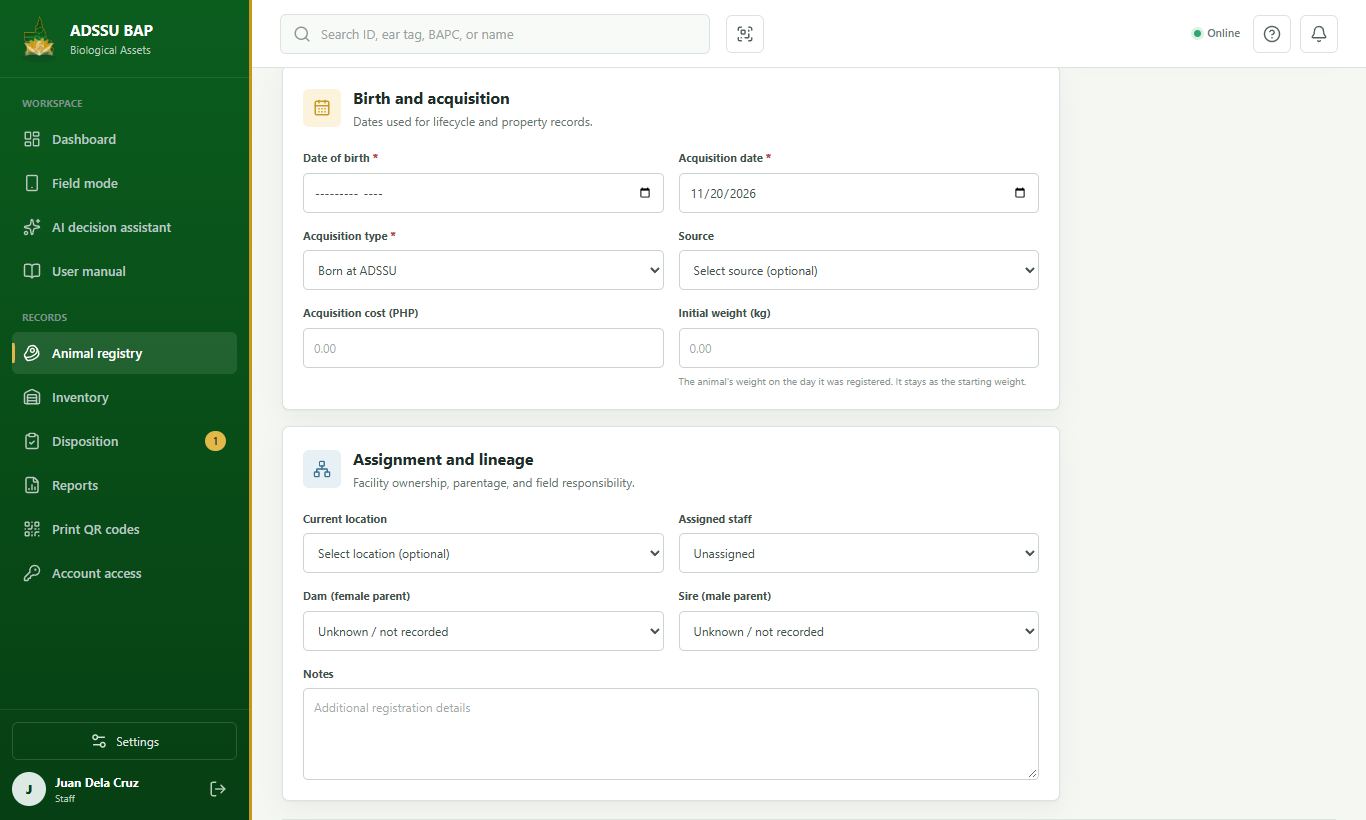
  6. Write where it is kept, who takes care of it (an administrator can be chosen too; the default is nobody), and its dam and sire if known. A photo helps others recognise it; press the X on it to take it off again.

  7. Press Register and create BAPC. The new profile opens with its livestock ID, BAPC number and QR code.

  8. To register a whole list, press Import CSV, download the sample file, fill it in and upload it. You check every row before anything is saved.

Step 1: Start a registration Step 2: Identity and classification Step 3: Birth and acquisition Step 4: Source of the animal Step 5: Bought by the kilo Step 6: Assignment and lineage Step 7: Save Step 8: Many animals at once
Start a registrationIn the Animal registry, press Register animal.
4

Monitoring and births

Keep each animal's history up to date from its profile.

9 steps
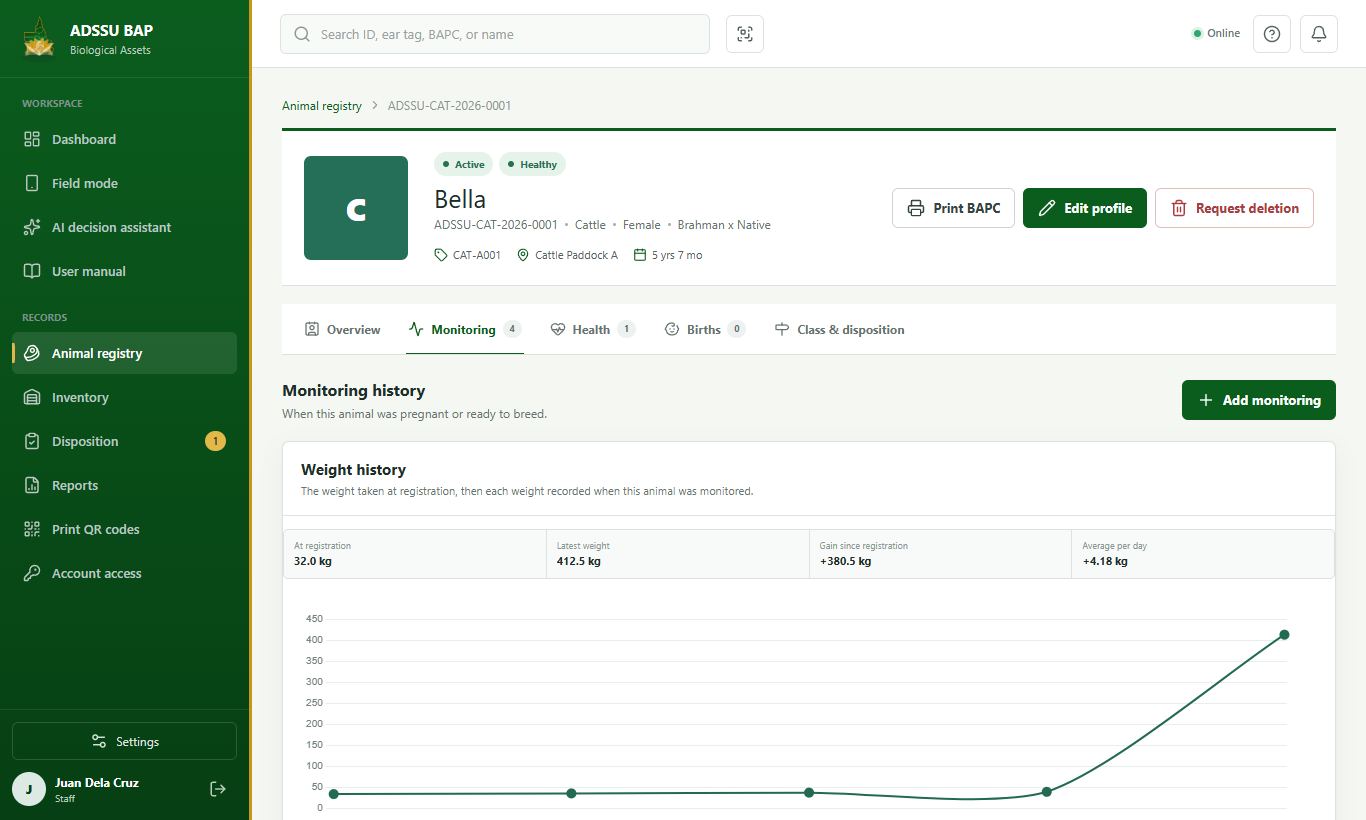
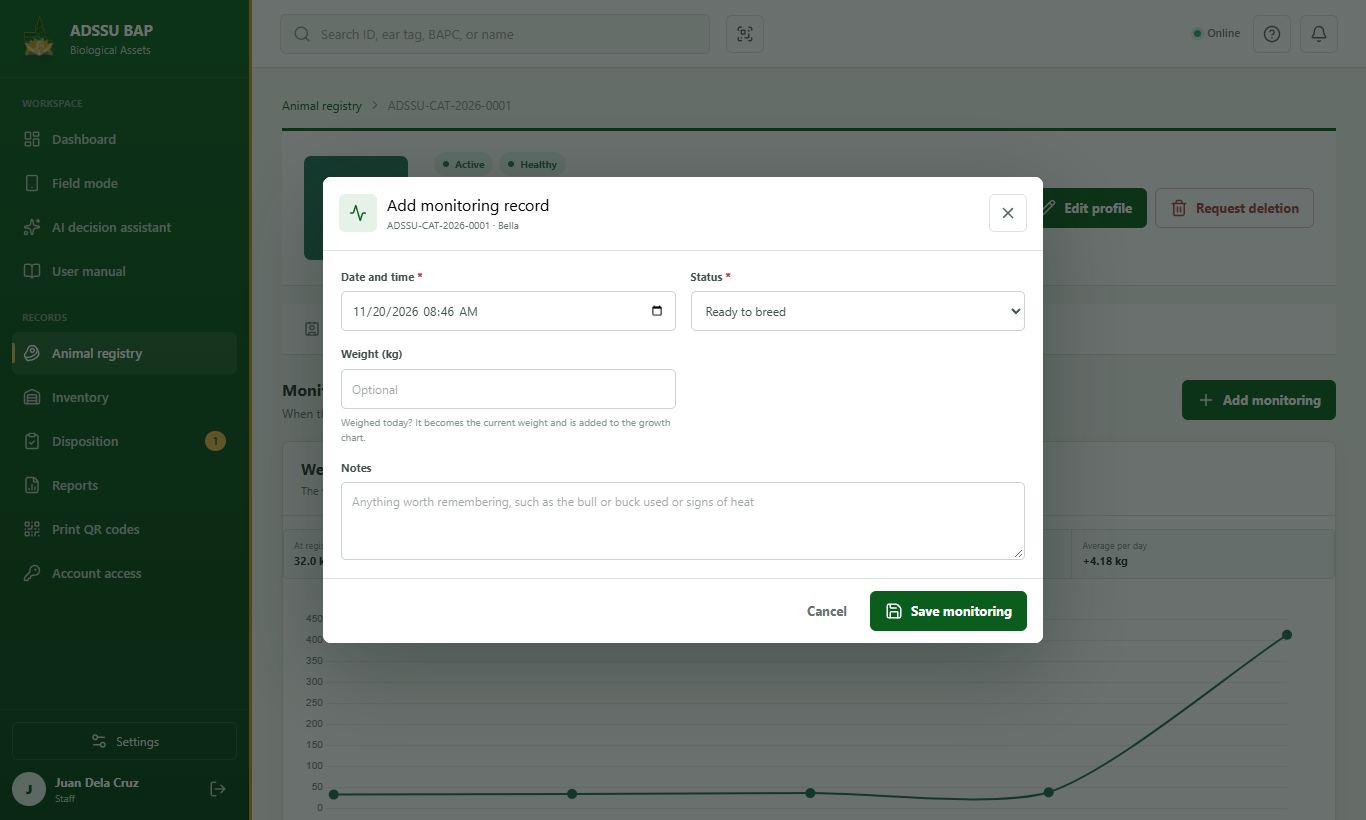
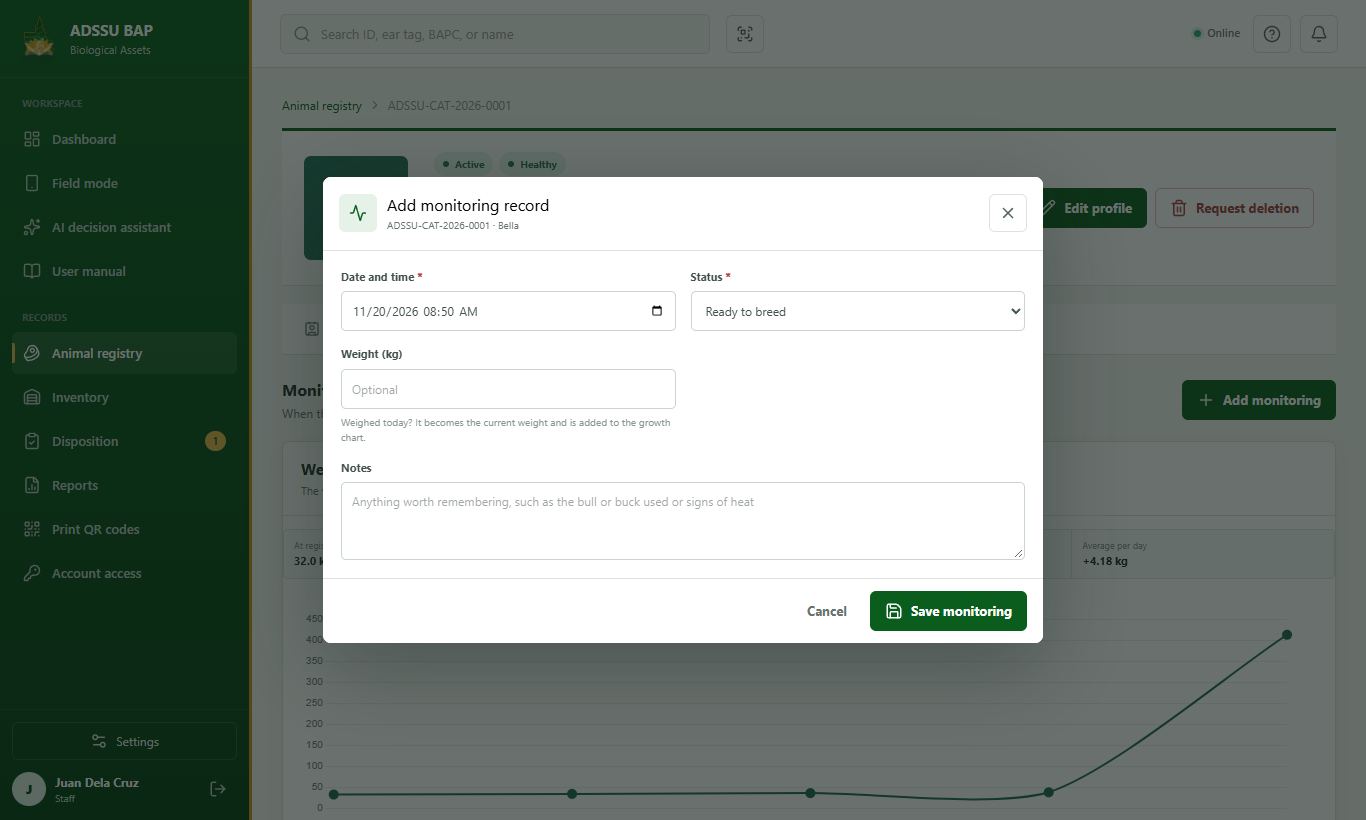
  1. Open the Monitoring tab of the animal and press Add monitoring.

  2. Choose Pregnant or Ready to breed. For a pregnant animal add the months along or the month she is due, write any notes, then save. A bull or buck can only be Ready to breed, and an animal already pregnant cannot be marked ready until she has given birth. A pregnant animal is also named in the Remarks of her property card.

  3. Type the weight in kilograms in Weight (kg) when you weigh the animal; it is optional. The weight becomes the animal's current weight. The Initial weight on the profile stays as it was on the day the animal was registered.

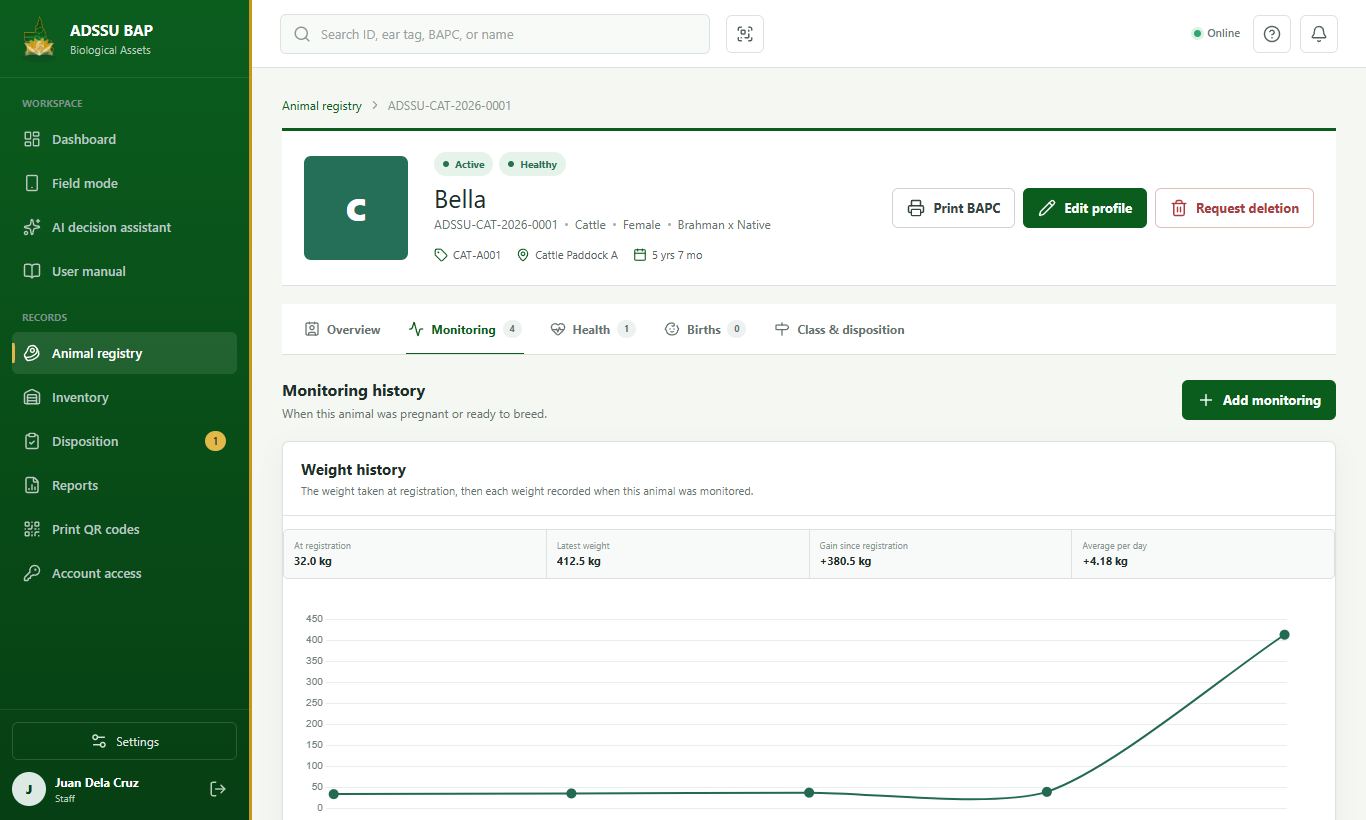
  4. The top of the Monitoring tab shows the Weight history: the weight at registration, the latest weight, the gain and the gain per day, with a chart of every weight taken.

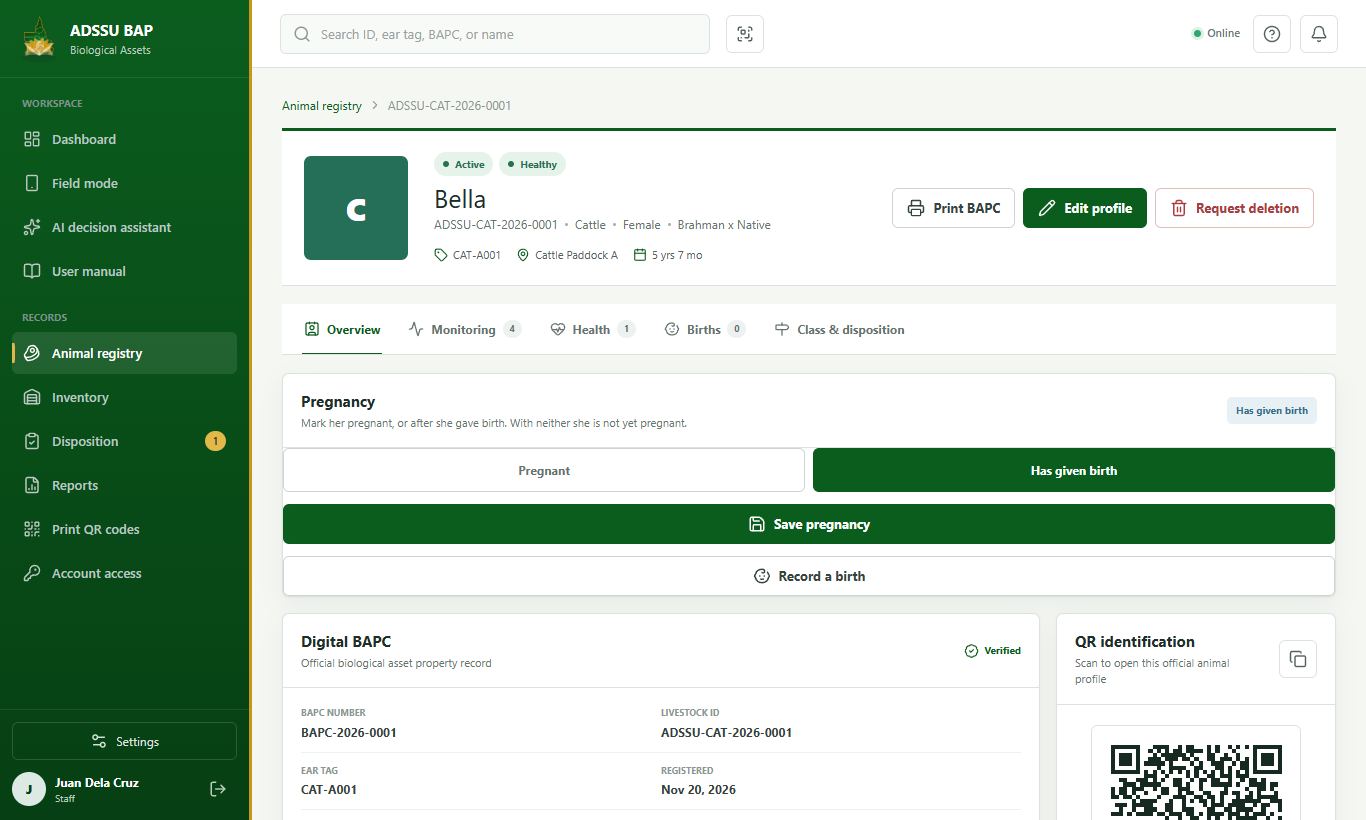
  5. For a female, choose Pregnant and type how many months along she is. The month she should give birth is worked out from it, and you can change that month. Choose Has given birth after the delivery, or the same choice again to clear it. With neither she is not yet pregnant. Her class changes with it (for example Heifer to Cow).

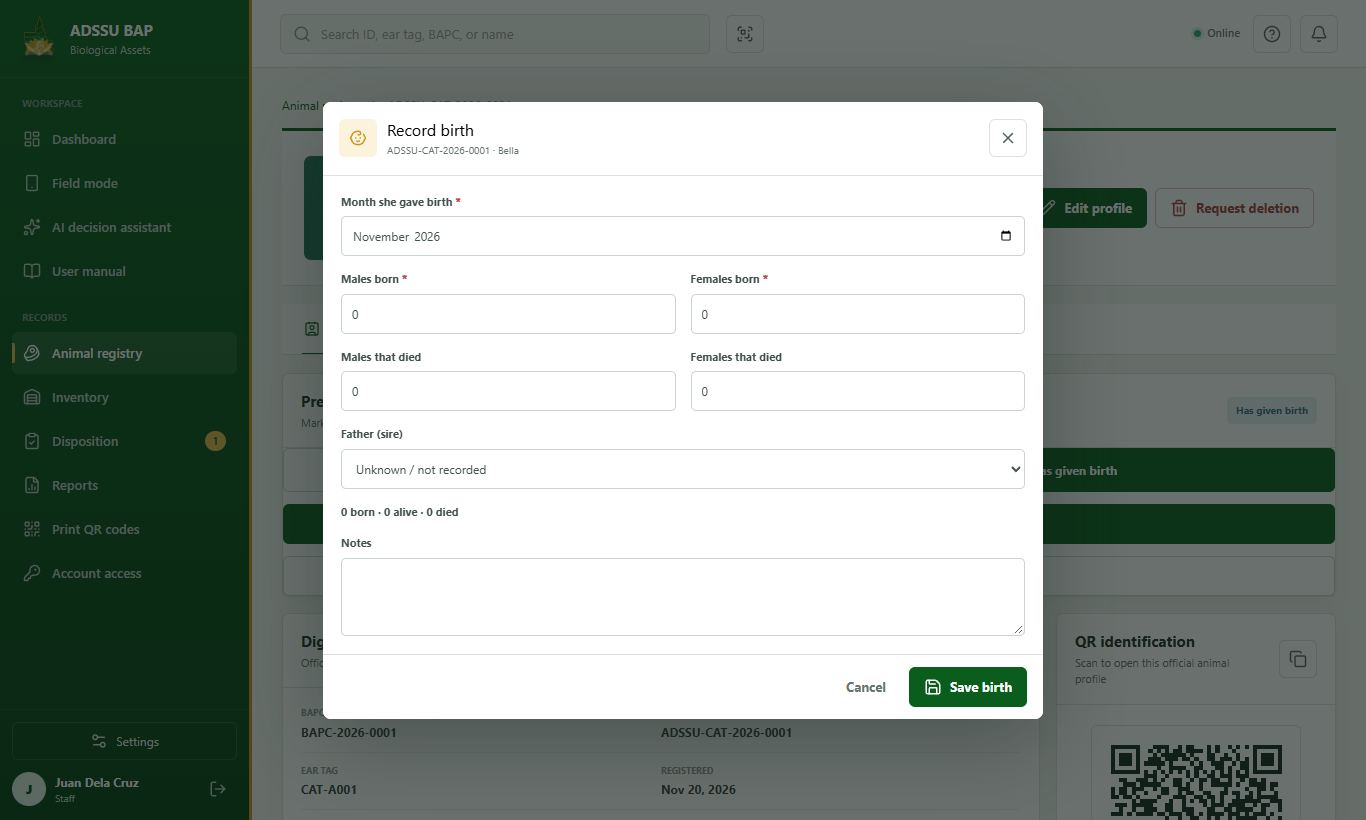
  6. Press Record a birth. Give the date, how many males and females were born, how many of each died, and the father if known. The ones that lived are what is left after the deaths.

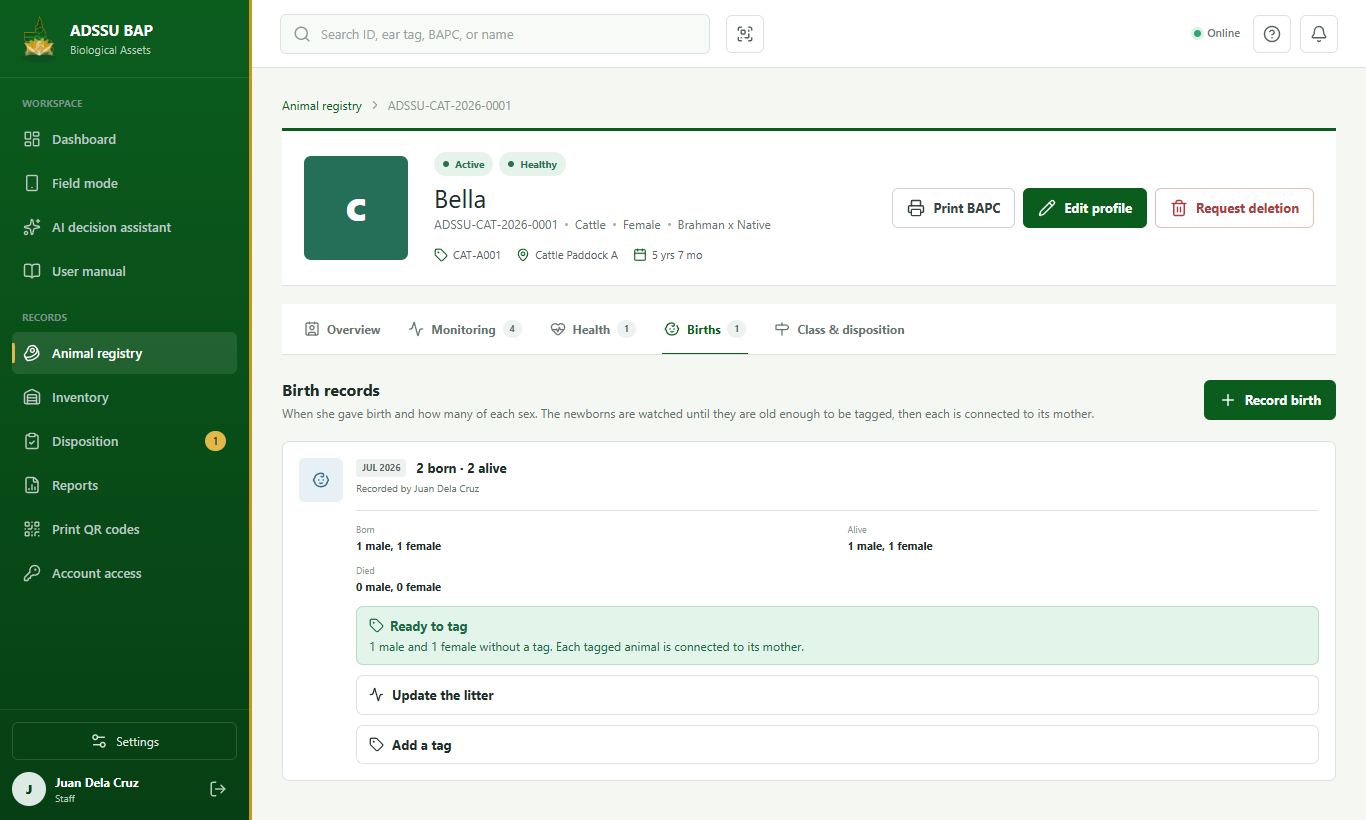
  7. Every newborn is watched as part of its litter, from birth. Open the Births tab and press Update the litter whenever some die: the deaths come off the living count.

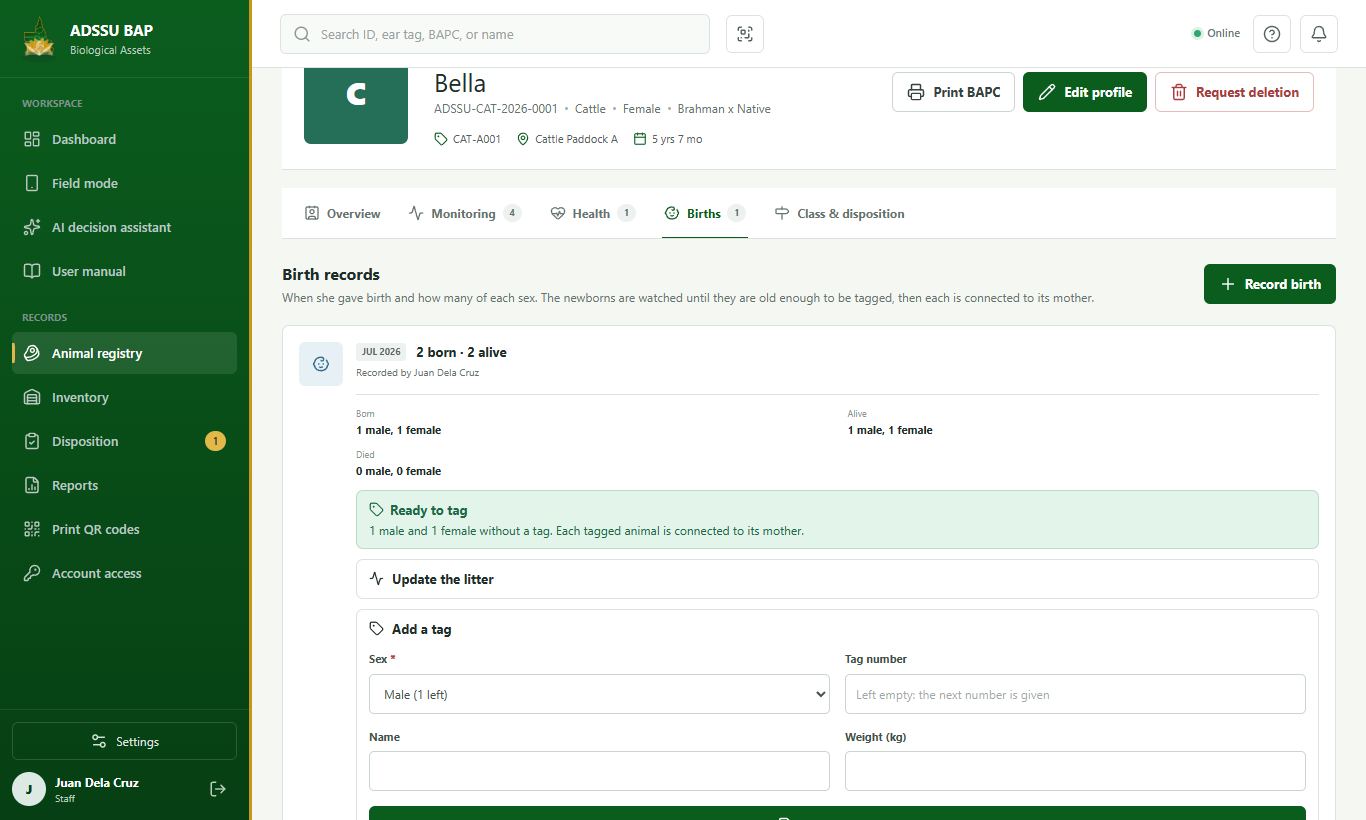
  8. When the animals are old enough (the number of months is set by the administrator for each species), the litter says Ready to tag. Press Add a tag, choose male or female, type the tag number, and the new animal is registered and connected to its mother and father.

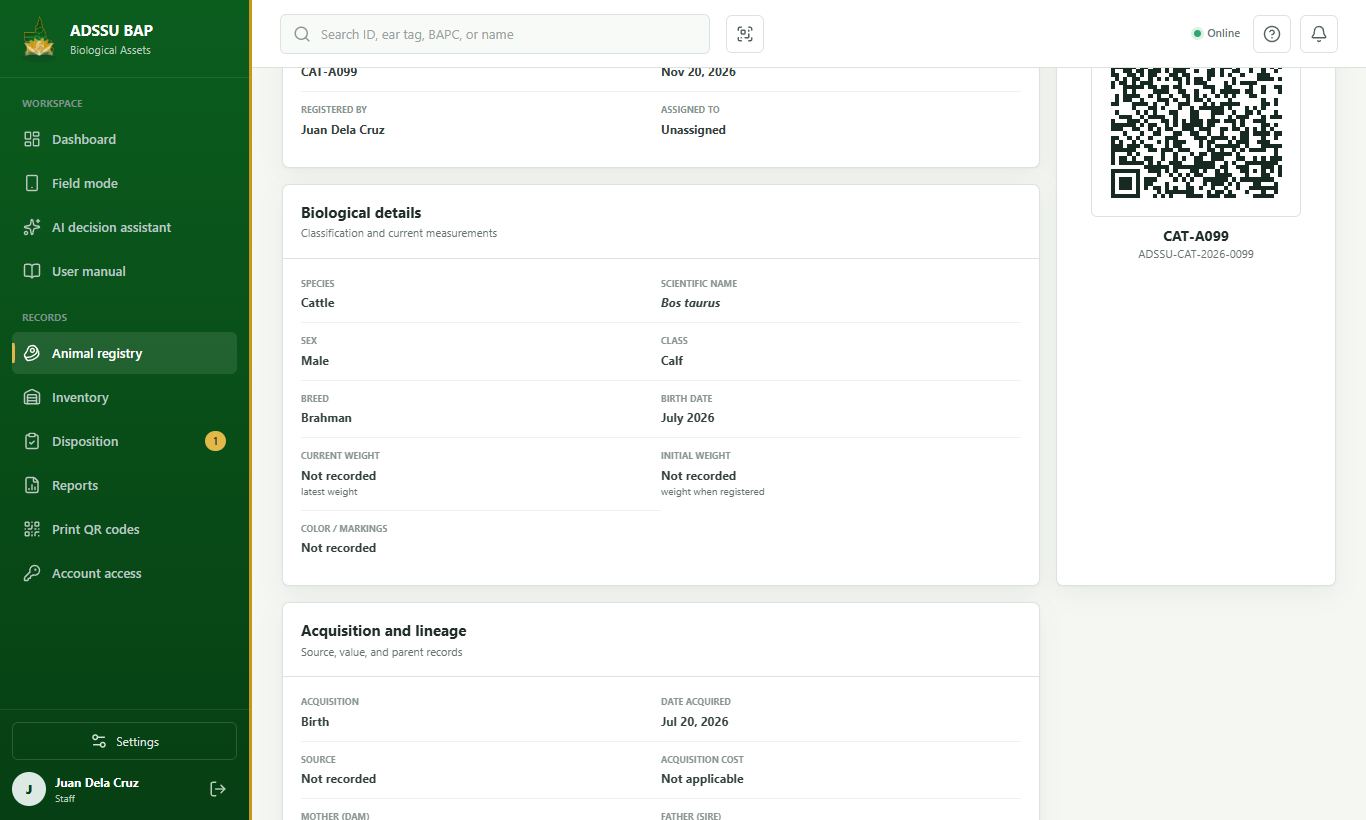
  9. Scanning a tagged animal shows its mother and father by tag number, and whether each is still alive. Every animal is followed from birth, purchase or donation until it is sold, transferred, lost or dies.

Step 1: Add a monitoring record Step 2: Say if she is pregnant or ready to breed Step 3: Weigh the animal Step 4: Follow the weight Step 5: Set pregnancy Step 6: Record a birth Step 7: Watch the litter Step 8: Tag the newborns Step 9: Scan a tagged animal
Add a monitoring recordOpen the Monitoring tab of the animal and press Add monitoring.
5

Health records

Record a checkup, vaccination, injection, deworming, illness or treatment, and follow up the next due date.

5 steps
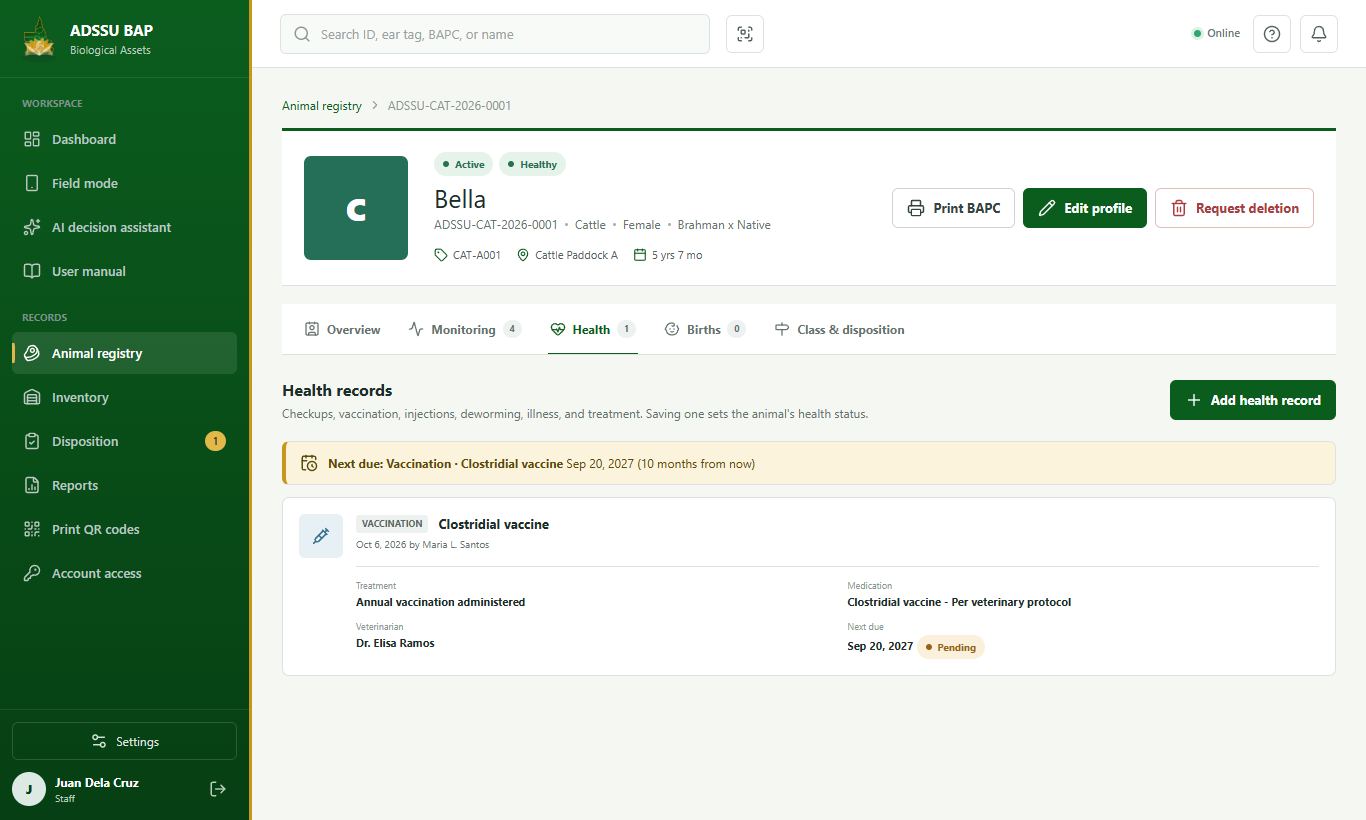
  1. On the animal's profile, open the Health tab and press Add health record. The tab also lists every earlier record.

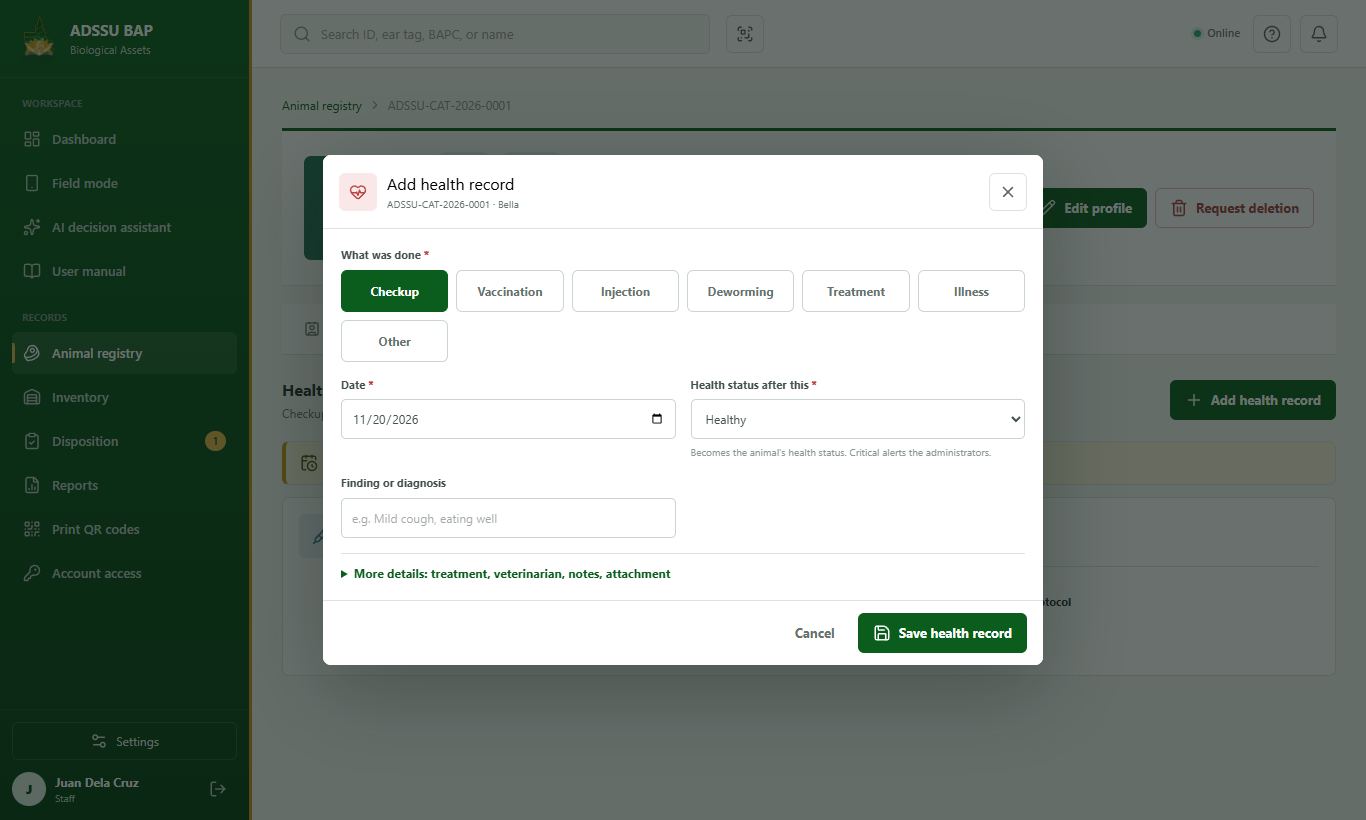
  2. Pick Checkup, Vaccination, Injection, Deworming, Treatment, Illness or Other. The form then asks only for what that type needs.

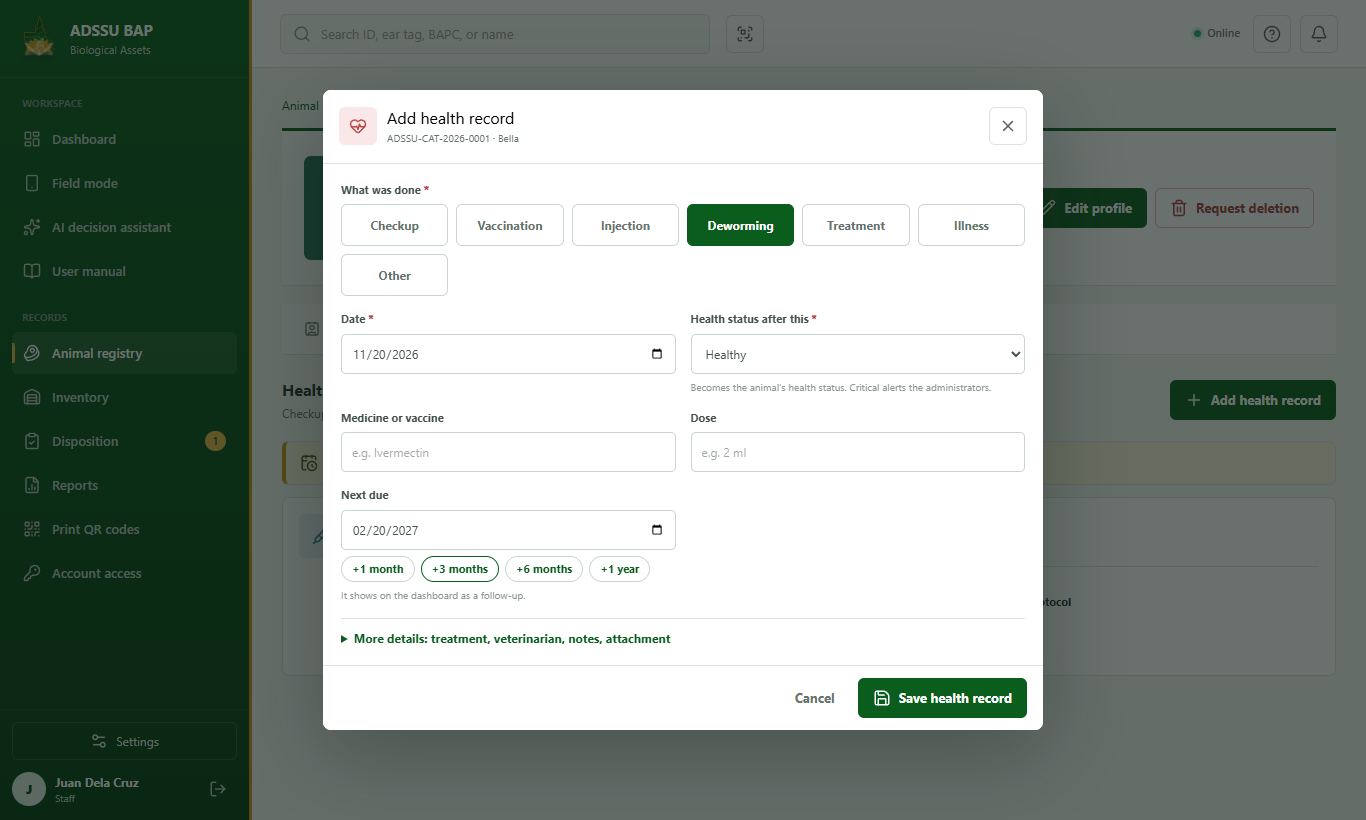
  3. For a vaccination, injection, deworming or treatment, type the medicine, the dose and when it is due again; the +1 month, +3 months, +6 months and +1 year buttons fill the date from the record date. A checkup or illness asks for the finding instead. Treatment, veterinarian, notes and an attachment (photo or PDF up to 5 MB) are under More details.

  4. Health status after this becomes the animal's health status (Illness suggests Under observation, Treatment suggests Under treatment). Critical alerts every administrator. Press Save health record and confirm.

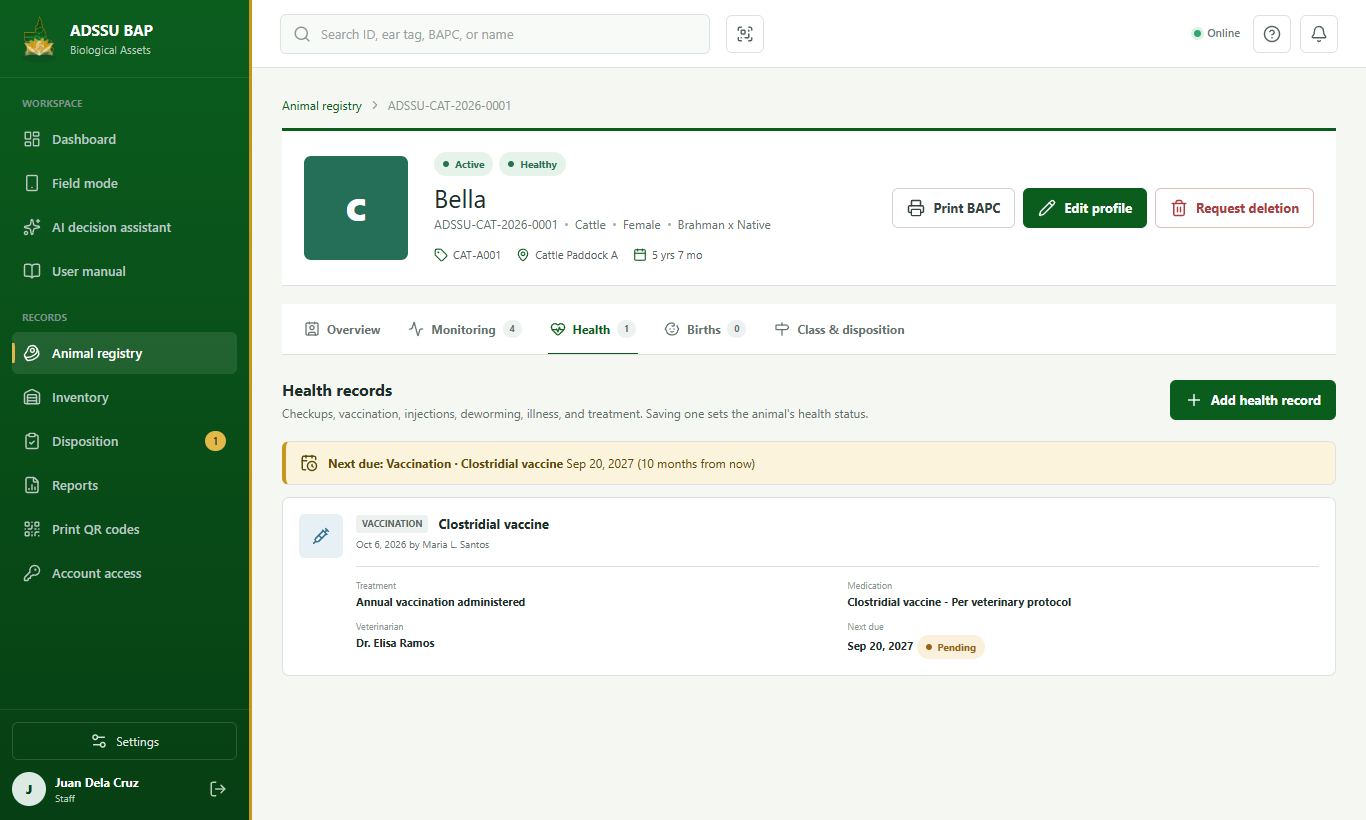
  5. A banner at the top of the Health tab shows the next care due, or Overdue in red. A new record of the same kind clears the old due date. Follow-ups of the next 30 days also show on the dashboard.

Step 1: Open the Health tab Step 2: Choose what was done Step 3: Medicine, dose and next due date Step 4: Set the health status and save Step 5: Follow up what is due
Open the Health tabOn the animal's profile, open the Health tab and press Add health record. The tab also lists every earlier record.
6

QR scanning and Field mode

Work on the farm with a phone, even without internet.

3 steps
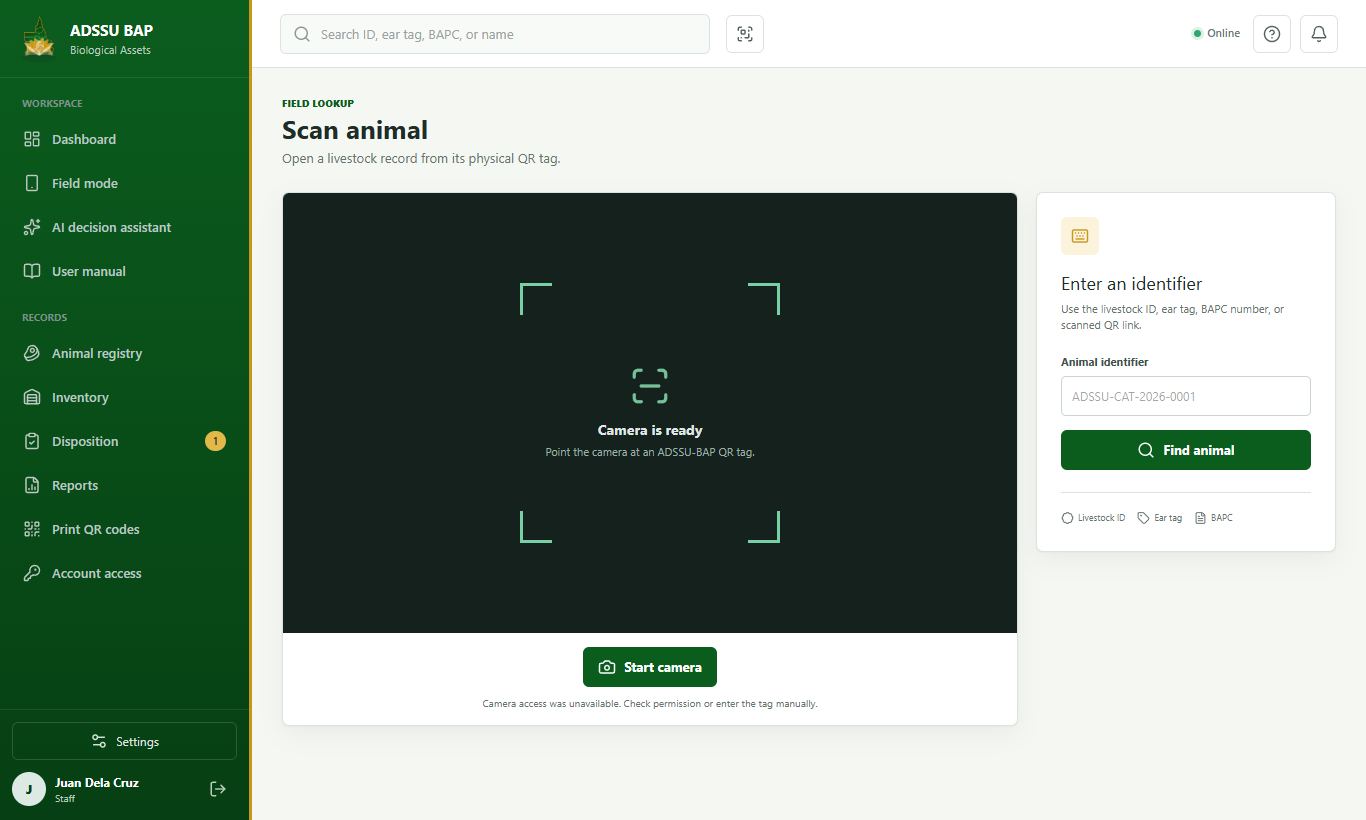
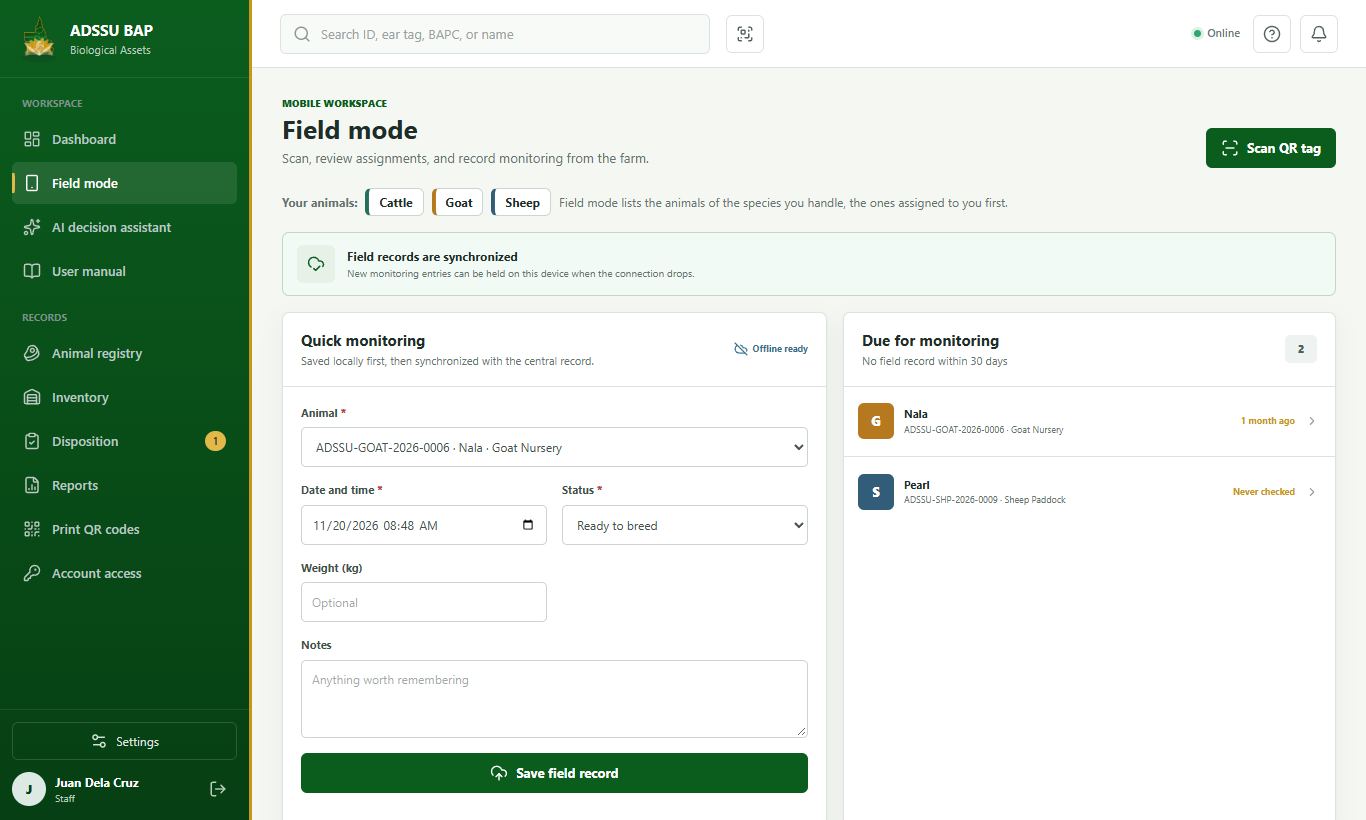
  1. Press the scan button at the top (or Scan in the phone menu) and then Start camera. Point it at the QR label to open the animal.

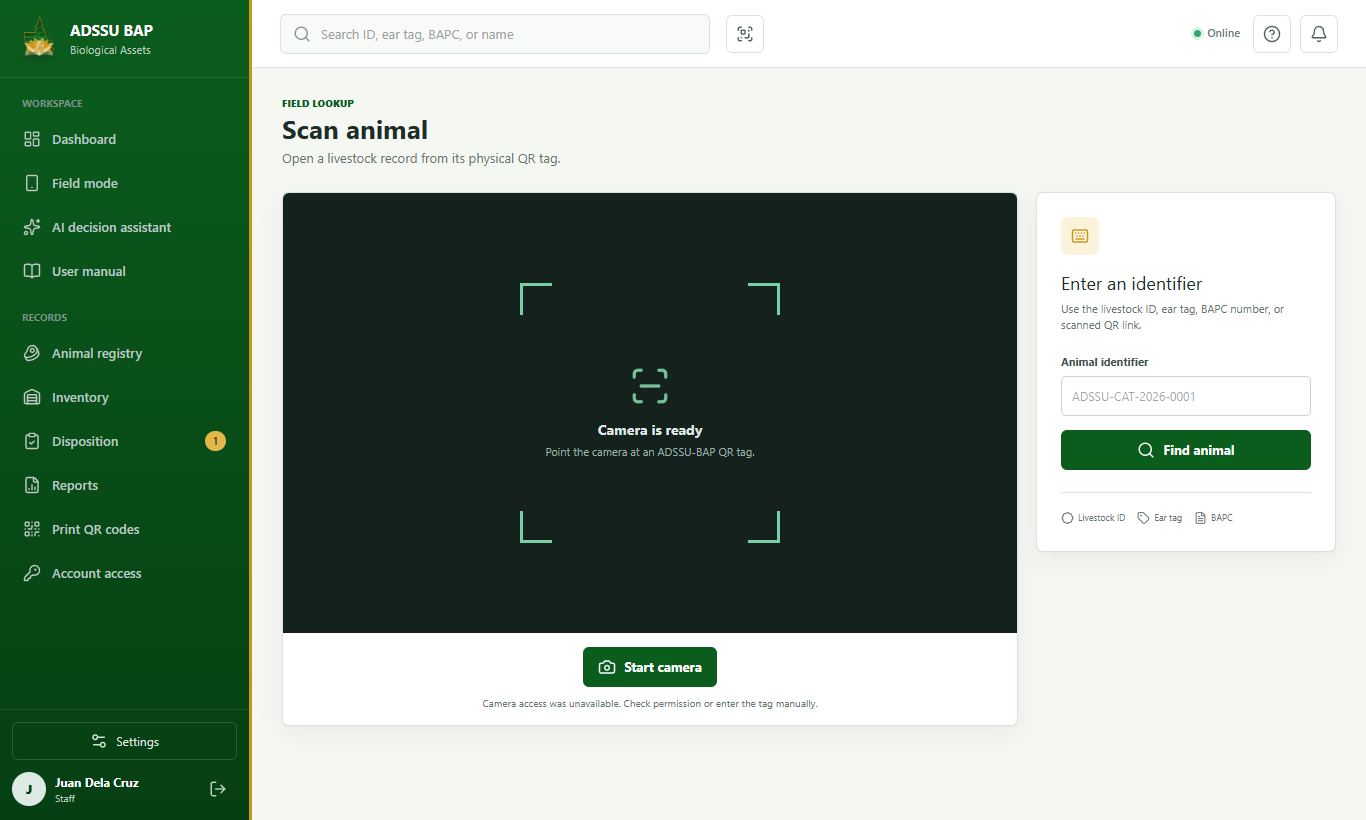
  2. Type the livestock ID, ear tag or BAPC number and press Find animal.

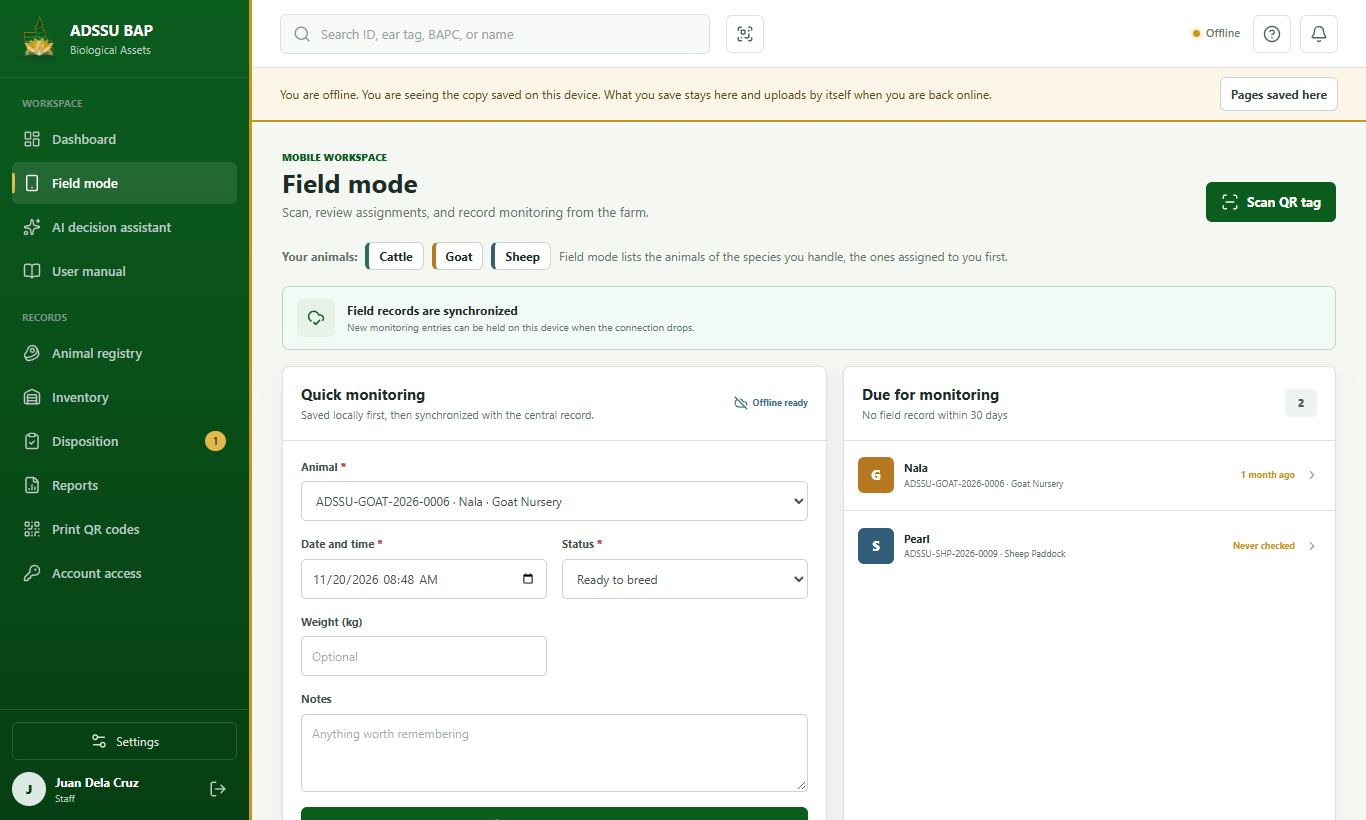
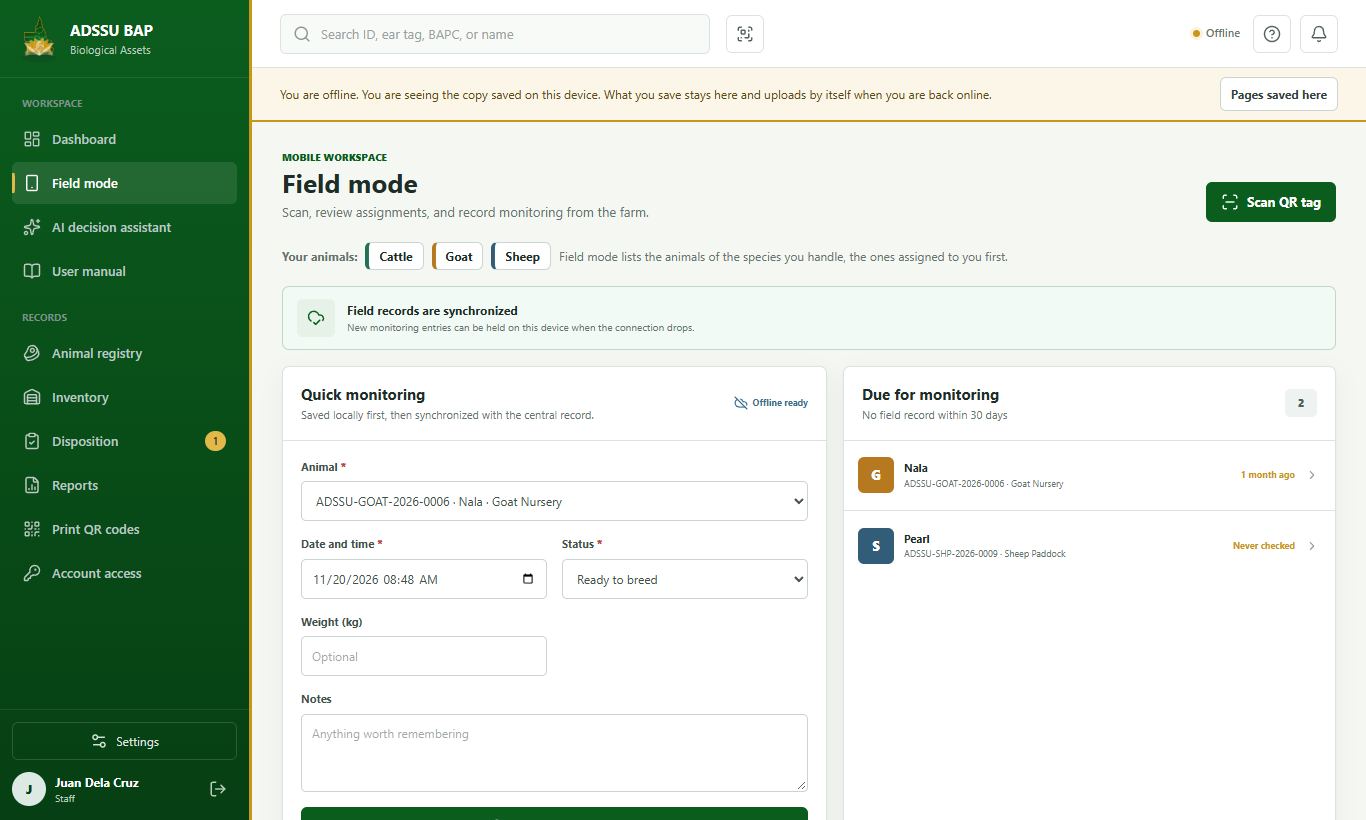
  3. Field mode lists the animals of the species you handle, those assigned to you first, and the ones due for monitoring, with a quick form to record Pregnant or Ready to breed and the weight. Entries made without signal are kept on the phone and sent once you are back online.

Step 1: Scan an animal's QR label Step 2: No camera? Type the ID Step 3: Use Field mode
Scan an animal's QR labelPress the scan button at the top (or Scan in the phone menu) and then Start camera. Point it at the QR label to open the animal.
7

Working without internet

The system keeps a copy on your phone or computer, so you can keep working on the farm and nothing is lost.

5 steps
  1. Sign in while you have signal. The device saves the pages and your animals in the background, and keeps them up to date each time you are online.

  2. With no signal, a yellow note says you are seeing the copy saved on the device and when it was saved. You can still open animals, scan their QR labels and fill in records.

  3. Press Pages saved here to see which pages are on the device and what is still waiting to be sent.

  4. Scanning, monitoring, health records, births, pregnancy, dispositions and new animals all work offline. A scanned tag opens the animal's saved profile, the same page you see online. If that animal's page was not saved yet, a short summary with Record monitoring is shown instead. Each entry is kept on the device.

  5. When the signal is back the waiting entries upload by themselves, in order. An administrator then reviews what needs approval. Nothing needs to be typed again.

Step 1: Open it online first Step 2: Keep working offline Step 3: See what is saved Step 4: Scan and record Step 5: It sends itself
Open it online firstSign in while you have signal. The device saves the pages and your animals in the background, and keeps them up to date each time you are online.
8

Asking to delete an animal

Staff cannot delete animals. You ask with a reason, and an administrator decides.

4 steps
  1. Find the animal in the Animal registry and open its profile.

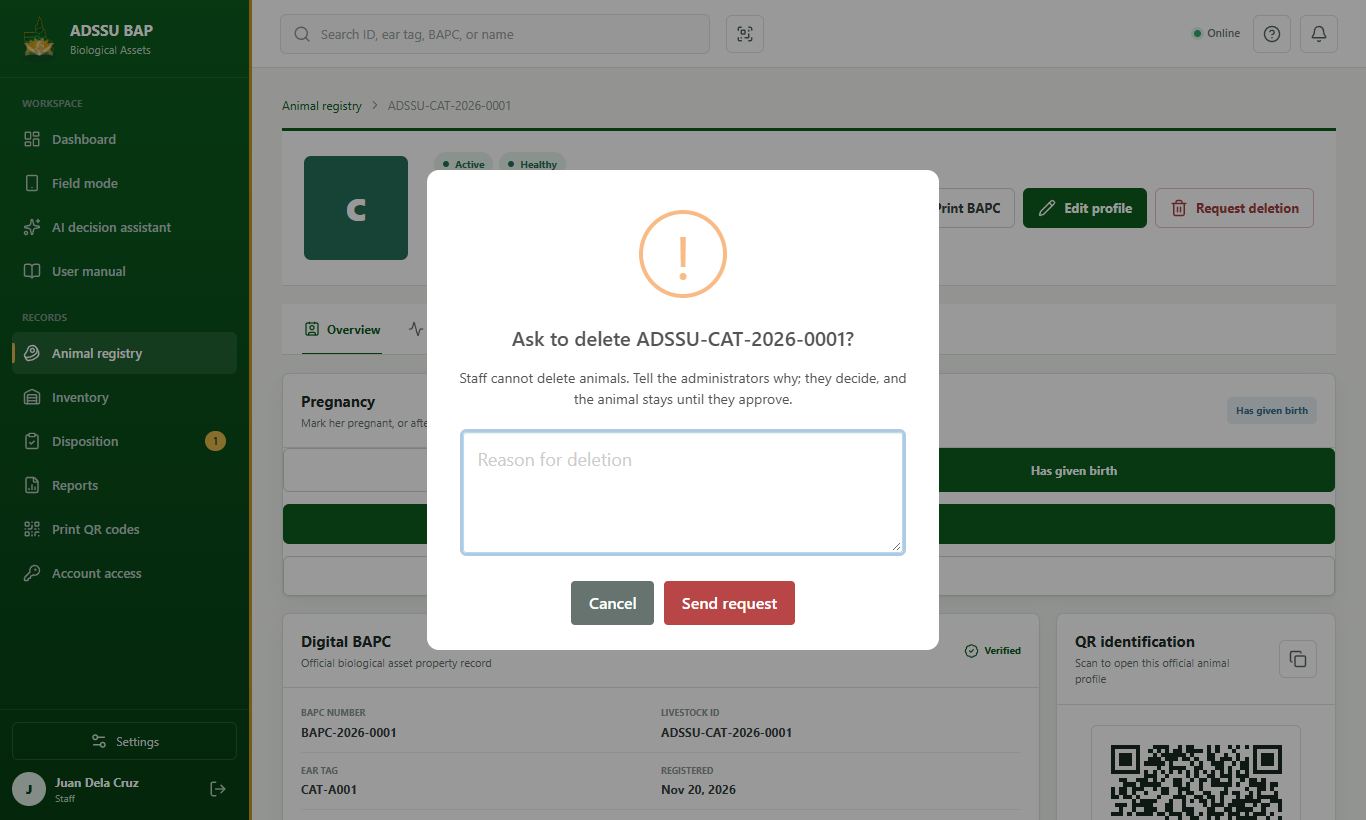
  2. Press Request deletion at the top of the profile.

  3. Write why the animal should be deleted (for example, registered twice) and send it. The administrators are told.

  4. The profile shows Deletion requested. You get a notification when it is approved or declined, with the administrator's note.

Step 1: Open the animal Step 2: Request deletion Step 3: Give the reason Step 4: Wait for the answer
Open the animalFind the animal in the Animal registry and open its profile.
9

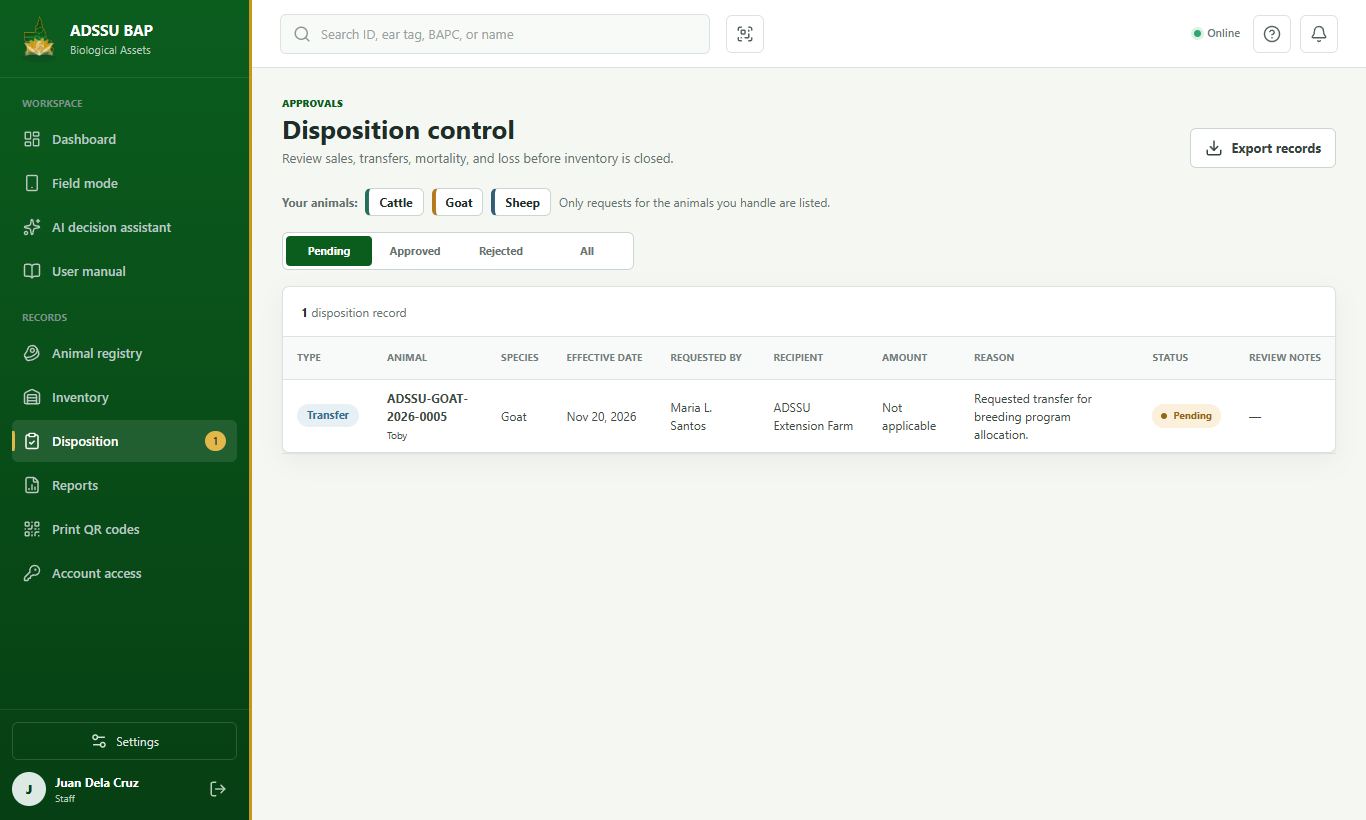
Requesting a disposition

Report a sale, transfer, death or loss. It takes effect only when an administrator approves it.

3 steps
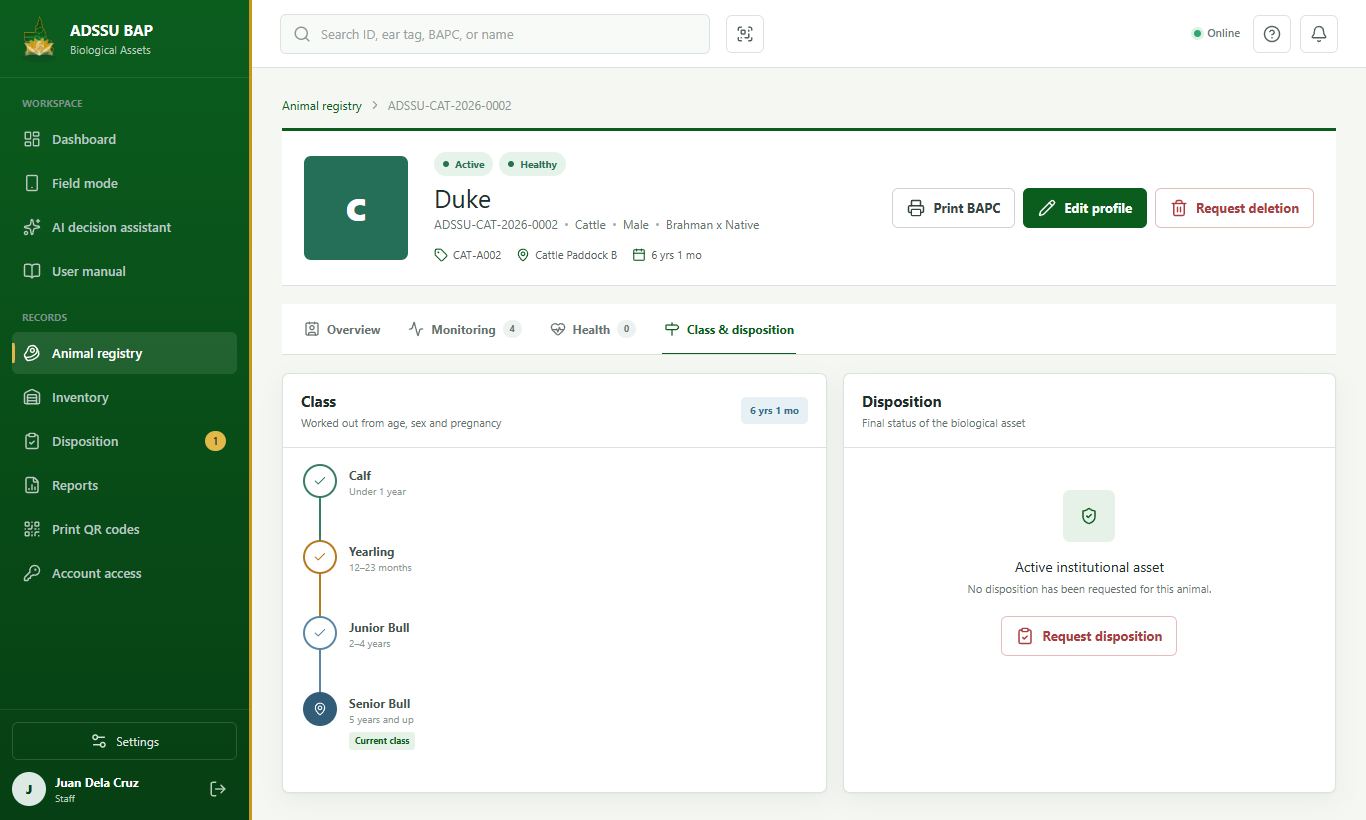
  1. On the animal's profile, open the Class & disposition tab and press Request disposition.

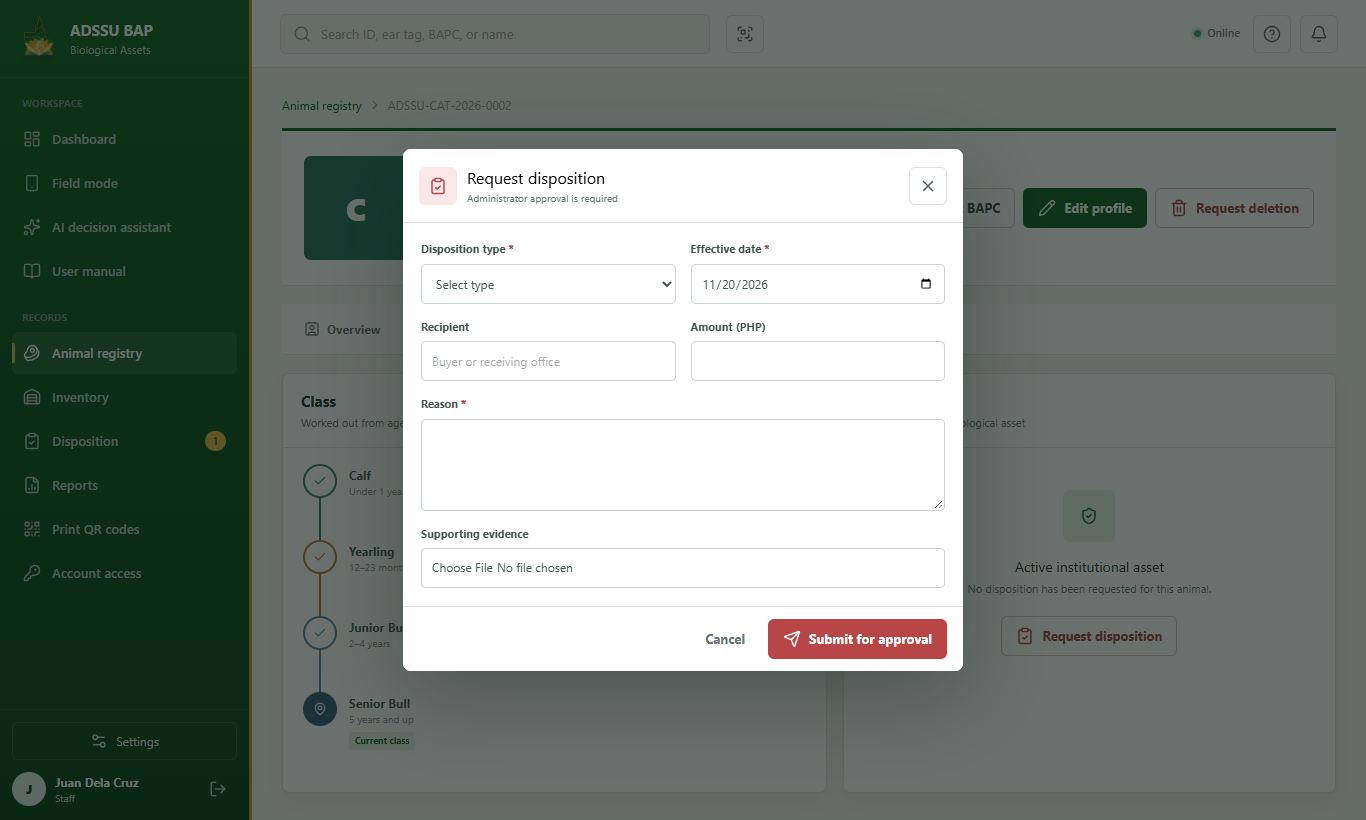
  2. Choose the disposition type, the effective date and the reason. Add the recipient and amount where they apply, and attach supporting evidence such as a photo or document. Press Submit for approval.

  3. Disposition in the sidebar shows every request and whether it is pending, approved or returned.

Step 1: Open Class and disposition Step 2: Fill in the request Step 3: Follow the request
Open Class and dispositionOn the animal's profile, open the Class & disposition tab and press Request disposition.
10

AI decision assistant

Ask questions about the animals in this system and get a short answer, or an Excel file.

7 steps
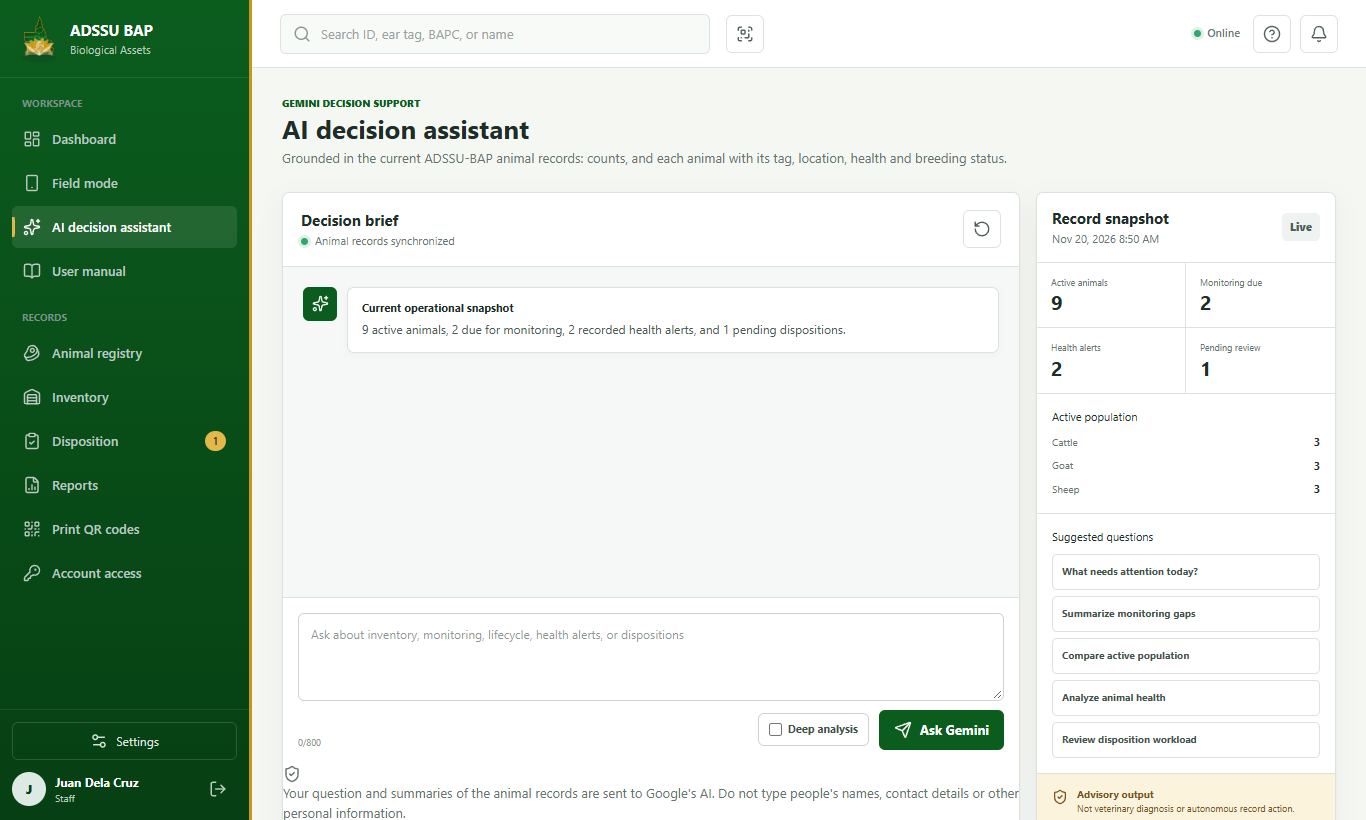
  1. Choose AI decision assistant in the sidebar. The panel on the right shows the current numbers it works from.

  2. Type a question about inventory, monitoring, lifecycle, health alerts or dispositions, for example: How many cattle have no health issues? Press Ask Gemini. Tick Deep analysis only for questions that need real thinking.

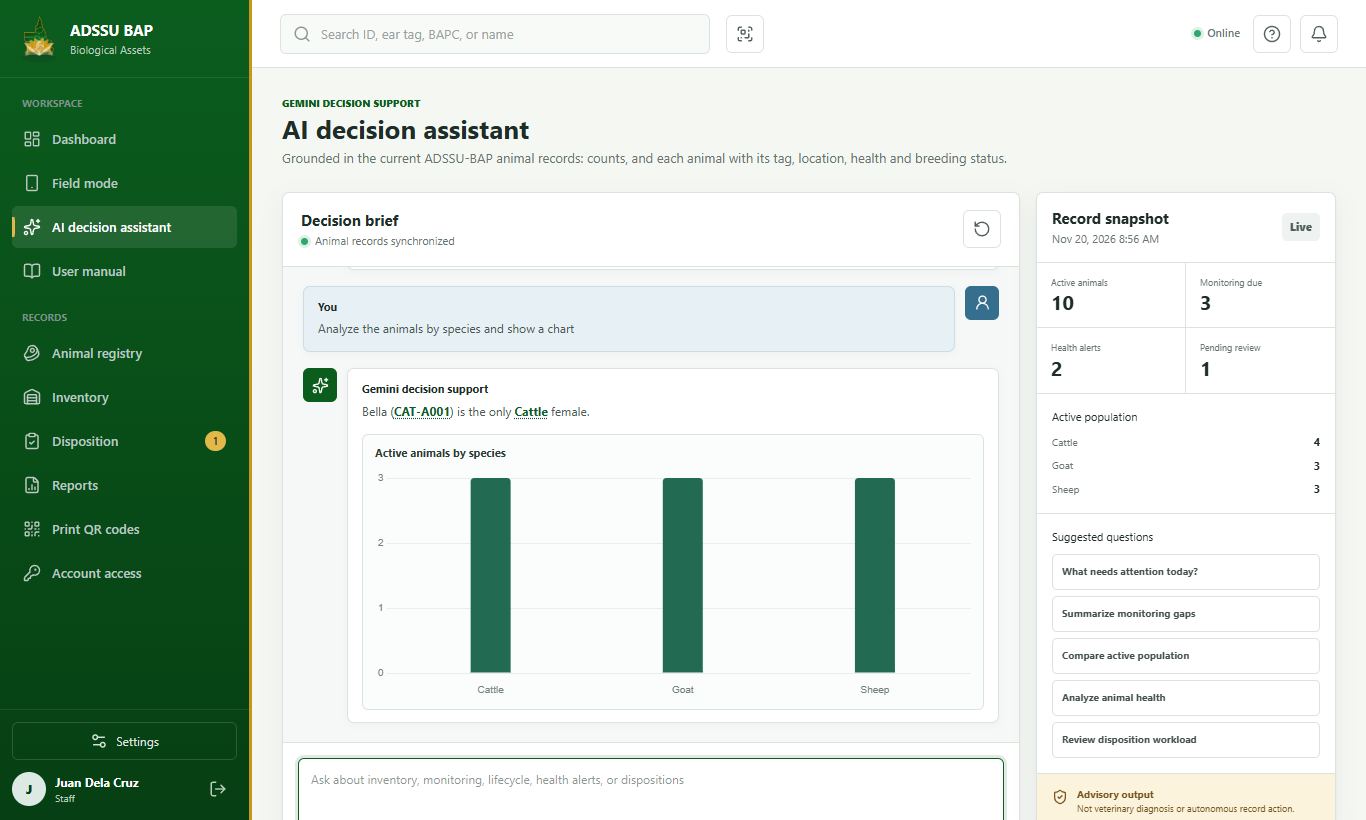
  3. The assistant knows every animal you handle, not only the totals: species, breed, sex, class, age, weight, health, location, pregnancy, whether it is ready to breed, parents, the last monitoring and health record, births, and the animals that left the herd. Ask in plain words, for example: How many female cattle are in the farm? Which female sheep are ready to breed, and what are their tag numbers and locations? Which animals are pregnant and when are they due? Which goats are due for monitoring? Which animals are not healthy? Where is CAT-A001 kept? How many births this year? Counts are exact; for lists it gives the ear tag number first, with the livestock ID and location.

  4. In an answer, every tag number, livestock ID and name is a link: press it to open that animal in a new tab. A class (for example Senior Bull) or a species opens the Inventory for it. When you ask for an analysis, a comparison, a trend or a chart, the answer comes with charts as well.

  5. Add that you want a file, for example: Give me an Excel file of the female sheep that are ready to breed, with tag number and location. The answer comes with a green download button for the .xlsx file, ready to open in Excel. The link works only for you and for 30 minutes.

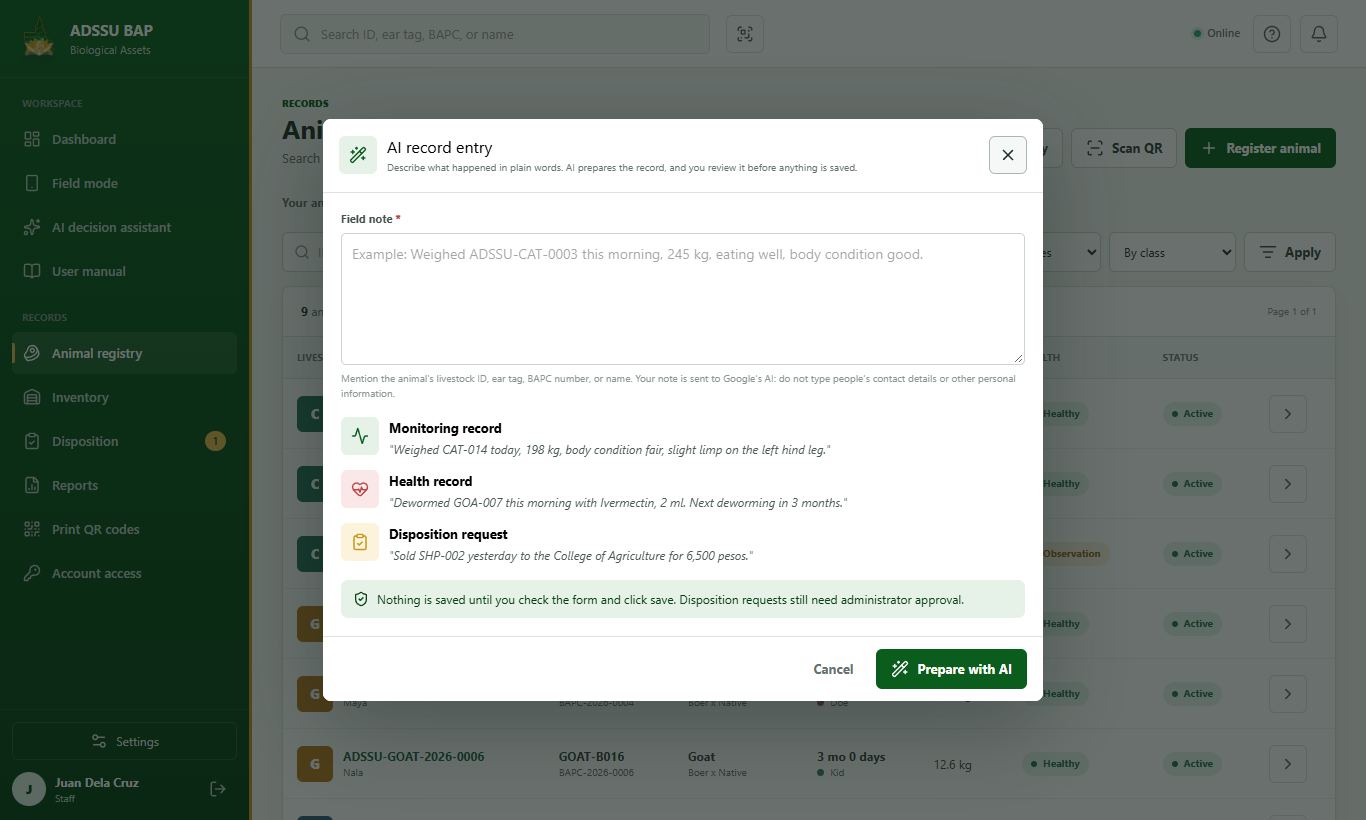
  6. In the Animal registry, press AI record entry and describe what happened in plain words, for example: Dewormed CAT-007 this morning with Ivermectin, 2 ml. Next deworming in 3 months. AI opens the right form (monitoring, health or disposition) already filled in. Nothing is saved until you check it and press save.

  7. It answers only from the records of this system and only for the species you handle. Questions about anything else get no answer. It does not know the names of staff, buyers or recipients, free-text notes or photos, and it never diagnoses or suggests treatment. The answer is only as current as the records, so keep monitoring and health records up to date. Do not type people's names or contact details: the question is sent to Google's AI together with the animal records you may see.

Step 1: Open the assistant Step 2: Ask a question Step 3: Ask about the animals themselves Step 4: Open the results and see charts Step 5: Ask for an Excel file Step 6: Let AI prepare a record Step 7: What it will not do
Open the assistantChoose AI decision assistant in the sidebar. The panel on the right shows the current numbers it works from.
11

Weight analytics

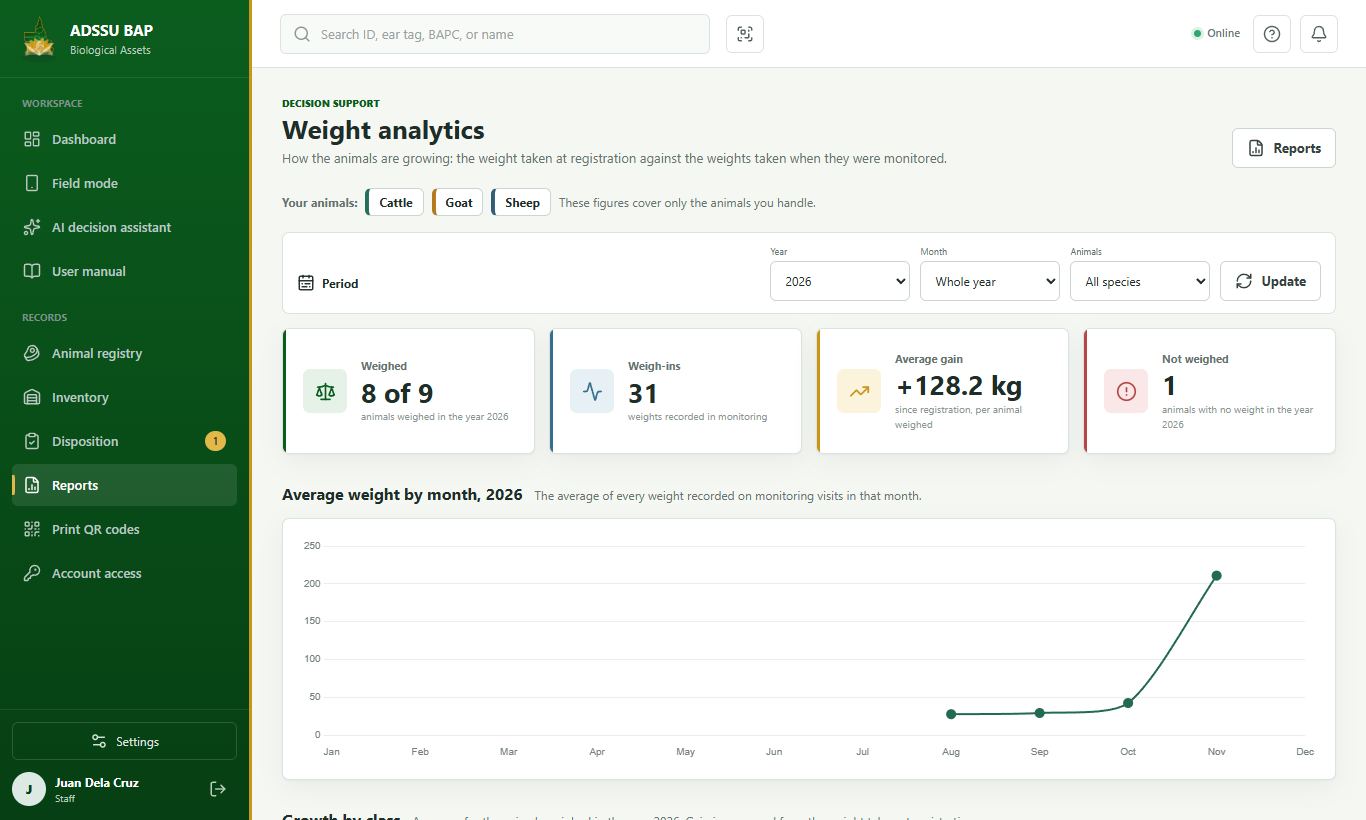
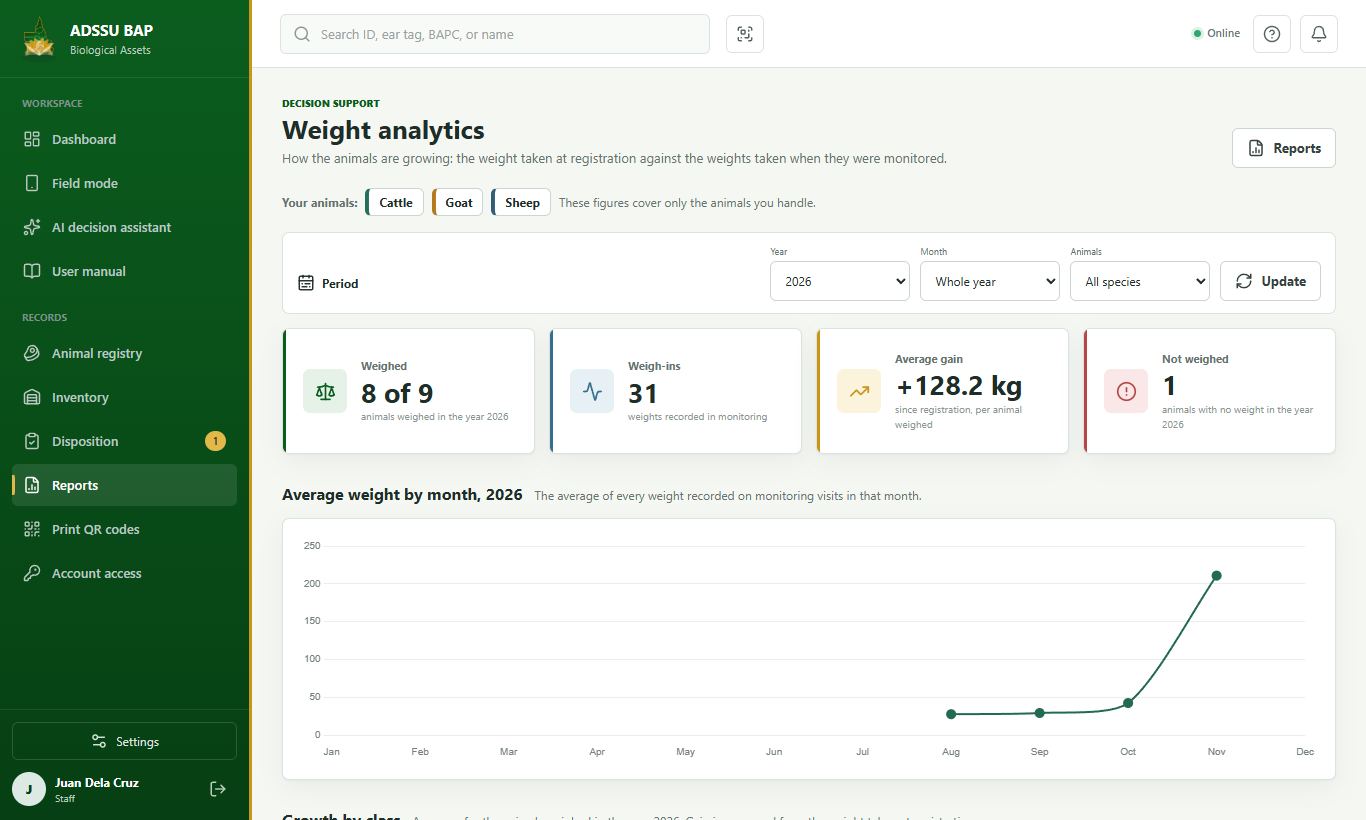
See how the animals are growing: the weight taken at registration against the weights taken while monitoring.

3 steps
  1. In Reports, open Weight analytics (or More on a phone). Choose the year, a month if you want one, and a species, then press Apply.

  2. The cards count the animals weighed, the weigh-ins and the average gain. The chart shows the average weight of each month, and Growth by class compares the weight at registration with the latest weight of each class.

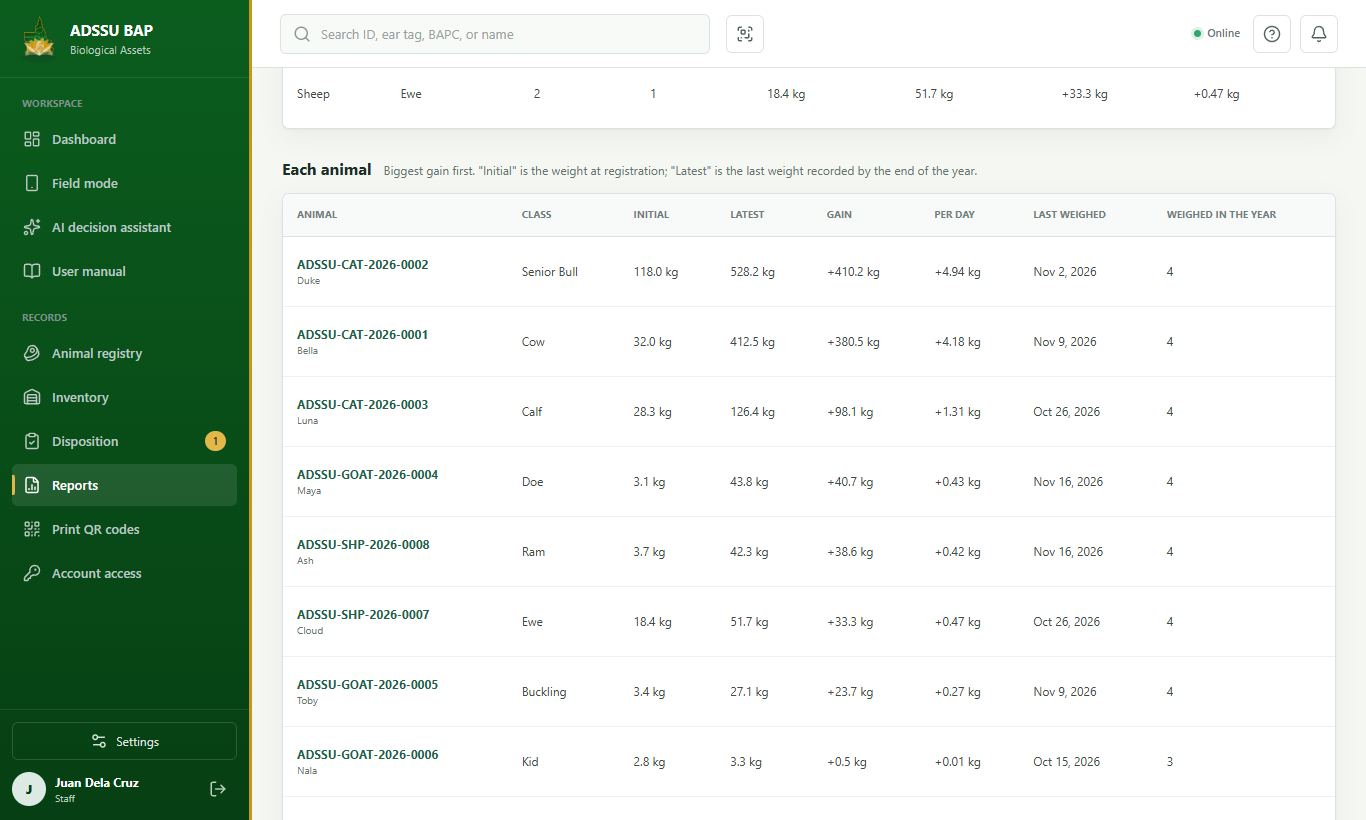
  3. The last table lists every animal with its initial weight, latest weight and gain, the biggest gain first. Animals not weighed yet come last: weigh them when you monitor them.
Step 1: Open Weight analytics Step 2: Read the growth Step 3: Look at each animal
Open Weight analyticsIn Reports, open Weight analytics (or More on a phone). Choose the year, a month if you want one, and a species, then press Apply.
12

Inventory, reports and QR labels

See the herd at a glance and print the official forms.

5 steps
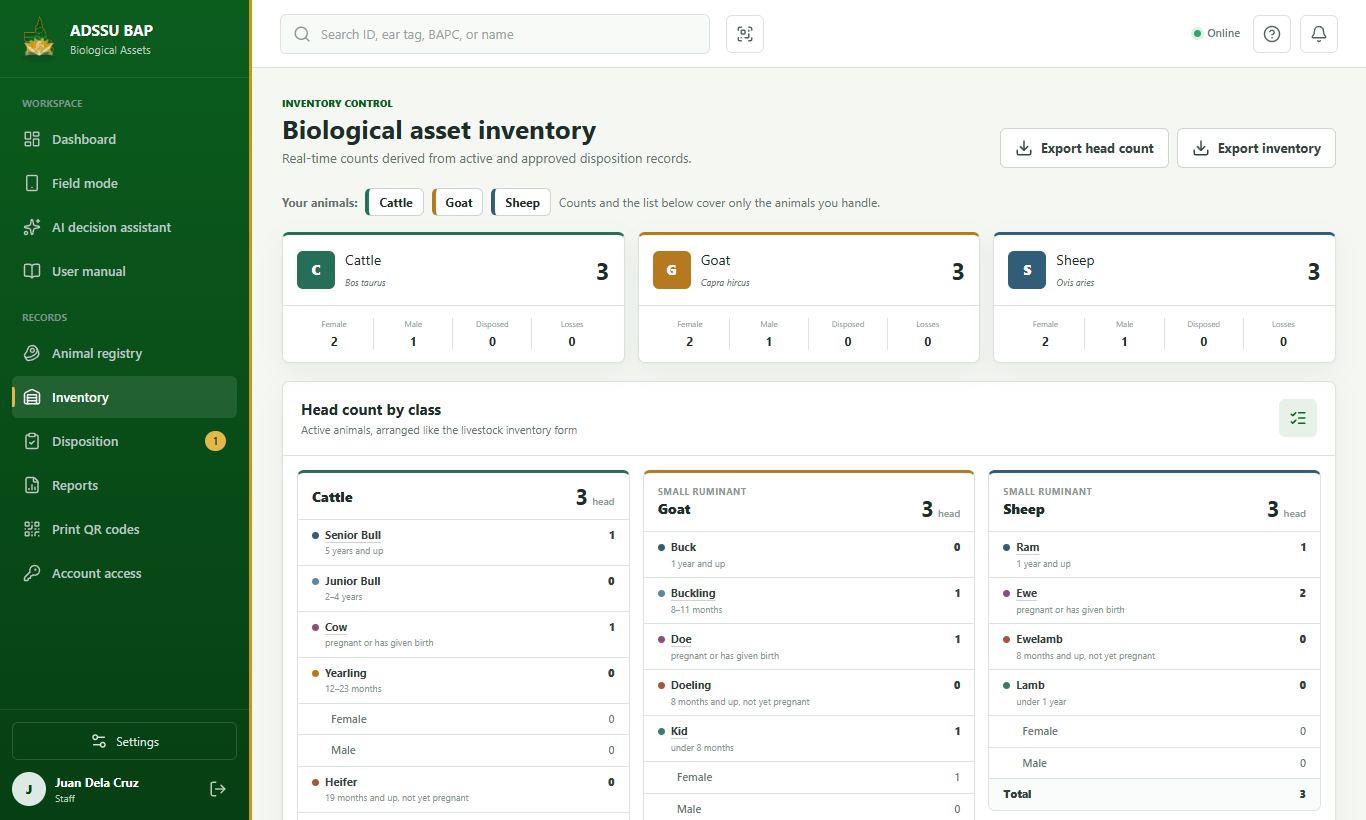
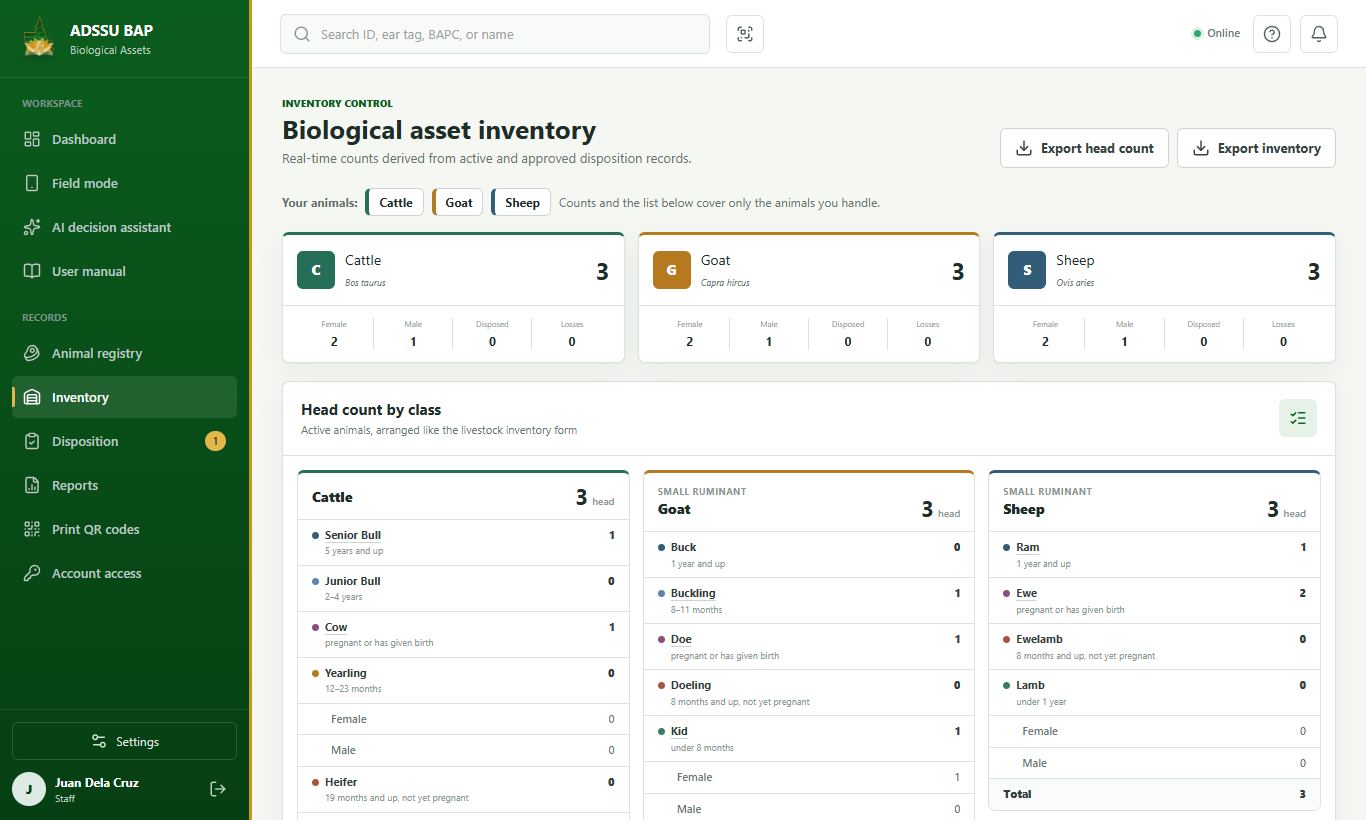
  1. Inventory shows the head count by class and the list of animals, with search and filters.

  2. Export head count or Export inventory downloads a CSV file you can open in Excel. Every export starts with a title, the date and the filters used, then clear column headings.

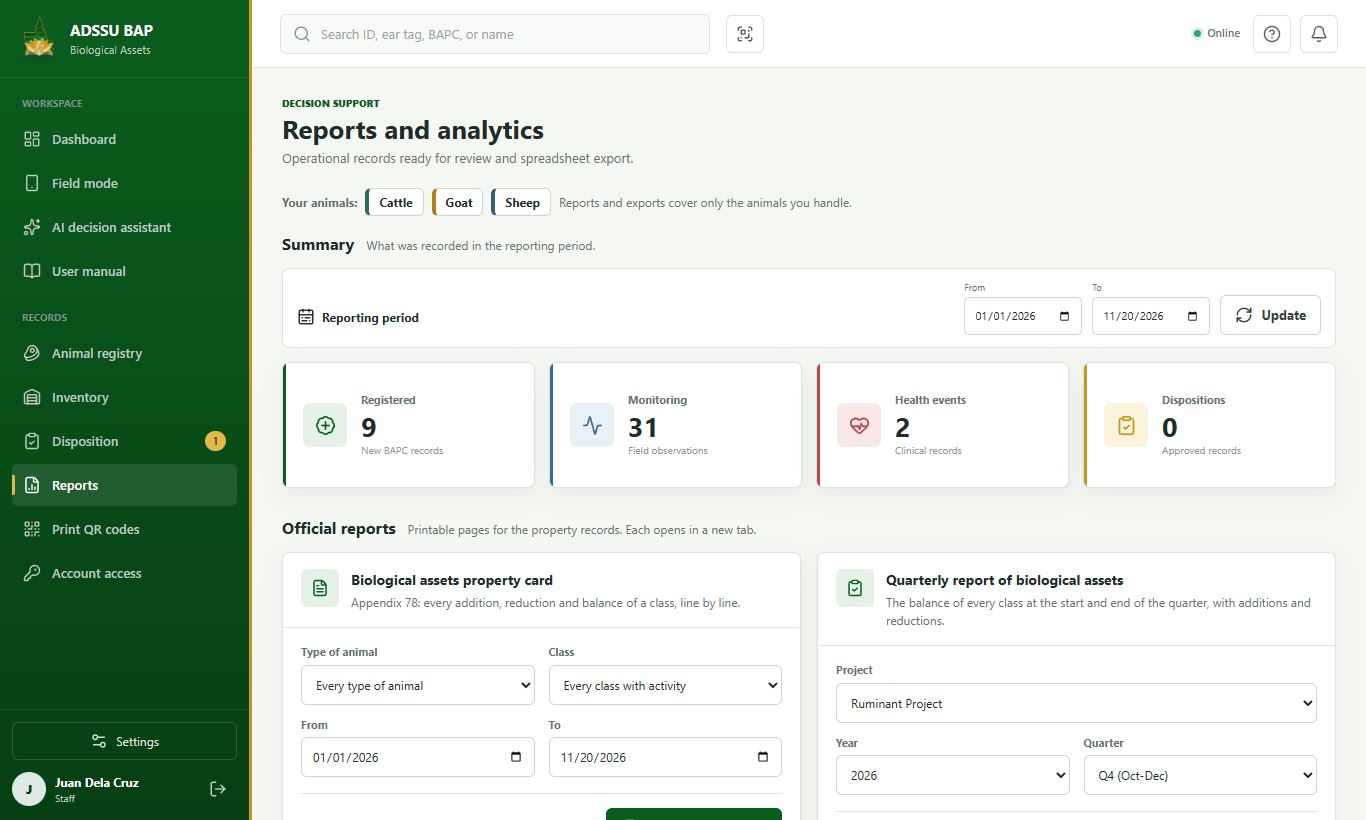
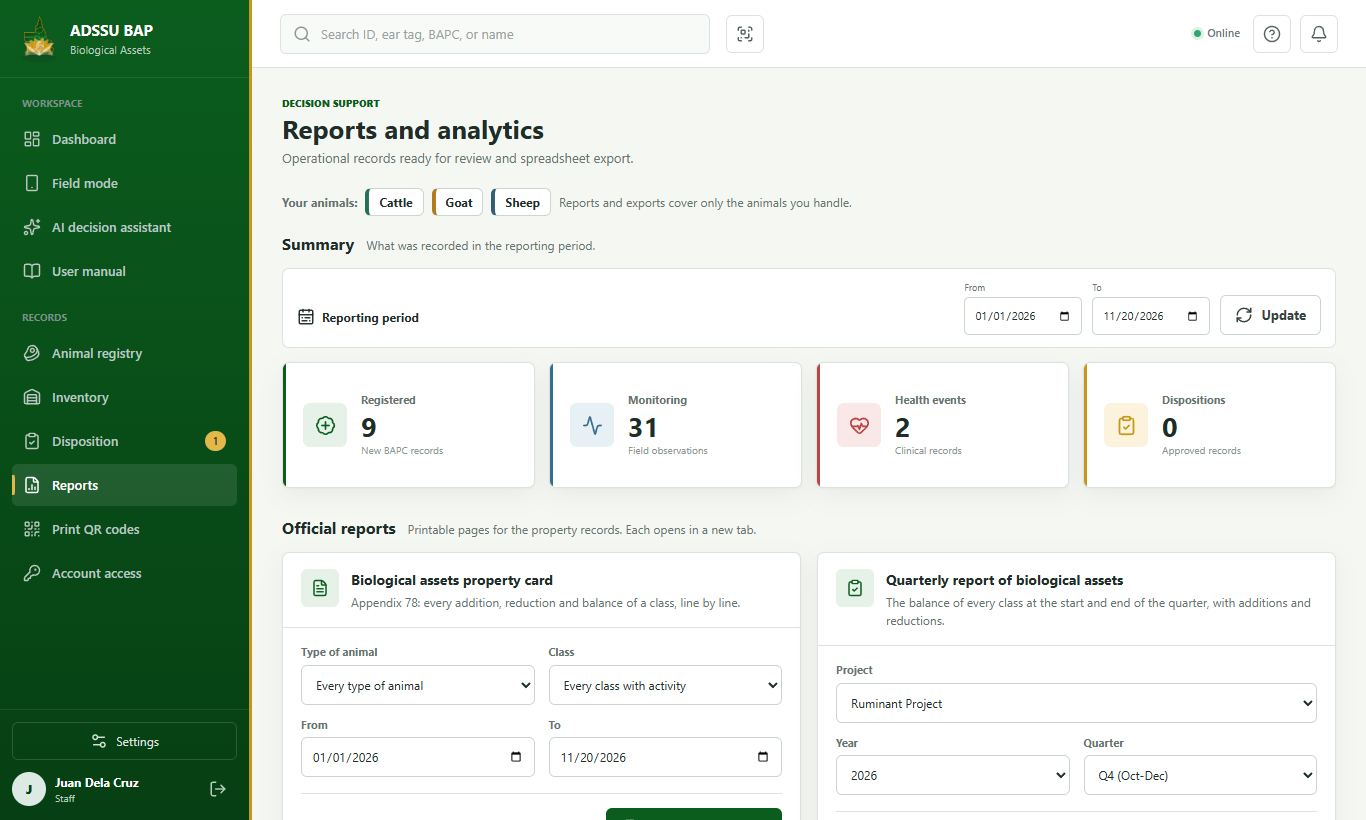
  3. In Reports, choose a class and the period, then press Open property card (Appendix 78). The Reference column names the animals on each line, and a female that is pregnant is named in the Remarks of the latest line. The signature and footer sit at the bottom of the printed page.

  4. Choose the project, year and quarter and press Open report, or CSV to download it.

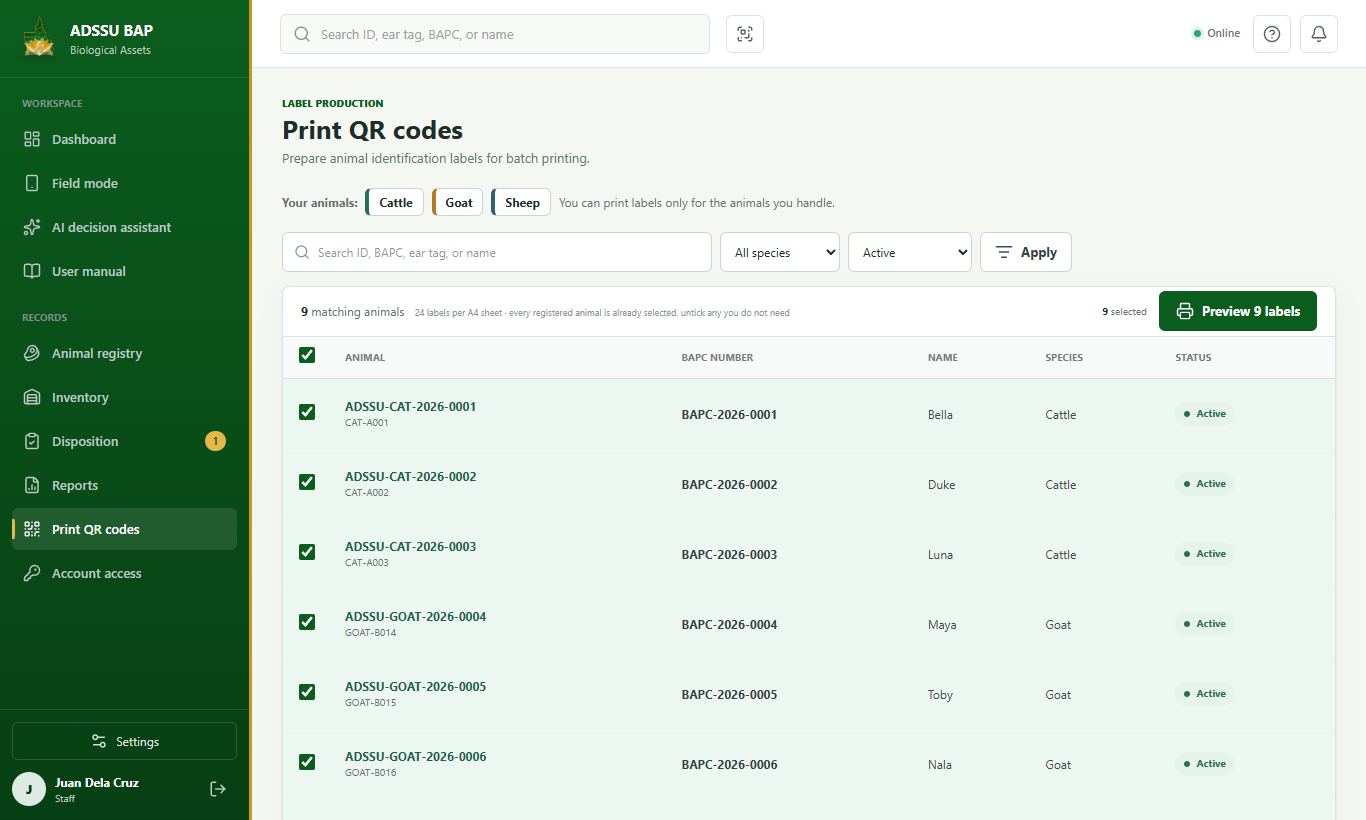
  5. Print QR codes makes a sheet of labels for the animals you choose.

Step 1: Check the inventory Step 2: Export the inventory Step 3: Print a property card Step 4: Open the quarterly report Step 5: Print QR labels
Check the inventoryInventory shows the head count by class and the list of animals, with search and filters.
1 / 5 Next: Your account
13

Your account

Notifications, profile, recovery codes, settings and password.

6 steps
  1. The bell at the top shows alerts such as returned dispositions and health follow-ups.

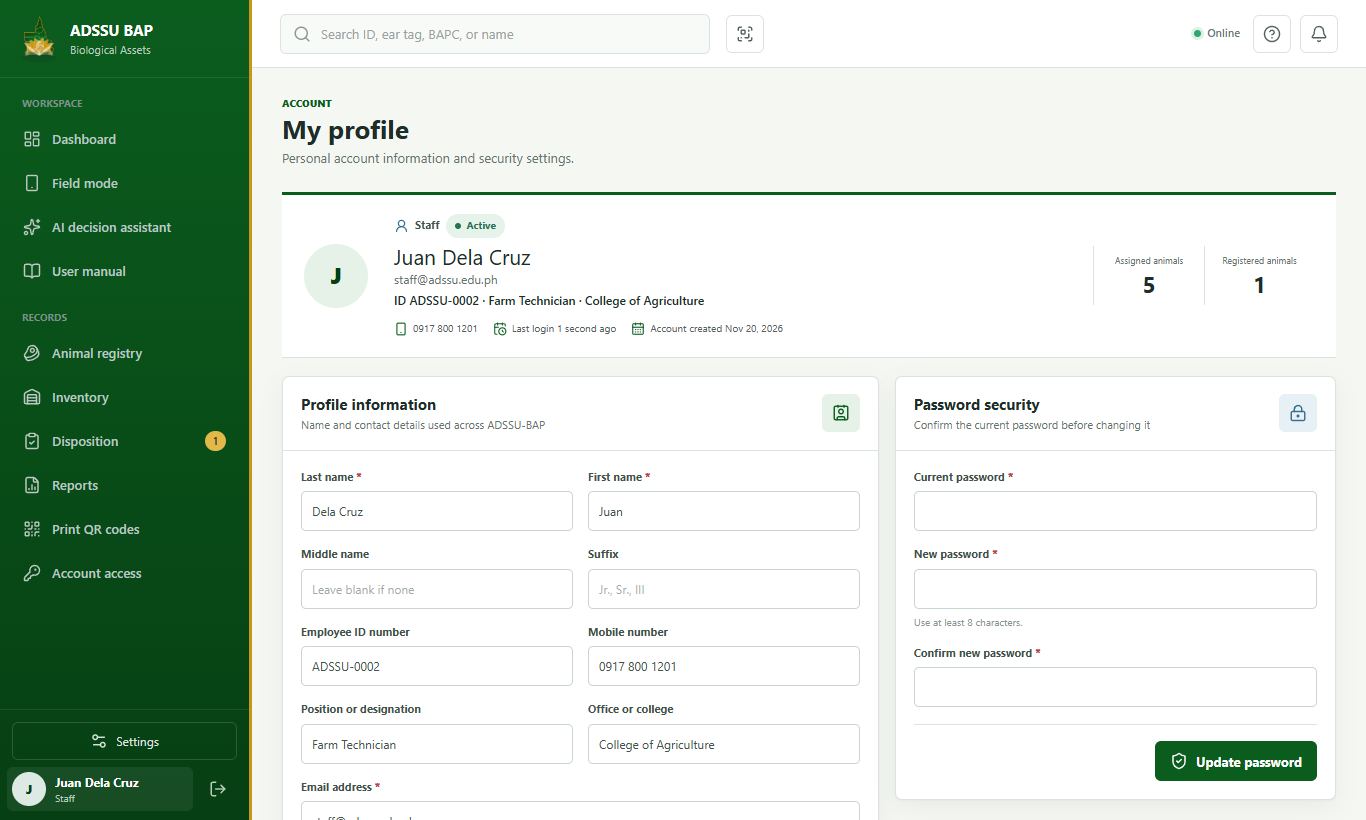
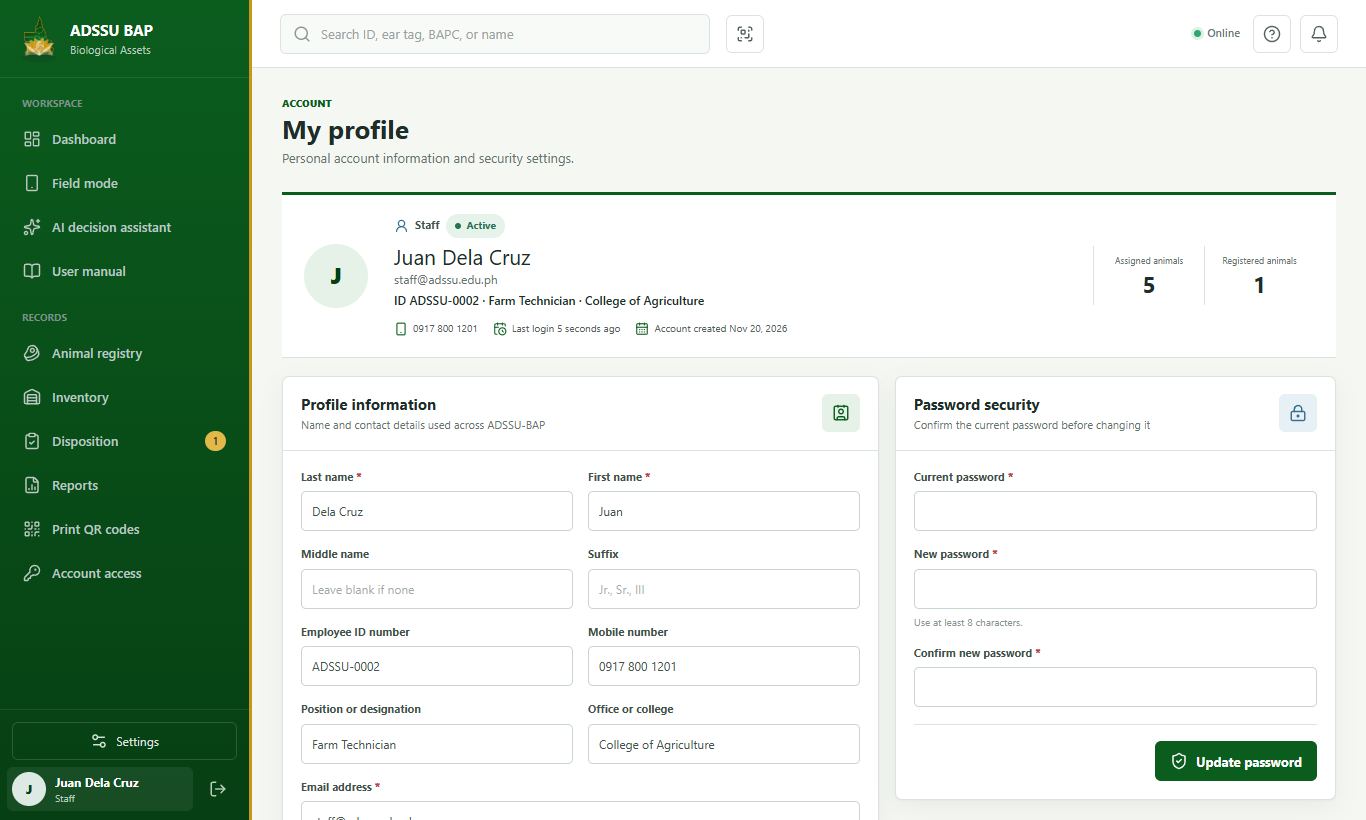
  2. Click your name at the bottom of the sidebar to open your profile. Under Two-step verification you can make new recovery codes. Each works once if the sign-in email does not arrive, and making new ones stops the old ones.

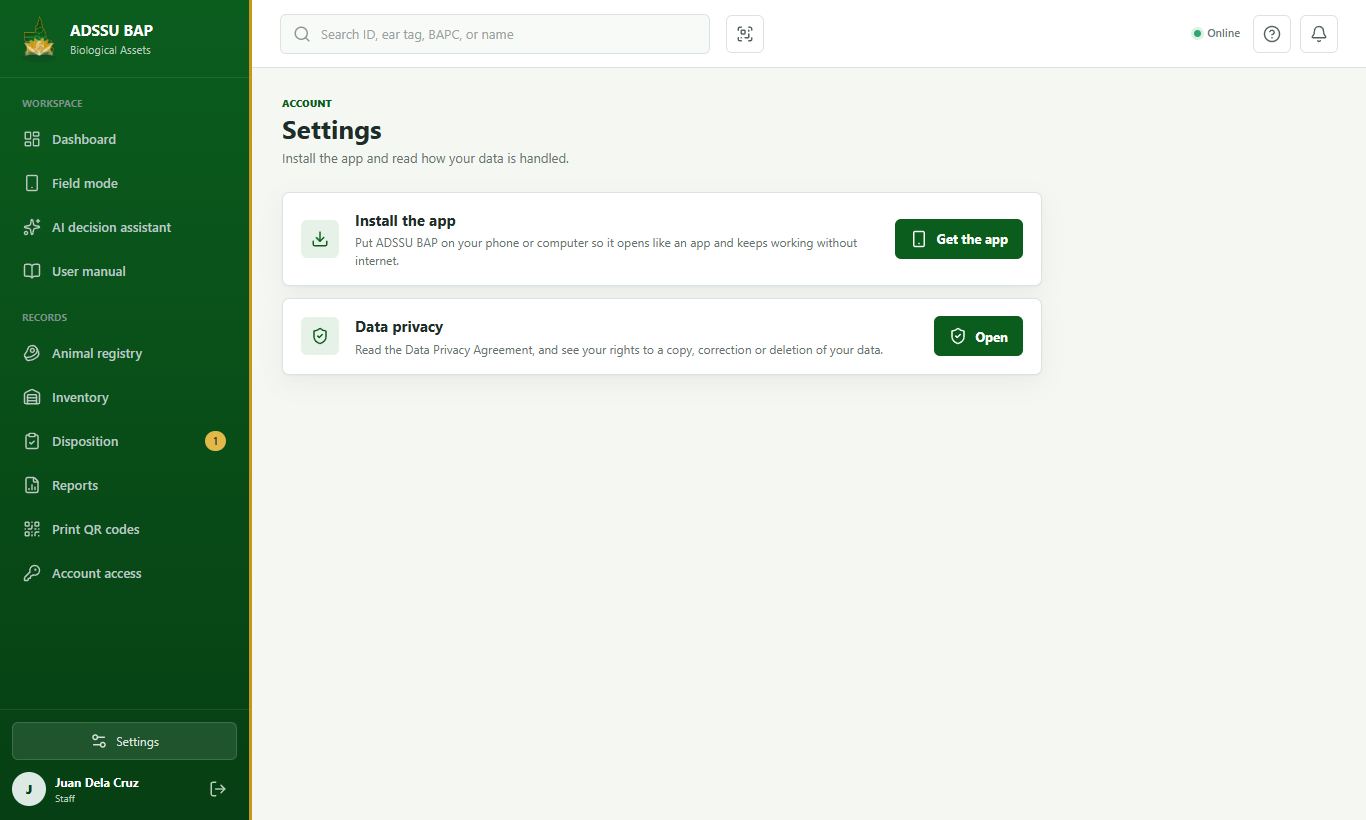
  3. Settings, just above your name in the sidebar, holds Install the app (put ADSSU BAP on your phone or computer so it works offline) and Data privacy (the agreement you accepted). An administrator also finds View as staff there.

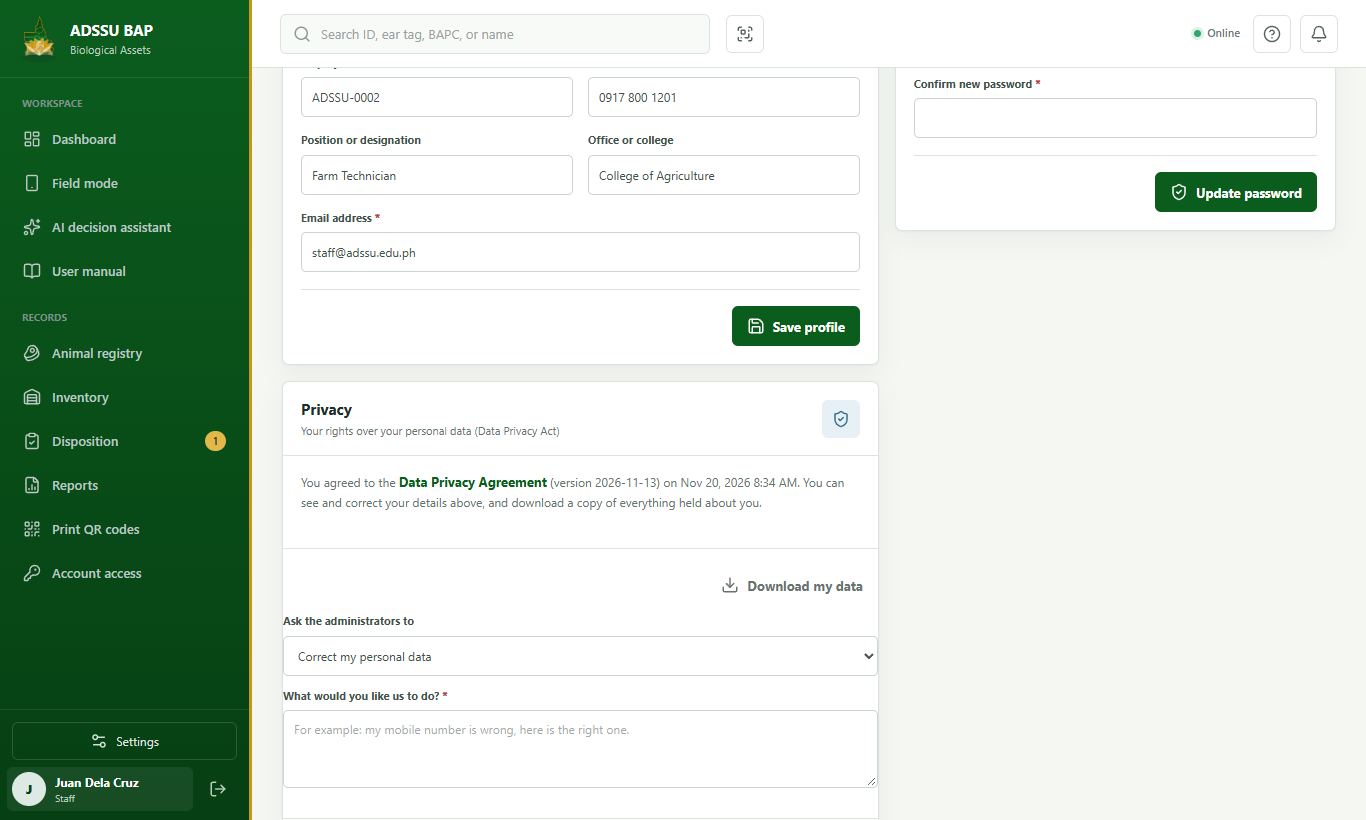
  4. On your profile, under Privacy, you can download a copy of your data, or ask the administrators to correct it, delete it or stop using it. They answer you by email or in person.

  5. Type your current password and the new one twice, then press Update password.

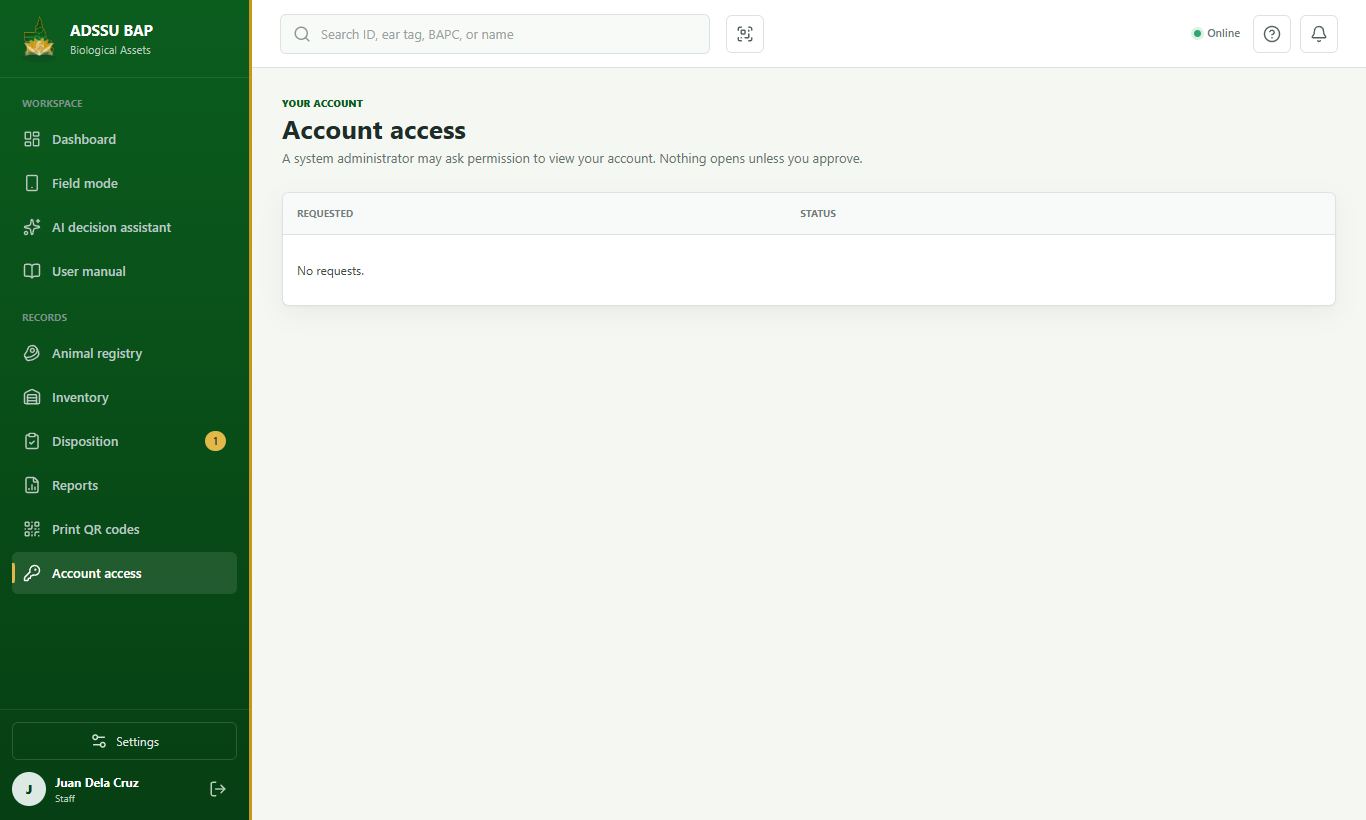
  6. A system administrator may ask to view your account. Open Account access in the sidebar: nothing opens unless you press Approve, and you can Deny.

Step 1: Read your notifications Step 2: Keep your recovery codes Step 3: Open Settings Step 4: Your privacy rights Step 5: Change your password Step 6: Account access requests
Read your notificationsThe bell at the top shows alerts such as returned dispositions and health follow-ups.
1 / 6